


Designer:
Rich Meinke
Project Category:
Freestyle
Project Level:
Beginner
Project Time:
1-2 Hours
Project Cost:
$50-$100
Project Description:
This project, the first in the set of DML Flat Panel “Beginner Series” projects, will briefly introduce you to DML speaker technology and explain, step by step, how to build a simple 2’x2’ DML flat panel speaker from materials that are readily available. In short, this project is the quickest way to get listening to a nice sounding flat panel speaker.
Design Goals:
WHAT IS A DISTRIBUTED LOUDSPEAKER (DML)
A Distributed Mode Loudspeaker operates on completely different principals than conventional dynamic/cone speakers or other panel speakers such as electrostatic or ribbons. Unlike those types of transducers where the diagrams move in a pistonic motion, a DML flat panel speaker randomly generates vibrating nodes producing output at different frequencies and amplitudes across the entire panel with equal output from both sides of the panel.
This provides some very interesting advantages:
- Near Omni-directional dispersion pattern, radiating equally from the front and back of the panel, has little narrowing of off-axis output with increasing frequency.
- A single diaphragm (panel) capable of producing a true full-range response.
- Low 3rd order distortion provides excellent voice intelligibility.
- Panels and the resulting finished loudspeaker are thin and light-weight, making them easy to move around the listening room or put away out of sight.
Large, tall panels operate as a line-array which exhibit a 3dB loss in sound pressure compared to a point source that decreases by 6dB for every doubling of distance. Not a DML technology advantage however, even a 24” x 36” panel will display qualities of a line-array at reasonable listening distances. Some explain an array sounding like a large set of headphones. To me, listening in the focused array is like stepping into the recording venue.
LISTENING TO A DML PANEL
The term “magic” has been associated with these flat panels long before I began building and listening to my own panels. After listening to them for some time now I can only agree that there is, indeed, magic in these panels!
The near Omni-directional output is an absolute joy to listen to. They throw a huge soundscape that just fills the room. Even tiny 14.5” x 12” panels absolutely fill the room with delicious flat panel sound. If you didn’t know that the tiny panels were speakers you would have little clue where the music is emanating from. This is very unique.
The panels are also very light and the large surface area requires little movement to generate sound pressure. This leads to a “fast” and detailed speaker. Even on recordings that I know very well, I began hearing nuances in recordings that I had not heard before. The detail that these panels are able to extract is not etched or harsh and provides the detail in a polite way; much different than what we are accustomed to with conventional high quality speakers.
DML’s are sensitive and require little power to play loudly. For instance, a single Dayton Audio DAEX25FHE-4 exciter on a 2’x2’ XPS panel is roughly 91+dB. DML panels also do not suffer from Baffle Diffraction Loss so a 91dB panel is equivalent to a 97dB traditional box speaker, assuming 6dB diffraction lose. While this is a very compelling quality, panels will saturate often times before the thermal limits of the exciter are reached. This reduces the output of the panel. This is not to say that even a small 2’x2’ panel cannot play to satisfying listening levels. Where higher output may be required, a multi-panel array is a solid solution. Look for updates in the Flat Panels section of the Speaker Projects area of the Parts Express Project Gallery for a DML multi panel array design.
It is my opinion that these flat panels are not as well suited for rock or synthesized music, but best with: Jazz, Blues, vocal and other acoustic music genres. Well recorded, live performances on these panels are fantastic and bring the performers into the listening room like no other speaker I have had the pleasure of listening to over the last 30+ years.
Finally, a word of caution from my own experiences listening to these panels. The presentation of a DML is different as sound is produced across the entire panel; this makes for a more diffused output compared to a traditional speaker. There is a lack of presence and a sensation that the sound is coming from the back of the speaker, through the panel, then finally to the listening position. This took many hours of listening to adjust to. I had nearly given up on these panels before giving them a few long listening sessions. Also, after switching from my KEF Q500s to the panels, I heard a constant underlying, vibrating signature with my XPS panels. While it is a warm sound, it is an aspect of the panels that I had not noted previously. I adjusted to this aspect quickly and the KEF remains in storage and has not been connected to my audio system for some time now.
These speakers may not be for everyone due to music tastes and personal preferences. But they are easy to build, inexpensive, and take only an hour or 2 to put together so I can highly recommend them to anyone looking to build a musical sounding speaker. I always wanted to own an exotic flat panel speaker, and these have exceeded my expectations.
Driver Selection:
Based on sound quality, the most recommended exciter for small, light-weight panels (as used in the project) is the Dayton Audio DAEX32U-4 Ultra. The DAEX32EP-4 Thruster is a close second, and for an inexpensive exciter that still performs very well, I can recommend the Dayton Audio DAEX25FHE-4.
Enclosure Design:
For the easiest build, use 2’x2’ Project Panels from Home Depot (Owens Corning FOAMULAR® 150 rigid XPS foam insulation). These are cheap, require no cutting, and will give you a good introduction to DML panel sound. However for better performance, a panel 24”x32.5” (golden ration) would provide better low and high frequency response. Home Depot will usually, but not always, cut a 4’x8’ sheet of XPS on their panel saw. If this is possible, go for the larger panels and follow the same process outlined below.
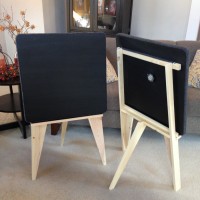
Enclosure Assembly:
Building the panel is simple and can be completed in 1-2 hours. It is important to sand off all of the panel “skin”. The sanded surface should be dull, soft and velvety feeling, with none of the original sheen still present. After the panel is prepared, it must be treated with a mixture of even parts of glue (wood or white) and water. XPS, non-treated, does not sound as good and has a “plastic” sound quality.
Step 1 – Panel preparation.
- Round the corners of the XPS project panel. Using a glass or bowl as a guide, lightly mark the panel using a pen or pencil. With a serrated knife, cut up to 1/4” from the marked line. In other words, leave extra material by not cutting right up to the marked line. XPS tends to break away in large chunks and could ruin our nice round corner.
- To finish rounding the corner, use an electric palm sander and 100-grit sandpaper by sanding right up to the marked lines. Sanding goes quickly, so use light pressure.
- Again with 100-grit sandpaper, sand off the XPS panel’s “skin” by holding the sander firmly but applying light pressure, make straight passes over the panel in the same direction with each pass. Clean the XPS dust off the panel and sandpaper frequently to avoid build up that leaves scratches to the panel. Sand both the front and the back of each panel until there is no “sheen” on the panel’s surface. Better to take off more panel than leave any skin.
- Break the edges and corners of the panel by taking light pressure with the sander held at a 45 degree angle to the edge. Be careful to not apply too much pressure as it can create gouges.
- Once you have reasonably round edges, finish the panel by hand sanding the edges and corners. With 100-grit sandpaper, use light, long passes over the entire length of the panel’s edge. While not required, finish off with 150-220 grit if you have it handy.
Step 2 – Panel treatment.
- The panels need to be treated with even amounts of water and wood or white glue. If you want to color the panels black, mix black ink with the water but keep the 1:1 proportions if not extra glue. You can mix the glue, water and ink (if desired) in a flat bottom glass bowl.
- With a 2 Inch foam roller, roll on the water and glue mixture over the panel. The mixture is thin so don’t worry about applying too much but make sure it is even. Treat 1 side for each panel.
- If you are not coloring the panels with ink, do not treat the round edges. If you are coloring the panels, use only 1 thin coat on the edges.
- Repeat the treatment on the other side until both sides of the panel are treated twice. To make this process go faster, use a hair drier to quickly dry the treated panel.
Step 3 – Apply the exciters to the panel.
- Each exciter is mounted roughly 2/5 from the top and side of the panel. On a 2’x2’ panel, place the exciter 9 ½ inches from the inside and 10 inches from the top. I mark this location by making a light indent with a pen or pencil. Mark both panels but make the pair in a mirror image. I position the exciter so that the wire connection tabs are facing the inside of the panel. So imagining viewing the panels from the listening position, the exciters will be mounted at the top inside of each panel with the tabs pointing to the inside of the panels.
- Lightly sand the location where the exciter is to be placed. Blow or brush off any dust so the exciter will make a good bond to the panel.
- Place the exciter on the panel in the marked position. The exciters come with 3M VHB (Very High Bond) adhesive pre-applied to the exciter. Just remove the paper exposing the adhesive and slowly lower the exciter on the panel surface. Press the exciter with light pressure. For best results, glue the exciter to the panel with the same glue you use for the panel treatment. I would try the VBS first to allow you to try another panel size or material.
Tips & Tricks:
Equalizing
As stated earlier, light weight flat panel made with XPS have an uneven frequency response. One of the biggest improvements that you can make to these panels are equalizing and shaping the response to your preference.
2 areas that benefit:
- Smoothing and tailoring the overall frequency response to your liking.
- Extending the bass and high-frequency extremes as desired.
I have used the Behringer DCX2496 Loudspeaker Management System & Crossover for many years with my open baffle speakers and appreciate the power and flexibility. I no longer purchase expensive passive components and use this for all cross-over and equalization duties.
Extending bass response and adding “slam”
While these particular panels can sound quite good down to a reasonable 80Hz (can go much lower on larger panels), flat panels of all types have a general reputation for bass that lacks “slam”. These panels are very open, “fast” and clean sounding and had concerns about the potential of adding bloat or muddy bass response with a subwoofer. But in an attempt to add slam, I tried a small (and hopefully more agile) 8” sub, the Dayton Audio SUB-800, and am very happy with the results obtained with this small sealed sub, especially considering the low cost. Playing these at reasonable levels the quality is very good; reading the user reviews on the PE website confirms my own results. They also look really nice and not what you would expect from a subwoofer costing under $100 – very highly recommended!
To relieve the panels from playing lower bass, I recommend the Harrison Labs FMOD Inline Crossovers if you have no other means of preventing the panels from playing the low frequencies. For smaller panel as described above, I recommend the 150Hz crossovers (the specific model is listed below). For larger panels, the 100Hz crossover would likely be a better choice.
If you need higher output and greater extension, the Dayton Reference or Ultimax based subwoofers with high powered plate amps will obviously provide significantly better performance.
Measuring speakers
To give insight and guide equalization, I recommend some means of measuring the speaker response. Keeping with a low cost approach, I have used the following with my iPhone to good effect:
- Dayton Audio iMM-6 Calibrated Measurement Microphone
- Audio Tools iPhone app (base app with no in app purchases) to apply the calibration file of the iMM-6 mic.
- Audio RTA is an inexpensive RTA app with 1/12th octave resolution.
While I own Omnimic and REW measurement systems but still use this combination above often as it is so quick and easy to use; very handy.
Conclusion:
There is something special about these flat panel speakers that make them very enjoyable and just plain fun to listen too. I’ve gone back and forth between my DIY open baffle speakers and KEF Q500s but I keep coming back to these flat panels despite the drawbacks mentioned above; all of this from a speaker that costs about $50. If you enjoy listening to music instead of a pair of speakers, you cannot go wrong with these magic panels!
About the Designer:
Rich is a member of the Parts Express Speaker Building Team.
Projects Part List:
| 295-235 | DAEX32U-4 Ultra 32mm 40W 4 Ohm | 2 |
| 300-627 | Dayton Audio SUB-800 8″ 80 Watt Powered Subwoofer – [optional] | 1 |
| 266-276 | Harrison Labs FMOD Inline Crossover Pair 150 Hz High Pass RCA – [optional] | 1 |
| 100-020 | Wired Home SKRL-14-50 14 AWG OFC Speaker Wire 50 ft – [optional]. | 1 |
| – | Project Panels 2 ft. x 2 ft. Project Panel-PP1 | 2 |
| – | Wood or White “School” Glue 4oz | 1 |
| – | Foam paint roller | 1 |
| – | 1-2 oz. Black ink | 1 |