Quantcast
Channel: Parts Express Project Gallery
Viewing all 739 articles
Browse latest View live

GOJIRA Solid State Power Amplifier

$
0
0
OLYMPUS DIGITAL CAMERA OLYMPUS DIGITAL CAMERA OLYMPUS DIGITAL CAMERA OLYMPUS DIGITAL CAMERA OLYMPUS DIGITAL CAMERA OLYMPUS DIGITAL CAMERA OLYMPUS DIGITAL CAMERA OLYMPUS DIGITAL CAMERA OLYMPUS DIGITAL CAMERA

Designer: Hong Nguyen

Project Category
Amplifiers

Project Level
Advanced

Project Time
20+ Hours

Project Cost
$100 – $500

Project Description
This is a class AB, high output amplifier, capable of delivering 250W/channel into 8 ohms, or 350W/channel into 4 ohms, designed mainly around components that Parts Express carries. Components that I added to improve the quality of the amplifier are soft start, DC supply, speaker protection modules, and a temperature regulated circuit for the fan. This is an advanced project, and requires that you understand the dangers of AC as well as DC voltage. Having said that, if a person with no electronics background such as myself, can end up bringing this project to fruition, any of you speaker geeks can do the same and better.

Design Goals
The goal of building an amplifier, in my opinion, is to end up with something powerful that can accommodate music dynamics easily without clipping, while delivering low distortion and the absence of hum or buzz during quiet passages. The amplifier also has to be able to protect your valuable speakers should components fail, and electronic components do fail. Everyone who knows me knows how loud I listen to music, and since watts are cheap, why build a 25W amplifier when you can buy a 350W mono module for 35 bucks?

Driver Selection
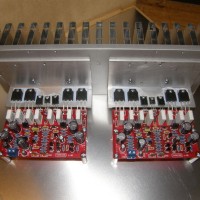
a. Amp Modules: I chose the Yuan-Jing mono amplifier modules for this project, for their attractive prices ($70 for the pair), and mated them with the Sure 35,000uF power supply module ($60) that PE has been carrying for a while. The YJ module is very similar to a less powerful amplifier module that I built in the past, and the wiring is comparably straight forward.

b. Power Supply: The Sure power supply has built-in dual rectifiers attached to heat sinks, and LED arrays that show the rectified voltage for each rail (negative and positive), and well as indicate when the capacitors are completely discharged in the event you have to disconnect or reconnect the amp modules. During testing, the Sure modules completely discharge within 15 seconds, allowing you to work on it practically right away.

c. The soft start module was built from scratch from a Texas Instrument schematic. After doing point to point soldering for my first 3 amps, I decided to do a PCB for this project. For details on how to “PCB the easy way”, please look at one of my threads on the Tech Talk forum.

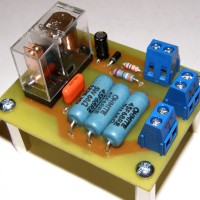
d. The DC supply is basically a simple circuit that takes an AC voltage (in this case a 18VAC secondary) and converts it into a DC voltage using a small full bridge rectifier, then regulates it into 12VDC using a LM7812. This circuit was also built from scratch and put on a PCB. This module powers the fan and the LED of the power button.

e. The speaker protection module is an eBay kit, the XY Speaker Protection module V.2 ($5.00). I have used this module reliably for the past 5 years, and it has worked protecting my speakers many times, when my DIY amp modules has blown up or failed. The module has a red LED that lights up briefly on power up, then goes off, and stays on if an amp failure is detected. For this project, I moved the LED to the front faceplate, next to the power button, so any failure can be instantly detected. This module requires 12VAC, and has an on board rectifier.
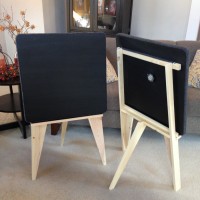
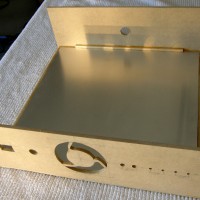
Enclosure Design
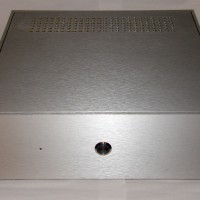
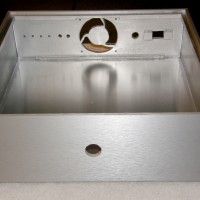
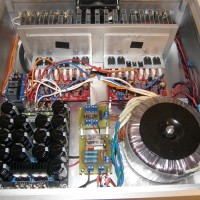
The case is constructed entirely of MDF, and is 16”W X 16”L X 5”D. The bottom is 1/2” thick, while the rest is 1/4” thick. The exterior is covered with the new PE metallic vinyl, and the interior painted with metallic paint. The opening for the fan was cut with a jig saw. The top was first covered in vinyl, then drilled to allow venting of the large heat sink.

Enclosure Assembly
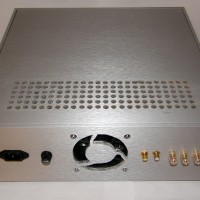
a. The bottom piece of the enclosure is lined with a sheet of aluminum (Home Depot item) and connected to earth ground. The following components can be found on the rear panel: IEC receptacle, fuse holder, 12VDC fan, RCA inputs and speaker binding posts. For the inputs, I used insulated microphone wire. All other wirings were done with 16AWG stranded copper wires.
b. The transformer is an Antek 6440, delivering 600VA, with 3 sets of secondaries: 40VAC, 18VAC, and 12VAC. Even though the amp modules only specify +/-45VDC, I have used higher voltage on another similar module reliably, thus my choice for the Antek, which delivers a rectified voltage of +/-56VDC. The 18VAC secondaries power the DC supply, and the 12VAC secondaries the speaker protection module.
c. The DC supply powers the fan and the power button LED. This circuit consists of a 2A full bridge rectifier, a LM7812 voltage regulator, and a couple of 0.47uF capacitors.
d. The schematic for the soft start can be found on TI’s application note AN-1849. The component cost for this module is about $8.00, and has served my amp builds very well for the past 5 years.
e. To ensure the proper heat dissipation, I added a temperature regulated DC fan. This circuit consists of 3 components that cost around $5.00, and can be found on www.heastsink-guide.com: a MOSFET power transistor, a 10K trim potentiometer, and a 10K NTC temperature sensor. This keeps the fan idle on startup, and keeps the overall noise down even when the amp warms up.
f. As described above, the speaker protection module, powered by the 12VAC secondaries, is quite reliable for something that can be had for $5.00 on eBay.
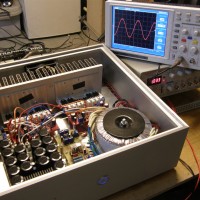
Conclusion
The build was easy, straight forward, and drama-free. The sound is superb at normal listening volume, but I can’t wait to take it through some more serious testing later. This amp sounds very similar to my Rod Elliott’s Project 101 that I did almost 2 years ago, and for $35.00 per module, you can’t really go wrong there. However, it wouldn’t be fair not to mention some cons as well:
a. Complete lack of instructions, so unless you’ve built amps before, you have to be able to figure out where the connections go (no instructions came with the Sure power supply either).
b. The right channel is slightly warmer than the left channel, and in the absence of a bias adjustment component, there’s no way to adjust their “idle” speed.
Overall, this amp delivers great sound, great value, and a high level of satisfaction due the fact that it requires quite a bit of DIY skills. As you can see, all I did here is to pull knowledge from the internet and put it together in a package that complements components offered by PE, and not for a whole lot of money either.

About the Designer
Hong Nguyen is by day a Director of Operations for a healthcare company that develops and manages ambulatory surgery centers. He has been building speakers and amplifiers for almost 8 years, and is a member of the Speaker Building Design Team.


Project Parts List

Yuan-Jing Mono Audio Amplifier Board
Sure 100V 30A 35,000uF Rectifier Board
Avel 500VA 30V+30V Toroidal Transformer
Silicone Thermal Heat Sink Compound
SPST Rocker Switch
Fuseholder
Perforated PC Board
AC Cooling Fan
12V CT 5A Power Transformer
Steel Aluminum Vinyl Wrap
Power Jack Chassis Mount
Binding Posts

Add All Parts To Cart


4×6 Guitar Cabinet

$
0
0
4x6w_carvin 4x6_top 4x6_bot

Designer:Mike Grobusky

Project Category
Guitar and Bass Speakers

Project Level
Intermediate

Project Time
1-8 Hours

Project Cost
$100 – $500

Project Description
Guitar cabinet. 4 x 6.5 with Eminence

Design Goals
Small, portable, killer tone

Driver Selection
Eminence 6-1/2″ Guitar Speaker 20W 4 Ohm

Enclosure Design
Sealed cabinet

Enclosure Assembly
3/4 baffle, 1/2 sides birch plywood, back is 5/8 particle board
inverted slant front baffle

Conclusion
Note. Speakers wired in series. Total cabinet is 16 ohms. Best suited for tube amplifiers up to 50 watts.

About the Designer
Played guitar for 40 years. Retired sound system engineer.

Project Parts List

Eminence 6-1/2″ Guitar Speaker 20W 4 Ohm

Add All Parts To Cart

Miura Jr’s

$
0
0
23508073429_6b740054ba_z 19678157145_b6db6afa96_z 23249051073_c9c610dbcc_z 23507942129_37c94c8855_z

Designer: Derekj

Project Category
Bookshelf Speakers

Project Level
Beginner

Project Time
8-20 Hours

Project Cost
$100 – $500

Project Description
A small 2 way design using the new Dayton Audio Carbon Fiber woofer.

Design Goals
The goal here was to create a small speaker to be used in a small room or as a desktop speaker. I also wanted to keep the cost down so it could be a cost effective build.

Enclosure Design
A simple 5lt ported enclosure tuned to 60hz with a 2″x6″ port.

Enclosure Assembly
I used 3/4″ MDF for the baffle and 1/2″ for the rest. The thicker baffle was used so I could put a 3/4″ round over on the front of the enclosure. The enclosures were then finished with a maple veneer and 5 coats of wipe on poly.

Crossover Design
The crossover gave me the most trouble trying to get a reasonably flat response. I had a few different versions I had built with various different shaping filters, but in the end a simple 12db LR4 on the woofer and 18db on the tweeter with a padding resistor gave me great results. Crossover point is centered around 3k.

Conclusion
The Dayton Audio CF120 is a great little woofer! Many thanks to Parts-Express that had donated quite a few pairs of these drivers to the various DIY events this past year.
I am very happy how the speakers turned out. A fairly balanced sound and even surprising bass output for a small 4″ driver. Obviously a subwoofer is required for true full range sound but these guys turned out great for what they were designed for. And with the recent price drop on the Dayton Audio CF120 these can be built for under $150 a pair.

About the Designer
I have just gotten the DIY bug a few years ago and love my new hobby. I come from a car audio background and found the move into home audio a natural progression. I am a mechanic by day and enjoy the outdoors here on the West Coast of Canada.

Project Parts List

Dayton Audio CF120-4 4-1/2″ Woven Carbon Fiber Midwoofer 4 Ohms
Dayton Audio ND25FA-4 1″ Soft Dome Neodymium Tweeter

Add All Parts To Cart

RCA Console Lab 15 Retrofit

$
0
0
rca_console lab_15_in_rca lab_15_box lab_15_box_back

Designer: Triode

Project Category
Furniture

Project Level
Intermediate

Project Time
8-20 Hours

Project Cost
$100 – $500

Project Description
I won an Eminence Lab 15 as a door prize at the DIY KY 2015 speaker event this year and thought I’d retrofit it into a RCA 6-HF-4 phono console that I have in my diningroom. There is a mandate in the household for no visible speakers in the dining room so this was a good way to hide a new speaker in a piece of furniture already in the room.

Design Goals
A mono full range 3-way speaker with sealed enclosures using the Lab 15 for a low end that would fit in a RCA 6-HF-4 chassis

Driver Selection
I started with the Lab 15, I knew I wanted a sealed enclosure for the mids, and based on the available area in the box I thought a MTM configuration in the top section of the existing grill would work nicely. I wanted to maximize bang for the buck, given these parameters the Dayton Audio ND140-4 5-1/4″ Aluminum Cone Midbass 4 Ohm Drivers and a Dayton Audio DC28F-8 1-1/8″ Silk Dome Tweeter seemed to fit the bill.

Enclosure Design
The external dimension of the box were fixed based on what would fit inside the RCA box. A divider was used to separate it into 2 sealed cavities, with the lower cavity for the sub about twice the size of the upper cavity. A 3d model is available here:
https://cad.onshape.com/documents/2f07eeb101144286bc4ca1f0/w/fb867ff8ca32462c804dba2d/e/e837701ad9924774ba9d00c1

Enclosure Assembly
The box made of 3/4″ MDF fit snug in the existing chassis of the 6-HF-4. Of course I had to remove the existing speakers and record player, and cut out the shelf that separated the speaker and phono sections. To cut a clearance hole for the Lab 15 in the RCA chassis I laser cut a template out of 1/8″ plywood and used a router bit with a bearing to cut it out. The new box slid right in the top and was screwed in place to avoid any rattling. I removed the original baffle, peeled back the top section of the grill cloth and laser cut a new opening for the MTM top section.

Crossover Design
For a crossover I decided to go active and use minidsp 2×4. I measured the impedence curve for the Lab 15 once it was mounted in the box and used a linkwitz transform based on the measured Fc and Qtc in order to achieve an F3 of 20Hz with a Q of .7
For the mids I used 48dB/oct Linkwitz-Riley filers at 125 Hz and 2250 Hz .
For the highs I used a matching 48dB/oct Linkwitz-Riley filer at 2250 Hz.
I set the gain of each crossover section based on the published sensitivity numbers, then tweaked a bit by ear.
The power amp I have on the sub can do about 450 W into the 6 ohm Lab 15.

Conclusion
I have to say that the bass response on the finished product is quite satisfying.

About the Designer
I’ve been an electronics design engineer for 15 years and have been a speaker building hobbyist on and off for about 20.


Project Parts List

Dayton Audio ND140-4 5-1/4″ Aluminum Cone Midbass Driver 4 Ohm

Dayton Audio DC28F-8 1-1/8″ Silk Dome Tweeter

Eminence LAB15 15″ Pro Audio Subwoofer Speaker

Add All Parts To Cart

The Titan Method

$
0
0
image5 image6 image.jpeg4 image.jpeg5 image.jpeg6 image.jpeg7

Designer: Seth Aitchison

Project Category
Bookshelf Speakers

Project Level
Beginner

Project Time
1-8 Hours

Project Cost
Under $100

Project Description
The Titan Method is a very simple and easy centre channel speaker built from 3/4″ MDF and very personalized.

Design Goals
The goal is to build a simple 24″ x 12″ x 8″ sealed enclosure giving me .86 cubic feet of volume suitable for the drivers I’ve selected.

Driver Selection
Today I am using the Buyout Titan 6.5″ red surround woofers and a Vifa ferrofluid cooled soft dome tweeter.

Enclosure Design
The enclosure is a very simple design I created using DIY Audio and Video to determine the correct sealed volume and tuned for 70 Hz. I selected high quality 3/4″ MDF to make this enclosure very sturdy and easy to personalize with paint or vinyl wrap, cabinet corners, grills etc.

Enclosure Assembly
I cut the MDF into six pieces that the website gave me the dimensions for each piece, this is a beginner project and this is the third enclosure I’ve built using MDF and the outcome with this project. Superb.

Crossover Design
The crossover I haven’t put much detail into it as I pulled the original crossover network from one of my Energy ESM-3 speakers with the Vifa dome tweeter.

Tips & Tricks
When working with MDF, always drill pilot holes the same width of the screw shaft, not the threads. Avoid any wet areas. Double check your woofer’s voice coil lead wires from the terminals to make sure they clear the spider and the cone. One of my Titan woofers began making a snap noise at moderate excursion.

Conclusion
A whole day’s work gives you a beautiful centre channel speaker that doesn’t stab your wallet, thank you for looking.

Cheers!

About the Designer
I’ve been working with audio since the age of 10, fixing and repairing existing speakers or designing custom made speaker systems, overhauling existing speakers and so on.

High Quality sounding 2.1 desktop stereo

$
0
0
2.1_desktop_speakers desktop_speakers sub_plate_amp_for_desktop desktop__2_way_cabinet

Designer: Kevin

Project Category
Home Electronics

Project Level
Beginner

Project Time
8-20 Hours

Project Cost
$100 – $500

Project Description
Desktop 2.1 System with Lepai 2020 amp and DA 75 watt plate sub amp.

Design Goals
Get better at speaker building and woodworking skills.
Build a better full range near field sound system for the computer and TV in my home office.
Keep total budget low while delivering great sound.

Driver Selection
HP-5210 5-1/4″ Poly Cone Rubber Surround Woofer 8 Ohm (buyouts)
GRS 1TD1-8 1″ Dome Tweeter 8 Ohm (on sale)
Tang Band W6-1139SIF 6-1/2″ Paper Cone Subwoofer Speaker

Enclosure Design
Custom Subwoofer box (approx 0.7 cu. ft.), dual baffle, heavily braced with twin 2 in. ports tuned to 35 hz. Uses 70 watt Dayton Audio plate amp with high level inputs between Lepai amp and speakers. The ports were made with PVC pipe and finished with flanged 2 inch black port to mount to baffle and provide better look than PVC.

Speakers use an L-port design (approx. 0.4 cu. ft.) single baffle, braced tuned to about 45 Hz. The ports had a 3/4 inch round over on the exit and internal port entrance. I went slighly below the Fs of the current midwoofer since I knew I would not overpower them with the Lepai amp and in case I wanted to replace with better drivers if these low cost units didn’t work out.

Both boxes are overbuilt to be certain to keep resonance as low as possible. The weight penalty was a minor concern.

Enclosure Assembly
3/4 inch MDF and 3/4 inch furniture grade plywood (one side had high quality veneer already applied) left over from other projects.

Both sub box and speaker boxes used 3/4 inch acoustic damping foam placed on some internal walls, not blocking ports.

MDF was painted black and plywood used unstained and protected with satin Polyacrylic. 3/4 inch pine trim also left unstained and sealed with polyacrylic.

Crossover Design
Since I’m just learning about crossover design, decided to just go with a low cost generic approx. 3kHZ crossover attached on the speaker terminals purchased off ebay ($9/ea). Crossover claimed to handle 60 watts, which should be plenty with the Lepai amp.

Tips & Tricks
Luckily, the lepai amp is arm reach from my office chair, so minimized the inconvenience of remote volume control.

Not really a trick, but because the black paint is acrylic latex, I was able to also cover the paint with the satin polyacrylic as well…provides a much nicer look than the raw paint finish alone since I could sand between coats and also cover the real wood surfaces as well.

Conclusion
All I can say is expectations were exceeded, especially on the sound quality. Even with the subwoofer off, the speakers sound so much better than my TV or computer speakers and with the sub on, it is really incredible. For near field application the Lepai amp produced very high SPL levels of clean sound beyond what would be normal listening levels. The little Tang Bang sub really hits low and hard really making for great music, gaming, and TV/movies in my home office.

Cheers!

About the Designer
Recent early retiree after a career as a chemist/science laboratory management. This was my first ground up build. Prior projects always were with car sub builds with premade boxes (only having simple hand tools) or driver replacement in existing old vintage speakers.

Parts Used
Lepai LP-2020A+ Tripath Class-T Hi-Fi Audio Mini Amplifier
I replaced the stock 12V, 3 amp power supply with a 12V, 6 amp supply to get full output possible from that amp.


Project Parts List

Lepai LP-2020A+ Tripath Class-T Hi-Fi Audio Mini Amplifier with Power Supply

GRS 1TD1-8 1″ Dome Tweeter 8 Ohm

HP-5210 5-1/4″ Poly Cone Rubber Surround Woofer 8 Ohm

Tang Band W6-1139SIF 6-1/2″ Paper Cone Subwoofer Speaker

Add All Parts To Cart

Sony SS-C600AV Classics

$
0
0
image.jpeg8 image7 image8 image9 image10

Designer: Seth24

Project Category
Tower Speakers

Project Level
Beginner

Project Time
1-8 Hours

Project Cost
Under $100

Project Description
These are the prime of classic 90s style tower speakers featuring what used to be a simple 3-way speaker system with a 3″ tweeter, 4″ mid and a 12″ woofer with a 12″ passive radiator. I bought these Sony SS-C600AV towers with rotted foam surrounds for a new overhaul.

Will add more photos.

Design Goals
My design goals are to restore that 90s style and large big and bold sound using brand new hardware, I went ahead and selected the new woofers as these enclosures will now house twin active 12″ woofers but needed to make sure the correct volume of the enclosure would match the woofer’s recommended volume.

Driver Selection
The drivers I have selected are the Buyout WP-1240 12″ poly cone and foam surround woofers, with having a recommended sealed volume of 1.13 cubic feet, my Sony enclosures I calculated 2.26 cubic feet perfect for twin sealed 12s tuned for 60 Hz.

Enclosure Design
Back in the 90s, Sony’s line of tower speakers like the lesser common SS-C600AV is a stereo system perfect for that untimate house party, they are massive, very bold and aggressive looking with excellent sound quality to back it up.

Crossover Design

The crossover will be a simple 10 micro farad capacitor tied for the midrange and a 30 ohm resistor for the horn to ensure amplifier stability and avoid burnout, I won’t be using any low pass filters on the woofers as by themselves deliver that low end and midbass to my liking.

Tips & Tricks
When using piezo tweeters, be advised they often require power resistors, always ask the tech department about piezo tweeters.

Conclusion
These revived and better versions of the SS-C600AV speakers is a prime candidate coupled with these 12″ woofers, can’t find any other woofer at this price range to be anymore perfect. All Factory Buyout drivers from woofers, mids and tweeters can bring back your classic speakers or create new ones.

About the Designer
I have been passionate about theory of audio reproduction and building my own speaker systems, amplifiers, power distribution and all other audio related activities


Project Parts List

WP-1240-4 12″ Poly Cone Woofer with Foam Surround 4 Ohm

Add All Parts To Cart

Pyle Pro horn tweeters ordered from Amazon

Back Loaded Horn Design

$
0
0
shd_01 shd_04 shd_05 shd_06 shd_07 shd_08 shd_14 shd_02 shd_03

Designer: Cavett

Project Category
Tower Speakers

Project Level
Intermediate

Project Time
20+ Hours

Project Cost
$100 – $500

Project Description
Backloaded Horn Speaker has a full-range speaker driver. A full-range speaker driver is the ideal because it moves a lightweight diaphragm with strong magnetic circuit. However it doesn’t play a practical bass if you mount it on the general enclosures, like closed-box and bass-reflex.

However they are able to derive a satisfactory bass through the long horn from back side sound of the full-range speaker driver by back loaded horn enclosure.

A full-range speaker driver hasn’t crossover network unlike 2-way or 3-way speakers; it hasn’t any circuit elements such as capacitors, coils and resistors/attenuators. So, it expresses the sound source more real and the sound quality is completely unaffected by the network and the resistors/attenuators.

Consequently, the backloaded horn enclosure is able to derive its full ability from the ideal speaker driver. Therefore, backloaded horn enclosure provides big speakers-like bass and volume level even small speakers.

Design Goals
One of the things it is highly-efficient system. In other words, it has a high output sound pressure level; the backloaded horn system is an energy-efficient design. So it allows the driving by low-power amplifier, too. Low-power amplifier is good from the point of view of sensitive sound.

Driver Selection
Speakers for which I decided was the model W4-1337 SDF Tang Band 4 “full range. No filters and no supplement. Pure sound. The relationship and quality-benefit balance of money is accessible and well, after a year (the project I worked on some weekends and some holidays) I managed to finish it. Two speakers Part # 264-916

Enclosure Design
The design points for backloaded horn enclosure are the cubic capacity of an air chamber, the cross-sectional area of its throat, the horn flare rate, the horn length and the horn-opening area. Fold up the horn and crate it.

It plays the fine sounds because the driver diaphragm can move easily by backward opening of the speaker driver, like open back type cabinet. So, it plays the realistic sound with overwhelming high quality if its sound source is good, but that’s not how it works if its sound source is poor. Therefore, maybe have trouble finding a good sound source.

Enclosure Assembly

The assembly was made with stainless steel screws and side panels in brushed acrylic 18 mm, it was more complicated because the painting process had to be sanded to a smooth surface.
MDF 30 mm CNC Cutting.

Conclusion
At the moment I have running a LP7498e Lepai amplifier which has given me good service, but I think you can hear even better with another type of amplifier which’m finding a Rotel RCX-1500 could be used or one Arcam, Marantz or Parasound of the most recent models. I doubt some Chinese bulbs amplifiers.

About the Designer
Since I was a kid I liked everything about the reproduction of sound and music, mainly jazz, classical, some progressive rock, Mexican classical music and all that they have broad ranges reproduction. First I did some facilities in three cars I had but to evolve systems in cars and having to sell to be updated was decreasing my intervention in these and decided to start putting together a system for home, if no Hi-Fi and Hi-End if something to hear some pleasure and quality. Although he knew the operation and construction of the sealed baffles, vented and bandpass, found at the site of Fostex that the most efficient system for home small speakers was the Exponential Curved Backloaded Horn Speaker for their ability to enhance the frequencies still serious with a small speaker in a relatively small room.

Searching the internet I came to the site TelaVox who have several years developing this concept being the precursor Mr. Tetsuo Nagaoka and now marketed by Hasehiro Audio. Unfortunately, in Mexico there are no distributors or manufacturers similar to these speakers so I decided to build it myself. With some knowledge of design and manufacturing I started making the first drawings in InDesign and was polishing, imagining the measures he wanted. I decided on a measure 60 cm high and 38 deep and 20 cm wide. I researched a workshop that would make me cut on a CNC router, I prepared my files in Illustrator and finally took him out.


Project Parts List

Dayton Audio BPA-38SN HD Binding Post Pair Satin Nickel

Dayton Audio DSS4-SN Satin Nickel Speaker Spike Set 4 Pcs.

Also…
12 gauge wire
and Black screws

Add All Parts To Cart


Hybrid Open Baffle Bookshelf

$
0
0
righthob lefthob hybrid_enclosures_front backii backi

Designer: PR Audio

Project Category
Bookshelf Speakers

Project Level
Beginner

Project Time
1-8 Hours

Project Cost
$100 – $500

Project Description
Since I built a pair of Lampizator P-21 Open Baffle speakers I have been amazed at how good an Open Baffle (OB) speaker sounds. The speakers disappear like no other I have heard, and the sound just seems to float, plus it is very realistic. But, due to lack of space and large OB aesthetics (WAF) I wanted to have a pair of speakers that could sound as good as an OB and at the same time be compact enough to use in a small listening room. Inspired by Tekton’s Hybrid Bookshelf OB I decided to design and build one of my own design.

Design Goals
Since the speakers were going to be placed in the living room, the speakers had to be approved by my wife, so WAF was a major consideration. Also, the speaker couldn’t be bigger than the PSB B25’s I was using previously, had to be about the same height as to use the same speaker stands, and the sound had to be what I expected from an OB, though I was aware that due to the size of the speaker it would have its limitations as far a bass extension.

Driver Selection
I already own a few DIY speakers that use a full range single driver, and I have always enjoyed how they sound, especially in the mids. The problem with full range drivers is that they either sound very good from the bass frequencies to the mid-highs or they sound very good from the upper lows to the highs, but very difficult or expensive to find a full range driver that was very good from the low end all the way to 18k-20k Hz. Another important aspect was the fact that both drivers have to look coherent, not black and purple or white and gold, etc. I had read many good things about Mark Audio full range drivers, also about the capabilities of HiVi MXN mid-woofers. Upon researching more I was convinced that Mark Audio’s CHR-70A.3 had the correct size, specs, and color for my project, plus it complemented the gold color of the HiVi, which I wanted to try in a project. Sensitivity for both was almost identical, and the modeled bass extensio n of the HiVi in a vented enclosure had an F3 of 52 Hz, which is very respectable for a 5″ mid-woofer in a small enclosure. Both drivers have a very smooth frequency curve. Though Mark Audio is not available from PE, in this project you could successfully use Tang Band’s W3-881SJ.

HiVi M5N: PE P/N 297-436
Tang Band W3-881SJ: PE P/N 264-812

Enclosure Design
Though I have built a few DIY speakers, they have been speakers that had already been designed by someone else, and were easy to build. This time, I decided to take a stab at it for the first time, so I read a lot regarding speaker design. In order to determine the enclosure volume and vent size I used www.diyaudioandvideo.com calculator, and confirmed with WinISD. The resulting enclosure for the woofer has a volume of 0.25 Cu.Ft., which I adjusted dims as to fit my criteria. A 1″Dia. x 2″L vent was suggested by the design program. I knew that I wanted the same height as my PSB B25, which is 16″. In order to allow space for the full range driver I decided that the OB part of the baffle would be 6″ high, so I gave the woofer enclosure a height of 10″ and adjusted W and L accordingly to get 0.25 Cu.Ft. inside volume. After modeling the full range drivers response the best position was in the baffle was doing a mirror ima ge. As to be able to control better the speakers using a MiniDSP or active crossover bi-amp banana jacks were used.

Enclosure Assembly

Cutting the wood and assembling the enclosures was straight forward, after all it is a rectangular box. For this build I used 1/2″ MDF, but i recommend using 3/4″, at least for the baffle. Again I used www.diyaudioandvideo, as to determine the size of the panels needed. All panels were glued, and the enclosure veneered with walnut. As to decrease resonance and standing waves a 3/8″ thk. wool felt was glued to the back inside panel of the enclosure.

Crossover Design
I had done many simulations, and knew that around 600 Hz would be the best crossover frequency. So I designed a 2nd Order LR passive crossover. Since crossover design is both an art and a science, which I don’t dominate yet, I decided to go ahead with purchasing a 2-Way Behringer CX-2310 active crossover (PE P/N 248-664), as to confirm my findings. Using two identical amps with the same wattage, I was able to confirm that a crossover frequency of 600 Hz was very good, but 520 Hz was the best. With those findings I will build the passive crossover using high quality MKP caps.

Conclusion
The speaker is much more than I expected, it is very detailed, open, airy, controlled, and coherent. Soundstage is something you have to experience, as it is very real, like if you were standing in front of a stage. As for image the speakers simply disappear. This speakers come extremely close to the OB sound I like so much.

Tips & Tricks
* 3/8″ Thk. upholstery wool felt to line the inside wall is very good.
* Though I didn’t do it, use 3/4″ wood, at least for the baffle as to be able to flush mount the drivers.
* Experiment with poly-stuffing.

About the Designer
I started into audio DIY projects about 3 yrs. ago. Not an expert, but have read and auditioned plenty of speakers as to recognize this is an excellent speaker. Love to learn about tech trades, and I’m an avid sailor. When not hearing music or building an audio component, you can find me competing in sailing regattas all over the Caribbean.


Project Parts List

HiVi M5N 5″ Aluminum/Magnesium Midbass

Tang Band W3-881SJ 3″ Cast Frame Neodymium Driver

Parts Express Gold Plated Banana 5-Way Speaker Wire Binding Post Terminal

Add All Parts To Cart

the Monolith – quad Ultimax 18’s with granite

$
0
0
boxed_up finished_1 finished1 first_braces painted primer routing second_braces starting

Designer: Cory Harrison / Paducah Home Theater

Project Category
Subwoofers

Project Level
Intermediate

Project Time
20+ Hours

Project Cost
Over $1,000

Project Description
A relatively simple yet very large and good looking project that requires minimal tools if you are careful. Custom cut granite makes for a high end look, and four sealed Ultimax 18’s in an array sounds like quite the wrecking ball for home theater.

Design Goals
This was primarily designed around looks, as well as wanting more extension below 25 hz. I wanted a subwoofer box that looked like nice furniture and spanned my entire screen. Due to the layout of my room I don’t have a situation where I can place subs behind a screen, so they would be exposed. Other DIY and even factory subs simply didn’t exactly have the high end look that I was after, they just looked like a man cave where somebody threw a bunch of speakers in there. I knew I liked the basic look of the $10,000 James M213 where the entire baffle was recessed and not the driver cutouts, which I used for inspiration. Granite was used to finish the look as well as provide weight to stabilize the enclosures during high excursion.

Driver Selection
Four Dayton Audio UM-18-22

Enclosure Design
I didn’t have a table saw at the time and wanted this box to be easily cut with a circular saw. Using the 49″ width of MDF sheets I was able to come up with two boxes that could be transported separately that was nearly the exact width of my screen. I was shooting for at least 4 cubic feet after all displacement and was able to achieve that. When cutting there were only a few cross cuts that I was able to do on my miter saw. Everything else was done with a simple circular saw using a piece of clamped plywood as a straight edge. Approximate dimensions are two 20x20x49 enclosures end to end with the granite being 23×100 but cut in half. The interior was braced about as obnoxiously as I could get it but would probably use interlocking window style braces if I were to do it over. The enclosure was stuffed with R-19 insulation due to high end designers claiming it measures better than poly-fill.
If anybody wanted an exact cut list to replicate the box you can contact me through my website at paducahhometheater.com

Enclosure Assembly

Double-refined cabinet grade MDF basic enclosure, purposely dissimilar baltic birch and poplar corner braces, square poplar dowels for cross braces, double baffle, R-19 insulation for stuffing, no screws, only 90% glue and a couple of places where liquid nails was used to fill in small gaps which occurred due to my lack of a table saw

Crossover Design
No external crossover, even on the amp, just using the functions in a Marantz receiver.

Conclusion
It turned out quite nice visually, and with the help of a MiniDSP I was able to attain flat response to below 10 hz. Everybody feared that the granite would reflect light too much, but in reality it actually helps due to reflecting the light back up to the ceiling and away from your eyes at the viewing position. The only thing you can see in terms of reflections is the roundover edge, which I would try to eliminate if I had to do it over. Without the granite, the screen casts a distracting glow on the subs, actually making this situation significantly worse. In a 2700 cubic foot room this provides more than enough bass, at any frequency. Sound wise, it is able to provide the all-encapsulating bass that literally shakes everything, which is usually only obtainable in a vehicle. Altogether including wood, drivers, paint, insulation, granite, etc., this is about a $2,000 cabinet that weighs 750-800 pounds.

Tips & Tricks
1. I’d skip the Crown 2502 like I used, it sounds nice, but the new version does not let you override the limiters, and they come on too easily once you get well below 20 hz. Pretty sure I’ve already damaged this one as well, just sent it back for warranty repair. Look at the Behringer iNuke 6000 if shopping here, especially since it has a much needed DSP, otherwise, maybe Speakerpower if you want something nicer. The iNuke is questionable with four of these subs if you look at nominal impedance but if you consider the impedance curve shown on data-bass.com you’ll see that it is typically quite a bit higher than 2 ohms except in single digit frequencies.

2. Try to find the aforementioned double refined cabinet grade MDF, it works better with routers and painting, plus is significantly heavier and stiffer.

3. The key to these things looking good is a ton of sanding, be ready for this. I’m not the most patient person in this regard.

4. If you use black latex paint instead of truck bed liner, make sure you sand the primer a ton then use latex extender so your brush strokes disappear. Also give each coat at least a day, preferably more like 3 days, to fully cure, otherwise what’s called “flashing” can occur plus the paint can stay sticky.

About the Designer
I used to compete in car audio competitions and now run a home theater business in western Kentucky. You can find me at www.paducahhometheater.com


Project Parts List

Dayton Audio UM18-22 18″ Ultimax DVC Subwoofer 2 ohms Per Coil
Crown XLS 2502 DriveCore 2 Power Amplifier 2 x 775W at 4 Ohms
Dayton Audio BPA-38G HD Binding Post Pair Gold
Jasper Circle Jig Model 240

Add All Parts To Cart

lil sub

$
0
0
photo_1 photo_2

Designer: jared

Project Category:

Subwoofers

Project Level:

Beginner

Project Time:

1-8 Hours

Project Cost:

Under $100

Project Description:

Small two-tone subwoofer for 2.1 system with tube amp. Hoping to post pictures of speakers soon if PE allows.

Design Goals:

1. I designed this subwoofer to match a set of speakers I built using acacia fronts and pine boxes. I built those speakers with no visible screws or hardware of any kind except recessed banana plugs for the speaker wire connections. I will post pictures of those later if I am able. I wanted the subwoofer to also have no visible screws or hardware.
2. For this sub, I wanted more than a regular build and couldn’t decide on a particular design to go with, so the goal morphed into incorporating two designs – basically a reversible subwoofer. At first I planned a down-firing sub with a front/rear facing port that would allow the driver to face forward and the port downward when rotated 90 degrees. Limitations on cost and wood led to this design. I’m pretty happy with it. I still need to sand it, make the speaker connections, and enjoy. I did test the sub’s sound before making cosmetic commitments and it sounds great.
P.S. I used only powered hand tools – no table saw, miter saw, drill press, router table, etc., as I currently don’t have access to those things.

Driver Selection:

Tang Band W5-1138SM 5-1/4″ Neodymium Subwoofer
Part # 264-831

Enclosure Design:

Ported, appx .3 cu. ft. with 9″ long x 2-1/2″ port with flare (also available from PE though I did borrow mine from the PE/Dayton 8″ powered sub that I parted out. Passive and no x-over as I will be using a small SMSL amp fed by a 12-db active x-over at 90HZ.

Enclosure Assembly:

Simple pine box using “select” grade pine from local big box home store. Recessed front and rear baffles with enough backspacing to allow acacia front and rear panels for decoration. Dimensions are approximately 7x9x16″ w/h/d.

Crossover Design:

Active external crossover.

Tips & Tricks:

Patience… Acacia panels were cut ever so slightly big so that they are held in place simply by pressure. They do not rattle. Everything on the speaker and subwoofer builds was kept as simple and as cheap as possible.

Conclusion:

Sub sounds great for it’s size. Very happy with the outcome. Sub is also under a bench which holds my speakers and tube amp for the time being. Project cost less than $100 including the subwoofer but not counting wood glue, silicone, wood putty, etc. that I already had from other projects.

About the Designer:

I like taking on a project a couple of times a year – indoor shutters, guitar amp, office desk, bedroom bench, etc. I have built a few speakers before but they never turned out this nice. I was too cheap and too hasty in my youth. I like the design elements that emerge due to apparent limitations and trying to keep the design as simple as possible.


Project Parts List

Tang Band W5-1138SM 5-1/4″ Neodymium Subwoofer

Warfdale Resto-Mod

$
0
0
original_1963_warfdales warfdale_grill new_equipment_installed new_speakers_adaptors_installed wired_and_ready warfdale_old_and_new_drivers new_driversadaptor_platforms

Designer: 

Vintage Audiophile

Project Category:

Loudspeakers/Cabinets

Project Level:

Beginner

Project Time:

1-8 Hours

Project Cost:

$100 – $500

Project Description:

I recently completed the rebuilding or I should say a “resto-mod” of 1960s vintage Warfdale W-40 speakers. I found these British beauties at a garage sale for free. The cabinets were in great shape but what really struck me was the speaker cloth – they have a real 60’s British vibe. Of course the drivers were in poor condition (hence the price). I had a decision to make, do I follow the audio archeology route and try to track down original speakers online or do I replace them with modern equipment? Though I normally would take a more “purist approach” I let time and patience get the better of me, so I chose the latter. The task ahead was more of a mechanical challenge then and electronic one. In simple terms, the project involved the replacement of a 4-inch inch tweeter, 8-inch woofer and the addition of a new crossover set. The existing crossover consisted of huge capacitor and an L-pad – simple as you can get. Not so simple was the fact that the outer faceplates of the replacement speakers had to be mounted on the inside of the speaker cabinet The original speakers were mounted on studs protruding inward inside the cabinet. To complicate matters further, the 4 studs made to secure the original speakers would in no way line up with the mounting holes for the new speakers which had a 5-hole configuration. OK.. so why not remove the speaker cloth, expose the cutouts and simply mount new speakers? Well, the aforementioned speaker cloth – the reason I was attracted to these speakers in the first place-was because; a) after 50+ years the cloth is old and likely fragile; b) the cloth is mounted directly on and flush with the front face of the speaker cabinet so that the outer faceplate of a new speaker would be pressed too tightly against the cloth, and; c) the cloth, if even possible to remove, could NEVER EVER be re-mounted properly (by me anyway).

The solution I came up with was to mount “modern” speakers on 1/2-inch MDF adaptor platforms with the speaker faceplates on the outside and appropriate baffle diameters for each driver, then mount the platforms behind the original speaker cutouts. Mounting the speakers in this fashion enabled me to utilize the existing mounting studs protruding rearward to secure the woofer. Mounting the tweeter was trickier since the studs had to be removed and replaced with sheet metal screws. Once the speakers were mounted all that was left to do was to install new 2,000Hz 2-way crossovers, new binding posts and new wiring.

Design Goals:

Get a modern accurate sound while maintaining the cabinet’s vintage vibe.

Driver Selection:

275-070 Dayton Audio DC28F-8 1-1/8″ Silk Dome Tweeter
295-335 Dayton Audio DA175-8 7″ Aluminum Cone Woofer

Enclosure Design:

Original Warfdale W-40 fruitwood cabinets

Conclusion:

The moment of truth finally arrived to plug-in and play. I had no idea what to expect up to this point all I had to go by were technical specs and some customer review (which were all at least 4 out of 5 stars). I connected the speakers to my vintage Marantz 1060 integrated amp fired it up and what I heard simply blew me away. These speakers simply came alive – crisp highs clean well formed bass. The sounds coming from these resto-modified Brits far exceeded my expectations. To think these cabinets were built in 1963 just when the Beatles, the Rolling Stones, Kinks and others were just breaking over in England adds to the joy of listening to their music through these speakers.

About the Designer:

I thoroughly enjoy playing music through my vintage stereo equipment. As a consummate tinkerer, it gives me great satisfaction to restore old audio equipment.


Project Parts List

Dayton Audio DA175-8 7″ Aluminum Cone Woofer
Dayton Audio DC28F-8 1-1/8″ Silk Dome Tweeter
Dayton Audio XO2W-2K 2-Way Speaker Crossover 2,000 Hz
Dayton Audio BPA-38G HD Binding Post Pair Gold

Column design

$
0
0
img_1140

Designer:
Impunity

Project Category:
Tower Speakers

Project Level:
Beginner

Project Time:
20+ Hours

Project Cost:
$500 – $1,000

Project Description:
Simple but elegant tower speakers to complement my turntable

Design Goals:
As a first time builder, I wanted to make something different from the norm that wasn’t too complex as far as electronics go.

Driver Selection:
Because I wanted a good sound, I decided to buy the most expensive 4″ drivers available figuring that you get what you pay for. This may or may not be correct, but that’s how I approached this project.

Enclosure Design:Enclosure Assembly:
The enclosure assembly was by far the most difficult aspect of this job. The staves have to be cut accurately so that when rolled up, there are no gaps between the staves. I had installed 6 tabs on the inner faces of the staves so that the bottom and top of the enclosure could be dropped in later. Once the glue had set, then I had to mark out the positions of the driver recess & port and with the help of a circle jig, route out the recesses. Once all the wood work was done there was filling, preparation & priming before a super fine sanding and the application of pearl base coat and a urethane clear top coat.

Conclusion:
A lot of work with enclosures, expensive drivers, but worth every penny. The speakers sound terrific. They took a little while to “run in” – maybe 50 hours or so but I love their presence. I recently hooked them up to a Yaquin valve amp which almost made my hair stand on end. I play a lot of vinyl and this combination really works with that format.

About the Designer:
A regular guy…likes to play around & makes all sorts of things. First time building speakers. I would like to build a pair of horn loaded speaker using the drivers from my old Missions.

Parts Used:
Tang Band 4″ 1879
1-1/2 x 4″ flared ports
1 bag of Enclosure stuffing
Binding posts and wire

Zirconium

$
0
0
dsc00097 dsc00102 zirconium_baffle zirconium_bom zirconiumimp zirconiumoffaxis zirconiumonaxis zirconiumschematic

Designer:
Scott Sehlin

Project Category:
Bookshelf Speakers

Project Level:
Intermediate

Project Time:
8-20 Hours

Project Cost:
$100 – $500

Project Description:
Zirconium is a full range 3-way monitor with extended lows, detailed mids and extended highs. When designing a monitor, a primary decision is whether to go with a woofer, mid and tweeter or just woofer and tweeter to cover the audible frequency range. There are some woofers that can deliver extended low frequency response and low distortion, detailed midrange performance and some tweeters that can extend low enough to integrate with them, but those drivers tend to be either very expensive or somewhat limited at meeting one or more of those requirements. A three way allows for drivers that do one thing very well, which can typically be had at a better price point. The downside of a three way monitor is increased complexity in blending the drivers response and often the need to construct a separate enclosure for the midrange.

Design Goals:
The primary design goal was to get full range, low distortion performance out of the 0.56 cu. ft. Knock Down Cabinets for under $500. The project uses knock down cabinets and relatively simple driver mounting to help make this project accessible to those with intermediate level speaker building skills. My Hafnium project met some of these same objectives, but there were a couple of things I wanted to improve on.

1. Hafnium can play 30 Hz in its small enclosure, but can’t be played very loud when there is a lot of deep bass content. This can be solved with a high pass filter set at 30-40 Hz, but few modern receivers and amplifiers include this feature.
2. The mids and highs on Hafnium are smooth and open sounding, but are lacking the detail resolution of the best designs I have heard.

Driver Selection:
The goal for the woofer was something that would give extension to at least 30 Hz and be able to play reasonably loud without distorting. The Tang Band W6-1139SIF fills the bill perfectly, and can play 6 dB louder than the woofer used in Hafnium before reaching its excursion limits. For the tweeter, the goal was extended and detailed highs at a reasonable price. A number of manufacturers, including Parts Express with the B652-Air, are looking to air-motion tweeters (AMT’s). The Dayton Audio AMT Mini-8 is an affordable AMT tweeter and great for this project, but has limited response below 5 kHz. The Tang Band subwoofer is best used at or below 300 Hz, so the midrange in this design needs to cover a wide range. The Dayton Audio PS95-8 was designed as a full range driver, has a shorting ring and hard paper cone, and costs less than $25, so this looks like a winner.

Enclosure Design:
The 0.56 cu. ft. flat pack enclosure is a ready made solution. I decided to double up the front baffle for extra rigidity and to make the outer baffle removable for ease of assembly and maintenance if needed. The drivers are centered on the baffle with the port in the rear of the enclosure.

Enclosure Assembly:
The enclosure assembly started by assembling the flat pack enclosure, leaving the front baffle off. I then cut out a piece of 3/4″ MDF slightly oversized for the front baffle with woofer mid and tweeter openings of 7″, 4″ and 2″ diameter respectively.

Holes were drilled and threaded inserts were installed in the 4 corners of the 3/4″ mdf sheet approximately 1″ down and in from each corner. The midrange enclosure consists of 3″ pvc coupling, which snugly fits in the 4″ hole, a section of 3″ pvc pipe, and a 3″ pvc end cap. These are readily available at most hardware or home improvement stores.

That baffle was then glued to the front of the assembled cabinet and the sides of the baffle were trimmed to match the rest of the cabinet using a router and flush trim bit.

The baffle that came with the flat pack was used for the outer baffle. Holes for the drivers and recesses for the frames were cut using the dimensions published by Parts Express and shown in the baffle layout diagram.

Holes and countersinks were drilled into the corners, so that the outer and inner baffle could be attached via screws into the threaded inserts. Before attaching, the inner baffle was covered with 1/8″ craft foam sheeting to ensure no leaks or rattles between the two baffles.

The port starts with a press-fit 1.5″ by 4″ flared port sold by Parts Express. The port is extended to 8″ with a primitive but effective means of a 4″ section of cardboard paper towel tubing (which happens to be 1.5″ diameter) and duct tape.

The enclosure was finished with 3 coats of white Duratex.

Crossover Design:
The woofer low pass is a simple second order filter that gives a second order acoustic slope with a crossover point of 300 Hz. The tweeter high pass is a 3rd order electrical filter which gives an approximate 4th order acoustic slope with a crossover point of 5.35 kHz. The midrange filter is more complex, with a first order high pass to integrate with the woofer at 300 Hz, a third order low pass to integrate with the tweeter at 5.25 kHz. The polarity of the midrange is inverted relative to the woofer and tweeter. A parallel notch filter is included in the midrange circuit in order to deal with a peak and dip combination in the 2-3 kHz range. This peak and dip is shown in the manufacturer’s response file and was observed in 4 samples of the PS95-8 that I measured, so I believe that the notch filter will be effective for at least the current production run of PS95’s

Conclusion:
After a series of measurements and fine tuning by ear, I arrived at a response that is a couple of dB lower in the treble than in the bass or midrange. The tonal balance is similar to that of speakers that measure essentially flat, which underscores the importance of off axis response. The AMT Mini-8 has stronger off axis response than a typical 1″ dome tweeter and has some peaks in the off axis response, and this has to be accounted for in the design. The dip centered around 2.9 kHz largely flattens out off-axis, so it only has a minimal impact on sound.

Overall, this speaker has a very extended response for a bookshelf sized monitor and a neutral tonal balance with the detail resolution I was hoping for. This is not the simplest speaker to build, but may be worth the effort for those who are willing to go a step beyond a simple flat pack project.

About the Designer:
Scott’s interests in music and science have had him dabbling in home audio for about 40 years, building speakers for about half of that time. He is an Engineering Manager for an aerospace equipment manufacturer and a member of the Parts Express Speaker Building Design Team.


Project Parts List

Tang Band W6-1139SIF 6-1/2″ Paper Cone Subwoofer Speaker
Dayton Audio PS95-8 3-1/2″ Point Source Full Range Driver 8 Ohm
Dayton Audio AMT Mini-8 Air Motion Transformer Tweeter 8 Ohm
Denovo Audio Knock-Down MDF 0.56 cu. ft. Bookshelf Speaker Cabinet
ERSE 3.0mH 18 AWG I Core Inductor Crossover Coil
Jantzen Audio 1.0mH 18 AWG Air Core Inductor Crossover Coil
Jantzen Audio 0.35mH 20 AWG Air Core Inductor Crossover Coil
Jantzen Audio 0.40mH 20 AWG Air Core Inductor Crossover Coil
Jantzen Audio 0.20mH 20 AWG Air Core Inductor Crossover Coil
150uF 100V Electrolytic Non-Polarized Crossover Capacitor
Audyn Cap Q4 33uF 400V MKP Metalized Polypropylene Foil Crossover Capacitor
Dayton Audio DMPC-20 20uF 250V Polypropylene Capacitor
Audyn Cap Q4 3.3uF 400V MKP Metalized Polypropylene Foil Crossover Capacitor
Audyn Cap Q4 1.5uF 400V MKP Metalized Polypropylene Foil Crossover Capacitor
Dayton Audio DFFC-0.47 0.47uF 400V By-Pass Capacitor
Dayton Audio DNR-1.5 1.5 Ohm 10W Precision Audio Grade Resistor
Dayton Audio DNR-8.0 8 Ohm 10W Precision Audio Grade Resistor
47 Ohm 10W Resistor Wire Wound 5% Tolerance

DML Flat Panel

$
0
0
IMG_1839 IMG_1836 IMG_1843 IMG_1834 IMG_1795 FullSizeRender IMG_1792 IMG_1791 FullSizeRender_2

Designer:

Rich Meinke

Project Category:

Freestyle

Project Level:

Beginner

Project Time:

1-2 Hours

Project Cost:

$50-$100

Project Description:

This project, the first in the set of DML Flat Panel “Beginner Series” projects, will briefly introduce you to DML speaker technology and explain, step by step, how to build a simple 2’x2’ DML flat panel speaker from materials that are readily available.  In short, this project is the quickest way to get listening to a nice sounding flat panel speaker.

Design Goals:

WHAT IS A DISTRIBUTED LOUDSPEAKER (DML)

A Distributed Mode Loudspeaker operates on completely different principals than conventional dynamic/cone speakers or other panel speakers such as electrostatic or ribbons.  Unlike those types of transducers where the diagrams move in a pistonic motion, a DML flat panel speaker randomly generates vibrating nodes producing output at different frequencies and amplitudes across the entire panel with equal output from both sides of the panel.

This provides some very interesting advantages:

  • Near Omni-directional dispersion pattern, radiating equally from the front and back of the panel, has little narrowing of off-axis output with increasing frequency.
  • A single diaphragm (panel) capable of producing a true full-range response.
  • Low 3rd order distortion provides excellent voice intelligibility.
  • Panels and the resulting finished loudspeaker are thin and light-weight, making them easy to move around the listening room or put away out of sight.

Large, tall panels operate as a line-array which exhibit a 3dB loss in sound pressure compared to a point source that decreases by 6dB for every doubling of distance.  Not a DML technology advantage however, even a 24” x 36” panel will display qualities of a line-array at reasonable listening distances.  Some explain an array sounding like a large set of headphones. To me, listening in the focused array is like stepping into the recording venue.

LISTENING TO A DML PANEL

The term “magic” has been associated with these flat panels long before I began building and listening to my own panels.  After listening to them for some time now I can only agree that there is, indeed, magic in these panels!

The near Omni-directional output is an absolute joy to listen to.  They throw a huge soundscape that just fills the room.  Even tiny 14.5” x 12” panels absolutely fill the room with delicious flat panel sound.  If you didn’t know that the tiny panels were speakers you would have little clue where the music is emanating from.  This is very unique.

The panels are also very light and the large surface area requires little movement to generate sound pressure.  This leads to a “fast” and detailed speaker.  Even on recordings that I know very well, I began hearing nuances in recordings that I had not heard before.  The detail that these panels are able to extract is not etched or harsh and provides the detail in a polite way; much different than what we are accustomed to with conventional high quality speakers.

DML’s are sensitive and require little power to play loudly.  For instance, a single Dayton Audio DAEX25FHE-4 exciter on a 2’x2’ XPS panel is roughly 91+dB.  DML panels also do not suffer from Baffle Diffraction Loss so a 91dB panel is equivalent to a 97dB traditional box speaker, assuming 6dB diffraction lose.  While this is a very compelling quality, panels will saturate often times before the thermal limits of the exciter are reached.  This reduces the output of the panel.  This is not to say that even a small 2’x2’ panel cannot play to satisfying listening levels.  Where higher output may be required, a multi-panel array is a solid solution. Look for updates in the Flat Panels section of the Speaker Projects area of the Parts Express Project Gallery for a DML multi panel array design.

It is my opinion that these flat panels are not as well suited for rock or synthesized music, but best with: Jazz, Blues, vocal and other acoustic music genres.  Well recorded, live performances on these panels are fantastic and bring the performers into the listening room like no other speaker I have had the pleasure of listening to over the last 30+ years.

Finally, a word of caution from my own experiences listening to these panels.  The presentation of a DML is different as sound is produced across the entire panel; this makes for a more diffused output compared to a traditional speaker.  There is a lack of presence and a sensation that the sound is coming from the back of the speaker, through the panel, then finally to the listening position.  This took many hours of listening to adjust to.  I had nearly given up on these panels before giving them a few long listening sessions.  Also, after switching from my KEF Q500s to the panels, I heard a constant underlying, vibrating signature with my XPS panels.  While it is a warm sound, it is an aspect of the panels that I had not noted previously.  I adjusted to this aspect quickly and the KEF remains in storage and has not been connected to my audio system for some time now.

These speakers may not be for everyone due to music tastes and personal preferences.  But they are easy to build, inexpensive, and take only an hour or 2 to put together so I can highly recommend them to anyone looking to build a musical sounding speaker.  I always wanted to own an exotic flat panel speaker, and these have exceeded my expectations.

Driver Selection:

Based on sound quality, the most recommended exciter for small, light-weight panels (as used in the project) is the Dayton Audio DAEX32U-4 Ultra.  The DAEX32EP-4 Thruster is a close second, and for an inexpensive exciter that still performs very well, I can recommend the Dayton Audio DAEX25FHE-4.

Enclosure Design:

For the easiest build, use 2’x2’ Project Panels from Home Depot (Owens Corning FOAMULAR® 150 rigid XPS foam insulation).  These are cheap, require no cutting, and will give you a good introduction to DML panel sound.  However for better performance, a panel 24”x32.5” (golden ration) would provide better low and high frequency response.  Home Depot will usually, but not always, cut a 4’x8’ sheet of XPS on their panel saw.  If this is possible, go for the larger panels and follow the same process outlined below.

Enclosure Assembly:

Building the panel is simple and can be completed in 1-2 hours.  It is important to sand off all of the panel “skin”.  The sanded surface should be dull, soft and velvety feeling, with none of the original sheen still present.  After the panel is prepared, it must be treated with a mixture of even parts of glue (wood or white) and water.  XPS, non-treated, does not sound as good and has a “plastic” sound quality.

Step 1 – Panel preparation.

  • Round the corners of the XPS project panel. Using a glass or bowl as a guide, lightly mark the panel using a pen or pencil.  With a serrated knife, cut up to 1/4” from the marked line.  In other words, leave extra material by not cutting right up to the marked line.  XPS tends to break away in large chunks and could ruin our nice round corner.
  • To finish rounding the corner, use an electric palm sander and 100-grit sandpaper by sanding right up to the marked lines. Sanding goes quickly, so use light pressure.
  • Again with 100-grit sandpaper, sand off the XPS panel’s “skin” by holding the sander firmly but applying light pressure, make straight passes over the panel in the same direction with each pass. Clean the XPS dust off the panel and sandpaper frequently to avoid build up that leaves scratches to the panel.  Sand both the front and the back of each panel until there is no “sheen” on the panel’s surface.  Better to take off more panel than leave any skin.
  • Break the edges and corners of the panel by taking light pressure with the sander held at a 45 degree angle to the edge. Be careful to not apply too much pressure as it can create gouges.
  • Once you have reasonably round edges, finish the panel by hand sanding the edges and corners. With 100-grit sandpaper, use light, long passes over the entire length of the panel’s edge.  While not required, finish off with 150-220 grit if you have it handy.

Step 2 – Panel treatment.

  • The panels need to be treated with even amounts of water and wood or white glue. If you want to color the panels black, mix black ink with the water but keep the 1:1 proportions if not extra glue.  You can mix the glue, water and ink (if desired) in a flat bottom glass bowl.
  • With a 2 Inch foam roller, roll on the water and glue mixture over the panel. The mixture is thin so don’t worry about applying too much but make sure it is even.  Treat 1 side for each panel.
  • If you are not coloring the panels with ink, do not treat the round edges. If you are coloring the panels, use only 1 thin coat on the edges.
  • Repeat the treatment on the other side until both sides of the panel are treated twice. To make this process go faster, use a hair drier to quickly dry the treated panel.

Step 3 – Apply the exciters to the panel.

  • Each exciter is mounted roughly 2/5 from the top and side of the panel. On a 2’x2’ panel, place the exciter 9 ½ inches from the inside and 10 inches from the top.  I mark this location by making a light indent with a pen or pencil.  Mark both panels but make the pair in a mirror image.  I position the exciter so that the wire connection tabs are facing the inside of the panel.  So imagining viewing the panels from the listening position, the exciters will be mounted at the top inside of each panel with the tabs pointing to the inside of the panels.
  • Lightly sand the location where the exciter is to be placed. Blow or brush off any dust so the exciter will make a good bond to the panel.
  • Place the exciter on the panel in the marked position. The exciters come with 3M VHB (Very High Bond) adhesive pre-applied to the exciter.  Just remove the paper exposing the adhesive and slowly lower the exciter on the panel surface.  Press the exciter with light pressure.  For best results, glue the exciter to the panel with the same glue you use for the panel treatment.  I would try the VBS first to allow you to try another panel size or material.

Tips & Tricks:

Equalizing

As stated earlier, light weight flat panel made with XPS have an uneven frequency response.  One of the biggest improvements that you can make to these panels are equalizing and shaping the response to your preference.

2 areas that benefit:

  • Smoothing and tailoring the overall frequency response to your liking.
  • Extending the bass and high-frequency extremes as desired.

I have used the Behringer DCX2496 Loudspeaker Management System & Crossover for many years with my open baffle speakers and appreciate the power and flexibility.  I no longer purchase expensive passive components and use this for all cross-over and equalization duties.

Extending bass response and adding “slam”

While these particular panels can sound quite good down to a reasonable 80Hz (can go much lower on larger panels), flat panels of all types have a general reputation for bass that lacks “slam”.  These panels are very open, “fast” and clean sounding and had concerns about the potential of adding bloat or muddy bass response with a subwoofer.  But in an attempt to add slam, I tried a small (and hopefully more agile) 8” sub, the Dayton Audio SUB-800, and am very happy with the results obtained with this small sealed sub, especially considering the low cost.  Playing these at reasonable levels the quality is very good; reading the user reviews on the PE website confirms my own results.  They also look really nice and not what you would expect from a subwoofer costing under $100 – very highly recommended!

To relieve the panels from playing lower bass, I recommend the Harrison Labs FMOD Inline Crossovers if you have no other means of preventing the panels from playing the low frequencies.  For smaller panel as described above, I recommend the 150Hz crossovers (the specific model is listed below).  For larger panels, the 100Hz crossover would likely be a better choice.

If you need higher output and greater extension, the Dayton Reference or Ultimax based subwoofers with high powered plate amps will obviously provide significantly better performance.

Measuring speakers

To give insight and guide equalization, I recommend some means of measuring the speaker response.  Keeping with a low cost approach, I have used the following with my iPhone to good effect:

  • Dayton Audio iMM-6 Calibrated Measurement Microphone
  • Audio Tools iPhone app (base app with no in app purchases) to apply the calibration file of the iMM-6 mic.
  • Audio RTA is an inexpensive RTA app with 1/12th octave resolution.

While I own Omnimic and REW measurement systems but still use this combination above often as it is so quick and easy to use; very handy.

Conclusion:

There is something special about these flat panel speakers that make them very enjoyable and just plain fun to listen too.  I’ve gone back and forth between my DIY open baffle speakers and KEF Q500s but I keep coming back to these flat panels despite the drawbacks mentioned above; all of this from a speaker that costs about $50.  If you enjoy listening to music instead of a pair of speakers, you cannot go wrong with these magic panels!

About the Designer:

Rich is a member of the Parts Express Speaker Building Team.

Projects Part List:

295-235 DAEX32U-4 Ultra 32mm 40W 4 Ohm 2
300-627 Dayton Audio SUB-800 8″ 80 Watt Powered Subwoofer – [optional] 1
266-276 Harrison Labs FMOD Inline Crossover Pair 150 Hz High Pass RCA – [optional] 1
100-020 Wired Home SKRL-14-50 14 AWG OFC Speaker Wire 50 ft – [optional]. 1
Project Panels 2 ft. x 2 ft. Project Panel-PP1 2
Wood or White “School” Glue 4oz 1
Foam paint roller 1
1-2 oz. Black ink 1

“Micro-B” 2.1 Plate Amplifier

$
0
0
img_0539 3_soldered amp_back_done braided_lines dsc03430 dsc03438b img_0316 img_0354 led_resistors

Designer:
TomZ

Project Category:
Amplifiers

Project Level:
Intermediate

Project Time:
1-8 Hours

Project Cost:
Under $100

Project Description:
This project is based on the Parts-Express 2.1 amp board, Part # 320-608. As I saw this on the website and observed it’s specs — 15 watts for each of the stereo channels, and 30 watts for the subwoofer section — I wondered if it would work as the amp in a very small plate amp. After getting some positive feedback from the folks on the Tech-Talk board, I decided to design and build it, hoping it would produce decent sound in a ‘micro’ form factor.
It is a true plate amp, although much smaller than any I’ve ever seen before… at 4″ square, and only a few inches deep, it will fit in almost any speaker you can imagine, but still deliver clear, powerful output to any small/medium 2.1 speaker system.

Design Goals:
I wanted this project to be able to fit into even the smallest of speakers, or a subwoofer, so it needed to be sturdy and airtight. I also wanted this amp to be able to play loud enough with most speakers to provide rewarding music quality, but to also be completely hidden out of the way.
Additionally, I wanted this project to be very good looking, so I used an aluminum plate as the foundation for this project and paid extra attention to the small details… and tried to come up with an attractive layout for the components as viewed from the rear. I also wanted to use all Parts-Express components if possible.

Enclosure Assembly:
There are a total of 8 components that need to fit on the aluminum plate, and the plate that Parts-Express sells comes pre-punched with two notched holes, so I had to get creative to work around and with those existing holes. After designing and building several prototypes, I came up with a design that allowed all the components to fit on the plate with enough space around them to operate correctly. The two knobs for the subwoofer volume and main volume are probably the closest, but can still be easily adjusted individually.
A PDF is available with full instructions as well as a template that you can tape to the aluminum plate, which when center-punched — will show exactly where to drill the holes for every component.
Each component is mounted with clear silicone to act as a sealant against air leaks, and the threads of each component are sealed with blue thread-locking compound to prevent them from loosening over time from vibration. I protected the aluminum plate from scratches with blue painters tape, and I cleaned the plate as I built it with alcohol and cotton swabs to keep the aluminum looking pristine and beautiful.

Tips & Tricks:
My first prototypes, and even the bare amp board seems to be susseptible to noise interference, especially in the bass, “.1″ section of the amp. Hooking up the potentiometer to adjust the subwoofer made the noise issues worse. Looking for a solution, I received some good advice from the knowledgeable folks at the Parts-Express Tech-Talk board on how to reduce/eliminate these issues. First, I braided both the input and subwoofer level lines that are soldered to the amp board. This reduces their ability to act like an antenna and helped tremendously with noise. Also, I changed the amp potentiometer from the more commonly used 50k audio taper type, to a 10k audio taper potentiometer, and this helped to reduce noise as well. In the end, I can still occasionally hear a tiny bit of noise at various volume levels on the sub section only, but only in between songs and only when my head is right next to the subwoofer. Basically, the noise issues have been fixed, thanks to some good advice. Still, this amp board will pick up a bit of noise occasionally from nearby electronics or power supplies, for example, so be aware of that.
Also, regarding construction, I’ve built 6 or 7 of these plate amps so far and have broken several of the power switches and melted a few of the 3.5 mm stereo input jacks, so I would strongly recommend that you purchase two of each of these, they are inexpensive and it would be a shame to be almost done building this project and not be able to finish because of waiting for a $2.00 part to arrive in the mail.
Actually, the biggest tip I can suggest is to follow the PDF of the directions closely — there are pictures that detail each step and make construction almost fool-proof. I follow these directions now for each one I build and have no issues whatsoever.

Conclusion:
After building several of these plate amps, I have found them to be good sounding, and forgiving of low impedence loads. The specs suggest 8 ohm loads for both the stereo section as well as the subwoofer, but even with prolonged use at high volumes, I have found this amp board to run fine and cool with 4 ohm loads as long as the voltage stays at 16 volts. Using the maximum recommended 18 volts input may cause problems and I haven’t tested the board with anything higher than 16 volts, so I’m recommended you stick with 16 volts as the max.
In testing, I’ve used this amp to power anything from a set of Quark’s, to Neo Nano’s to Overnight Sensations, to even a larger set of D-3’s… and subs from the Voxel subwoofer to a larger Titanic MK2 subwoofer, and it had no problems or issues running any of these. Of course, because of the highish crossover frequency for the lowpass subwoofer section, smaller subwoofers will probably sound better; I’d suggest no larger than 5-6 inches or so, unless facing down — where upper-bass leakage will be less noticeable.
If you can follow the detailed directions and have 2-3 hours of free time and feel like building your very own 2.1 plate amp, this project will stealthily power a set of small to medium sized speakers and a small subwoofer very nicely, and you will have the satisfaction of knowing that you built it yourself.

About the Designer:
I’ve been interested in quality sound and building speakers
since childhood, starting when my father and I gutted the
speakers from an old stereo console unit and mounted them
in a few old wood boxes. Since then, I’ve built dozens of
speakers, subwoofers—and more recently—a few amplifiers.
I find it enjoyable to push myself to learn new things and
design and build ever more challenging projects!

Project Parts List:

2.1 Hi-Fi Class D Audio Amplifier Board 2x15W + 30W 10-18 VDC
Dayton Audio SBPP-BK Binding Post Plate Black Anodized
2.5mm Metal Panel Mount DC Jack
3.5mm Stereo Panel Mount Jack
SPST Mini Toggle Switch with Tapered Knob
Parts Express Dual Binding Post 1 Red 1 Black
10K Audio Taper Potentiometer 1/4″ Shaft
Super Bright Blue 5mm LED 3000 mcd 10 Piece Kit with Voltage Dropping Resistors
Marshall Type Guitar / Amplifier Knob – Gold
Consolidated Stranded 24 AWG Hook-Up Wire 25 ft. Black UL Rated
Consolidated Stranded 24 AWG Hook-Up Wire 25 ft. Red UL Rated
Consolidated Stranded 24 AWG Hook-Up Wire 25 ft. Green UL Rated
Consolidated Stranded 24 AWG Hook-Up Wire 25 ft. White UL Rated
Consolidated Stranded 24 AWG Hook-Up Wire 25 ft. Blue UL Rated
Consolidated Stranded 24 AWG Hook-Up Wire 25 ft. Yellow UL Rated
SC Wire 18 AWG Red/Black Zip Power Speaker Wire 1 ft. USA
NTE Heat Shrink Tubing 2:1 Black Assorted Sizes 4″ 28 Pcs.

Artisan

$
0
0
front direct rear

Designer:
Jared

Project Category:
Bookshelf Speakers

Project Level:
Beginner

Project Time:
8-20 Hours

Project Cost:
$100 – $500

Project Description:
Dual 4″ midrange drivers with 1″ fabric dome tweeters; ported

Design Goals:
I wanted to build a pair of speakers that would look good in a loft apartment or something like than. Something very very simple with clean lines, a touch or modern, a touch of rustic. I decided on two tone and Kevlar drivers. I HATE visible screws and hardware. I think it makes stuff look cheap. So I knew I wanted the drivers to be mounted from the rear, and once I got the wood cut I decided I was NOT going to use any screws, etc. on the rear either. If you’re really nice, I will explain how the speakers are held together. It’s not glue, it’s not magnets, and it’s not sheer determination. But they are sealed up fantastically and completely serviceable. In fact, I already replaced the crossovers inside with better components. I also ported the rear panels and recessed some binding posts for banana plugs. Find ‘lil sub’ for the matching sub I made later.

Driver Selection:
Stolen from Micca MB42Cs.

Enclosure Design:
Ported, about .25 cu ft. Acacia front panels, pine sides and rear.

Enclosure Assembly:
Ported, about .25 cu ft. Acacia front panels, pine sides and rear.

Crossover Design:
Stolen from original enclosures but upgraded.

Tips & Tricks:
Patience. Problem solve. Be creative. Let design limitations inspire not just solutions, but improvements.

Conclusion:
Flat response. Excellent sound – better than expected. I will probably upgrade the tweeters with Vifas from PE soon. I have a suspicion that will improve the already excellent sound. Played these through my tube amp after listening to them on my solid state amp for a while and I am almost certain Johnny Cash came in the room, switched off my stereo, and performed a few songs for me.

About the Designer:
I like taking on a project a couple of times a year – indoor shutters, guitar amp, office desk, bedroom bench, etc. I have built a few speakers before but they never turned out this nice. I was too cheap and too hasty in my youth. I like the design elements that emerge due to apparent limitations and trying to keep the design as simple as possible.

Mardi Gras Rockin’

$
0
0
Rockin it

Designer:
Michael Alline

Project Category:
Loudspeakers/Cabinets

Project Level:
Intermediate

Project Time:
8-20 Hours

Project Cost:
$500 – $1,000

Project Description:
I needed heavy duty speakers for Mardi Gras parties.

Design Goals:
Speakers that won’t explode when cranked.

Driver Selection:
I used Matt Phillips “Rockin’ it Old School” drivers, enclosure, and crossovers.

Enclosure Assembly:
Painted the boxes with RattleBomb metallic automotive paint from rothmetalflake.com.

Tips & Tricks:
Search the Parts Express website for Rockin it old school for everything you need

Conclusion:
These are loud but detailed wonderful sounding speakers!

About the Designer:
I’m basically a woodworker. These are easy to assemble.

E-Array

$
0
0
DSC_1350 crossover_schematic fr_individual front_projection side_projection system_fr system_impedance tweeter_wiring wiring_mids woofer_wiring
Designer:
R-Carpenter

Project Category:
Tower Speakers

Project Level:
Advanced

Project Time:
20+ Hours

Project Cost:
$500 – $1,000

Project Description:
Mid sized line array with improved realism vertical image, low distortions and high power handling.
Bass response projected to 80hz.
Relatively small budget for line array, using low distortion buyout Fountek drivers within desirable passband.

Design Goals:
Affordable Line Array sound in a small package.

Driver Selection:
Tweeter

Midrange

Woofer

Enclosure Design:
Sealed enclosure for both midrange and woofer sections. Multiple bracing is highly recommended.
Drawings are for 3/4” thick material.

Enclosure Assembly:
Box assembly.
Section, housing midrange drivers and the tweeters can be assembled separate. This is really up to the builder. One requirement to both, lower and upper compartment is extensive bracing. Because the upper section is fairly tall, it will produce standing wave. To negate the effect, it is recommended to use 5” or so of Rock-wool or Owen’s corning on the top and bottom of the midrange cabinet. The rest of the chamber can be filled with either Acustastuff (sold by Parts Express) or fiberglass if you don’t mind handling it. Woofer chamber also needs to be stuffed with Acustastuff or fiberglass.

Crossover Design:
Crossover design is fairly straightforward. Tweeter array is represented by a single T1 driver as well as midrange array is represented by M1 driver and woofers, by W1. This is done so the crossover CAD screen is not cluttered with 16 drivers.
Wiring the array.
Tweeters.
Tweeters are numbered from the top to the bottom. Top tweeter is #1 and lower tweeter subsequently numbered #5. Tweeters #1,#2, #4 and #5 are wired in series to each other. This quartet is wired parallel to the center tweeter #3.
Midrange drivers.
There’s total of 9 drivers. They are wired in 3/series parallel so the final impedance is equal to a single driver. Easiest way to connect the drivers correctly is to lay out 3 groups of 3 drivers. Solder series connections in each group of 3 and then connect 3 groups, parallel.
Woofers.
Woofers are wired parallel to each other.

Tips & Tricks:
The heart of the system is Fountek’s FE87 2-1/2″ full range driver. By itself it has a fairly low sensitivity, limited x-max and limited low end response. The midrange, lower treble are however very extended and the driver even deeps in to upper bass. This extremely wide pass-band lands it perfectly for a line array where it will used in multiples and low sensitivity will not be an issue any longer. Wide response also allows it to be used with low crossed woofers on the bottom and small tweeter to extend the response cleanly all the way to 20khz and makes the crossover network easier to design.
7” Dayton Aluminum woofers were chosen to reinforce bottom end. Positioning them close to the floor will somewhat negate the need for baffle step compensation and using a pair will increase sensitivity and decrease distortions. This will also allow for the form factor of a speaker to remain a slim tower. Sealed alignment, in my opinion is preferred from the various points of view. For starters, it is the volume and appearance of the box. Secondly, ported design for this woofers will entertain the situation where the drivers will quickly overextend below port tuning frequency and may introduce distortions. Sealed response in to 80 hz on the integration hand, makes the use of the dedicated low crossed powered subwoofer easy.
Finally to the tweeters.
It’s a small dome with the neo motor. Using 5 tweeters in the array configuration may invite itself for shading the tweeters and altering vertical image of the speaker.

Wiring the array.
Tweeters.
Tweeters are numbered from the top to the bottom. Top tweeter is #1 and lower tweeter subsequently numbered #5. Tweeters #1,#2, #4 and #5 are wired in series to each other. This quartet is wired parallel to the center tweeter #3.
Midrange drivers.
There’s total of 9 drivers. They are wired in 3/series parallel so the final impedance is equal to a single driver. Easiest way to connect the drivers correctly is to lay out 3 groups of 3 drivers. Solder series connections in each group of 3 and then connect 3 groups, parralel.
Woofers.
Woofers are wired parallel to each other.

Box assembly.
Section, housing midrange drivers and the tweeters can be assembled separate. This is really up to the builder. One requirement to both, lower and upper compartment is extensive bracing. Because the upper section is fairly tall, it will produce standing wave. To negate the effect, it is recommended to use 5” or so of Rock-wool or Owen’s corning on the top and bottom of the midrange cabinet. The rest of the chamber can be filled with either Acustastuff (sold by Parts Express) or fiberglass if you don’t mind handling it. Woofer chamber also needs to be stuffed with Acustastuff or fiberglass.

Experiment with the R10 to your own preferences. I ended up using 10Ohm value in a fairly reverberant space. This lowered output of the midrange array by about 3.5 db.

Conclusion:
The system is up for a reviews by enthusiasts and will be shown on the upcoming NY/NJ DIY speaker fest.

About the Designer:
Roman Erlikh is a professional furniture maker and a speaker builder.
Roman also hosts NY/NJ DIY Speaker fest in Brooklyn Navy Yard.


Project Parts List

Dayton Audio ND16FA-6 5/8″ Neodymium Dome Tweeter
Fountek FE87 2″ Full Range Driver 8 Ohm
Dayton Audio DA175-8 7″ Aluminum Cone Woofer
Acousta-Stuf Polyfill Speaker Cabinet Damping Material 5 lb. Bag
Audyn Cap Q4 3.9uF 400V MKP Metalized Polypropylene Foil Crossover Capacitor
Audyn Cap Q4 82uF 400V MKP Metalized Polypropylene Foil Crossover Capacitor
Dayton Audio DMPC-5.1 5.1uF 250V Polypropylene Capacitor
Dayton Audio DMPC-27 27uF 250V Polypropylene Capacitor
ERSE Super Q 3.0mH 16 AWG 500W Inductor Crossover Coil
ERSE 0.20mH 18 AWG Perfect Layer Inductor Crossover Coil
ERSE 0.33mH 18 AWG Perfect Layer Inductor Crossover Coil
ERSE 10mH 18 AWG I Core Inductor Crossover Coil
5.6 Ohm 10W Resistor Wire Wound 5% Tolerance
12 Ohm 10W Resistor Wire Wound 5% Tolerance
3 Ohm 10W Resistor Wire Wound 5% Tolerance

Small 2.1 system with Smith-horns

$
0
0
img_0273 IMG_0256 IMG_0251 IMG_0237 IMG_0226 IMG_0215

Designer:
Mike MacIsaac

Project Category:
Freestyle Speakers

Project Level:
Beginner

Project Time:
8-20 Hours

Project Cost:
$100 – $500

Project Description:
This is a unique “2.1” system inspired by the classic JBL 2397 “Smith Horn”. It cost less than $200, perhaps $125 in parts and maybe $75 for the wood (NOTE TO EDITORS) – need to work on getting pictures – will save for now…

Design Goals:
A small inexpensive 2.1 system, with a unique look. The shape of the Smith horns was copied for the subwoofer enclosure.

Driver Selection:
Two inexpensive full-range drivers. The Fountek FE87 was a good fit. One inexpensive subwoofer and amp. The HP-5210 5-1/4″ woofer and Dayton Audio SA25 25W seemed to also be a good fit.

Enclosure Design:
This was my first build, so I’m new at this. I tried to work the numbers and came up with 242 sq-in for the drivers and 345 sq-in for the subwoofer. I went with a cube for the drivers that ended up just under 7″, and the subwoofer also ended about 7″ tall.

Enclosure Assembly:
The driver cubes are 3/4″ x 3/4″ maple with 1/5″ plywood. The Smith horns are 1/2″ maple plywood with two 1/8″ bent maple strips glued to the front. The subwoofer is 3 pieces of 1/5″ plywood laminated together (many slots cut in the back of each to get the flexibility to bend). To try something different, I finished it with shellac. Not sure I’ll do that again, rather, go back to natural stain and 3 coats of polyurethane.

Crossover Design:
The only crossover is the low-pass built into the subwoofer amplifier.

Tips & Tricks:
Bending and gluing the plywood for the subwoofer enclosure was tricky. In the end having many cuts, maybe 3/8″ apart more than half way through the plywood allowed it to be bent with ease.

Conclusion:
For all the woodwork necessary, maybe I should have paid more for higher quality parts. But the sound is really nice, and that’s what counts.

About the Designer:
Newby speaker designer/builder, intermediate woodworker. Bringing the two together has been rewarding


Project Parts List

Lepai LP-2020A+ Tripath Class-T Hi-Fi Audio Mini Amplifier with Power Supply
Fountek FE87 2″ Full Range Driver 8 Ohm
Dayton Audio SA25 25W Subwoofer Plate Amplifier
HP-5210 5-1/4″ Poly Cone Rubber Surround Woofer 8 Ohm

You will also need some inexpensive spiked feet…

Viewing all 739 articles
Browse latest View live


<script src="https://jsc.adskeeper.com/r/s/rssing.com.1596347.js" async> </script>