Quantcast
Channel: Parts Express Project Gallery
Viewing all 739 articles
Browse latest View live

Concrete Blocks

$
0
0
dsc_0104 dsc_0105 dsc_0107

Designer:
Ben Gravell

Project Category:
Bookshelf Speakers

Project Level:
Beginner

Project Time:
1-8 Hours

Project Cost:
Under $100

Project Description:
For anyone looking for a simple, easy, and cheap speaker project that looks unique and sounds great, I present to you the Concrete Blocks! Suitable for beginners and apartment-dwellers or anyone looking for a quick single-weekend project.

Design Goals:
This project had multiple goals:
1) Sound nice, so that music, movies, and games can be enjoyed more fully using them
2) Be suitable for apartment use. This ruled out high sound pressure levels and deep bass, which actually complemented the other goals
3) Be easily fabricated by anyone with only a small set of tools
4) Look aesthetically pleasing and unique

Driver Selection:
The HiVi B3N 3″ Aluminum Driver Round Frame Part # 297-428 was chosen for its low price, great wide-range frequency response, and modern minimalist appearance. This driver is a long-time Parts Express favorite and staple, which made it an easy pick.
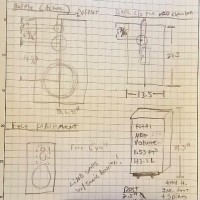
Enclosure Design:
The enclosure was designed to be as easy to fabricate as possible, without the need for large shop tools for extensive woodworking. To that end, the bulk of the enclosure was made of a concrete block with nominal dimensions of 8″ by 8″ by 8″ which can be purchased at virtually any hardware/home improvement store for about 1.00 USD. To complete the enclosure, solid wood front and rear baffles were used. These were made from a simple straight rip cuts on a nominal 3/4″ by 8″ by 6′ white pine board. The front baffles were then given 2.875″ diameter holes by cutting along a pencil-traced path with a jigsaw – this gave admittedly messy and imprecise results, but front-mounting the driver hid this. Better results could have been obtained by using a hole saw, but as long as the driver fit through the hole and the speaker-mounting screws had enough material to thread into, it had no negative effects. Holes were also drilled for thru-bolts and for the rear wire terminals. Four thru-bolts of 3/8″ diameter and 10″ length were used on each enclosure to hold the front and rear to the concrete enclosure, effectively functioning as a giant clamp. Standard 3/8″ washers were used on the front and rear faces of each bolt and nut, as well as split-washers on the rear to provide extra fastener security.

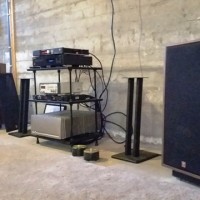
From an acoustic standpoint, the near-cubical internal dimensions were not optimal and likely create an undesirable ‘bump’ in the frequency response in the 100Hz-200Hz midbass range. However, in my application I was able to mitigate this by the use of EQ – even the extremely low-priced Kinter MA-170 I obtained had a nice bass cut/boost control centered at 100 Hz which was able to tame excessive boominess, which was not as significant as I had feared it would be.

Enclosure Assembly:
With the boards fully cut, the drivers were front-mounted to the front baffles using #6-32×0.75″ pan-head wood screws. The wire terminals were similarly fastened to the rear baffles. For ease of potential disassembly in the future, 8″ wire leads were soldered to both the speaker tabs and the wire terminal tabs, then spliced together using standard screw-type wire connectors. Final assembly of the enclosure was extremely simple. After adding a gasket of closed-cell weatherstripping around each baffle’s perimeter, all it took was to align the front and rear baffles on the concrete faces and hand-tighten the thru-bolts, then to come back around and fully tighten until the split-washers were fully compressed. Rubber feet were also added to the bottom of the concrete blocks to avoid marring the surface of whatever the speakers sit on.
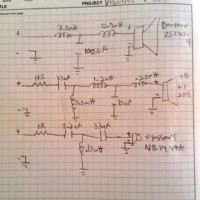
Crossover Design:
A crossover was not included in this design for two reasons: 1) simplicity and 2) in my application the speakers are run completely full-range at low power only.

Tips & Tricks:
The tension in the thru-bolts combined with the high coefficient of friction between the concrete faces and the front/rear baffles will be more than sufficient for restricting lateral (up-down and left-right) movement of the baffles, so internal battens/alignment blocks would have been redundant.
The diameter of the thru-bolts does not matter, but I could only find bolts in the 10″ length as small as 3/8″ which drives the cost up a bit. Hex or carriage bolts would work, but I chose hex bolts as an aesthetic preference. If you have a proper tool to cut metal, you could buy a cheaper long length of threaded rod and cut it to size.
If you had access to a tool for creating chamfers, you could chamfer away the inside edge of the speaker hole to promote airflow. I found that even without this step the speaker functioned well and mid-bass response did not suffer.

Conclusion:
For an investment of $50 and a half-day’s time, I was able to fabricate a pair of speakers capable of exciting, pleasant sound and striking yet understated visual appearances using only simple set of tools. It was a great starter project that I hope inspires others to jump into the world of speaker design and construction!

About the Designer:
Ben Gravell is an engineer who loves enjoying music, the outdoors, and electro-mechanical curiosities of all sorts.

Project Parts List:

HiVi B3N 3″ Aluminum Driver Round Frame
Two Conductor Speaker Wire Spring Terminal
JSC Wire 18 AWG Red/Black Zip Power Speaker Wire 1 ft. USA
Concrete Blocks

Tacklebox Tunebox

$
0
0
wp_20171020_003 wp_20171020_008 wp_20171020_009 wp_20171020_012 wp_20171020_014

Designer:
Matt Hickey

Project Category:
Home Electronics

Project Level:
Intermediate

Project Time:
8-20 Hours

Project Cost:
$100 – $500

Project Description:
Turned a old Plano tackle box into a portable music player for my Nephew Jack. Battery lasts for days and stores a bunch of tackle.

Design Goals:
Fun, portable and functional tackle box that plays tunes. Support Bluetooth, SD and FM radio.

Driver Selection:
Quam 30C25Z8OT 3″ Moisture Resistant Speaker 8 Ohm
Part # 244-3222

Enclosure Design:
Plano Tackebox

Enclosure Assembly:
Cut front holes for speaker and MP3 module with Dremel. Mounted Amp center with custom volume knob. Built simple enclosure out of acrylic sheets to protect components

Crossover Design:
Single mono water resistant driver

Tips & Tricks:
-Get everything wired and working during mock up.
-Cutting and drilling the acrylic for the bottom enclosure was a major pain and I cracked a few sheets.
-Cut the head off a lure to make a custom volume knob.

Conclusion:
Sound is decent especially with box closed. Had to sacrifice some space in bottom tray but top is fully functional. Nephew loved it.

About the Designer:
Maker and Software Sales Engineer

Project Parts List:

Low Voltage Mono Audio Amplifier Board NJM386D LM386 – Ideal for Battery Operation
12 VDC Bluetooth 4.0 FM Radio MP3 WAV FLAC Audio Preamp Board with Function Cables and Remote
Quam 30C25Z8OT 3″ Moisture Resistant Speaker 8 Ohm

Synergy Horn

$
0
0
01_front_v 31_sy_xo_schem 32_sy_fr_with_drivers 33_sy_impd 41_plan1 42_plan2 43_plan3 44_plan4 45_plan5

Designer:
John H

Project Category:
Freestyle Speakers

Project Level:
Advanced

Project Time:
20+ Hours

Project Cost:
$100 – $500

Project Description:
This project makes a Multiple Entry Horn (MEH) similar to a Synergy Horn. The horn design is for full range home audio use. Efficiency is about 86 dB at 2.83 V rms.

Design Goals:
The design goal was to make a compact MEH that would be comparable with high quality home audio speakers. The design goal meant that only a single midrange driver was required to meet home volume levels, the woofers needed to perform in the 30Hz range in a small enclosure, and the tweeter needed to perform better than a compression driver used in many horn designs.

Driver Selection:
After testing some tweeters in the horn model, the Tymphany XT25TG30-04 1″ Dual Ring Radiator Tweeter was chosen. The horn gain allowed the tweeter to be crossed with lower than expected distortion.

The horn simulations called for a midrange that would work well from 400 Hz to 1,500 Hz. The SPL requirement needed to be above 87 dB at 2.83 V rms for flexibility in the crossover design. The GRS 4FR-8 Full-Range 4-1/2″ speaker was chosen because it met the SPL requirements and could be mounted on its face without the surround hitting the cabinet while playing. The GRS also fit inside a 4 -inch diameter PVC pipe making for a simple midrange enclosure.

The woofers are a pair of Dayton Audio DCS165-4 6-1/2″ Classic Subwoofers. They perform well in a smaller volume and have reasonable sensitivity.

Enclosure Design:
The enclosure design is a stand mount cabinet with a 60 x 90-degree conical horn. The horn is about 6.7 inches deep. The horn is designed to maintain pattern control to 400 Hz. The internal cabinet volume is 20 liters for the woofers. The box tuning is at 38 Hz with an F3 of 36 Hz.

The enclosure is designed for all the drivers and ports to be within the horn mouth. It was found that a square opening for the tweeter performed just as well as a round transition opening.

There are chamber resonances associated with the midrange and woofer driver openings into the horn mouth. To simplify the construction the driver openings size and locations were adjusted such that only straight holes are required in the ½ inch MDF.

The woofer ports are made from 2-inch PVC pipe.

Enclosure Assembly:
The enclosure assembly is straight forward except for creating the side panels for the horn. The drawings include a plan for jigs to cut out the side panels. Note that the side panels are all the same and 4 are needed.

The enclosure consists of four parts; the rectangular cabinet, midrange enclosure, the horn, and the face frame.

Start by assembling the midrange enclosures. Cut 2.5 inch lengths of PVC pipe and glue to the back of the GRS drivers. Test fit the midrange enclosure, angle mounting brackets and the port PVC mounting blocks on the top horn panel. Assemble the horn. Assemble the face frame. Assemble the cabinet and port.

Final Assembly consists of Installing woofers and midrange. Use a drop of wood glue on the threads to hold the nuts in place. Cut the tweeter flange to center the tweeter in the opening. Add foam gasket to the tweeter opening and mount the tweeter. Install about 1/3 lb. of Acousta-Stuf insulation in the upper half of the cabinet.

Crossover Design:
The crossover was designed for flat frequency response with a minimum number of components. The crossover points were determined as a result of the high frequency roll off of the midrange and woofer performance in the horn. The tweeter to mid crossover is at 1,300 Hz. The mid to woofer crossover is at 400 Hz. The slopes are Linkwitz Riley 4th order. In the woofer circuit two 15 ohm resistors are wired in parallel for increased power handling.

Tips & Tricks:
Play with the speaker toe-in to get the imaging correct

Conclusion:
At first it seemed like a lot of work for minimal benefit. Now I’m sold on the inherent clarity of the Synergy MEH horn. The clarity is likely because of the lower midrange distortion or the controlled directivity in the room.

About the Designer:
John is a member of the Parts Express design team

Project Parts List:

Dayton Audio DCS165-4 6-1/2″ Classic Subwoofer 4 Ohm
GRS 4FR-8 Full-Range 4-1/2″ Speaker Pioneer Type A11EC80-02F 8 Ohm
Peerless by Tymphany XT25TG30-04 1″ Dual Ring Radiator Tweeter
Dayton Audio DNR-30 30 Ohm 10W Precision Audio Grade Resistor
Dayton Audio DNR-3.0 3 Ohm 10W Precision Audio Grade Resistor
Dayton Audio DNR-2.4 2.4 Ohm 10W Precision Audio Grade Resistor
Dayton Audio DNR-7.5 7.5 Ohm 10W Precision Audio Grade Resistor
15 Ohm 10W Resistor Wire Wound 5% Tolerance
Dayton Audio PMPC-2.0 2.0uF 250V Precision Audio Capacitor
Audyn Cap Q4 12uF 400V MKP Foil Capacitor
Audyn Cap Q4 15uF 400V MKP Metalized Polypropylene Foil Crossover Capacitor
Dayton Audio DMPC-20 20uF 250V Polypropylene Capacitor
Dayton Audio DMPC-25 25uF 250V Polypropylene Capacitor
125uF 100V Electrolytic Non-Polarized Crossover Capacitor
Dayton Audio 0.15mH 20 AWG Air Core Inductor Crossover Coil
Dayton Audio 0.80mH 18 AWG Perfect Layer Inductor Crossover Coil
ERSE 5.5mH 18 AWG I Core Inductor Crossover Coil

Tang Band 6.5 ported @ 35hz

$
0
0
photo_nov_01_7_10_27_pm photo_nov_01_11_02_29_am photo_oct_23_12_23_27_pm photo_oct_25_11_07_44_am photo_oct_25_11_08_02_am photo_oct_26_6_23_06_pm

Designer:
GregM

Project Category:
Subwoofers

Project Level:
Beginner

Project Time:
8-20 Hours

Project Cost:
Under $100

Project Description:
I will list a full description here, sorry if it is redundant with other fields below:

I had some ¾ Baltic birch left over from another speaker project, so decided to make a small sub to compliment my small room/computer musical setup. I have the Audioengine A2s. I used the Tang Band W6-1139SIF 6-1/2″ Paper Cone Subwoofer Speaker with the Dayton Audio SA25 25W Subwoofer Plate Amplifier. I built a ported box tuned to 35hz, with dimensions of 9.375 x 14 x 9.75 (in). The port diameter was 2ID x 17.9. The PVC made 2 90 degree bends to allow for ~2.5 inch clearance where the air enters the port, and for the PVC to not hit anything (subwoofer, amp, walls, etc). I stuff some polyfill along the walls between the PVC for dampening but didn’t add too much. Originally the PVC called for about 14.5 inches to be tuned to 35hz, but after considering the displacement of the amp, and subwoofer and the small piece of wood to attach the PVC to, it became slightly longer.
I was inspired by the Cerberus that is all over the DIY forums but I felt I could do better as far as eliminating the chuffing (he used 1.5 diameter vs my 2). I also used a homemade method of flaring the baffle end of the port by basically sanding the opening for what seemed like forever (but I had a lot of time for this project). I used a less powerful amp than for the Cerberus, so perhaps it isn’t pushed as well or as loud, but the results are impressive. I might buy the 70w Dayton plate amp, but I got the 25w one I’m using refurbished for 20 dollars. It isn’t working correctly (cutting on an off randomly) but it allowed me to hear pretty well that this was a good idea to build. I hear chuffing on the loudest volume before distortion on the lowest music/movie content I have. If I back off a bit it is fine.
I finished the outside of the box by counter sinking the 2.5 inch screws, then filling the holes with a mixture of sawdust from my cuts and wood glue. I then sanded these down flush. Then I by sanded the entire box extensively first with an 80, then 150, then 200 grit sandpaper. I then used two cans of primer, with sandings of 200 then 400 grit sandpaper. My last coat of primer was then sanded with 400 grit. I then emptied half a can of flat black on it, then sanded with 800 grit. After that I used an entire can of 2X rustoleum semi gloss on the box. I used 800 grit for the first coat, then none after that. It came out well, not perfect but good. Perhaps for a paint job like that I should’ve used MDF, but I used left over Baltic birch, so it felt free.
I hope this can be an inspiration for others. Perhaps I could’ve flared the port opening more to eliminate chuffing at high volume, but also perhaps the weak amp is making the woofer move too rapidly, maybe subsonic content is causing it, or maybe the 6.5 tang is almost impossible to port without chuffing because a 3 inch diameter port would never work in a box that small. I feel that the tradeoffs for this build are worth it. The 25 watt amp would’ve worked fine, but as I said it’s defective, cutting on an off often. Parts express gave me a refund, so I’m going to likely buy the 70 watt Dayton plate amp soon.

Design Goals:
To make a musical sub with medium output potential for a small 2.1 system used in my bedroom with my laptop, and mp3 players.

Driver Selection:
6.5 inch sub (see parts list)

Crossover Design:
Set in plate amp

Conclusion:
I am very happy with the build, and the results (visually and musically). I think I will put in the dayton 70 watt plate amp soon, and will update afterwards. But the 25w one (when it was working decently) worked well.

About the Designer:
I started making boxes a few years ago for my car and home with 6.5 up to 12 inch subs. Most boxes have been sealed but lately I’ve built ones ported.

Project Parts List:

Tang Band W6-1139SIF 6-1/2″ Paper Cone Subwoofer Speaker
Dayton Audio SA25 25W Subwoofer Plate Amplifier

2X4 foot 3/4 inch Baltic Birch from Home Depot.
2 foot long, 2 inch diameter PVC
2 90 degree bend connector PVC
2.5 inch wood screws.
Wood glue
Caulk
Primer+semi gloss spray paint.
80, 150, 200, 400, and 800 grit sandpaper

Overnight Sensation // Tonewood

$
0
0
img_1582 img_1601 img_1608

Designer:
Tonewood

Project Category:
Bookshelf Speakers

Project Level:
Beginner

Project Time:
20+ Hours

Project Cost:
$100 – $500

Project Description:
This is pretty straight forward, for more information about the Overnight Sensations go to Paul Carmody’s blog.
I made everything out of MDF, exept for the baffle which is made out of padauk that I had laying around from my previous build.

Design Goals:
– Make a pair of Overnight Sensations. Check.
– Make them stand out. Check.

Driver Selection:
HiVi B4S
Dayton ND20FA-6

Enclosure Assembly:
Woodglue all the way!dayton

Crossover Design:
By Paul Carmody

I’m not that good at crossovers yet.

Thanks Paul

Tips & Tricks:
Seal the mdf edges with woodglue mixed with water before painting!

Conclusion:
They sure sound amazing!

About the Designer:
Since I’ve build my first speaker about a year ago I’m hooked!
I found my passion and I continue to build more speakers to improve and learn as much as possible!
I’m working hard because I love it, I’m hoping to build speakers for customers in the future and start my own little business!

Project Parts List:

Dayton Audio DNR-10 10 Ohm 10W Precision Audio Grade Resistor
Dayton Audio DNR-6.0 6 Ohm 10W Precision Audio Grade Resistor
Dayton Audio DMPC-0.22 0.22uF 250V Polypropylene Capacitor
Dayton Audio DMPC-1.5 1.5uF 250V Polypropylene Capacitor
Dayton Audio DMPC-2.2 2.2uF 250V Polypropylene Capacitor
Dayton Audio DMPC-6.8 6.8uF 250V Polypropylene Capacitor
Jantzen Audio 0.35mH 20 AWG Air Core Inductor Crossover Coil
Jantzen Audio 1.1mH 18 AWG Air Core Inductor Crossover Coil
Parts Express Speaker Cabinet Port Tube 1-3/8″ ID Adjustable
Dayton Audio ND20FA-6 3/4″ Soft Dome Neodymium Tweeter
HiVi B4N 4″ Aluminum Midbass Round Frame

The Vegatrons

$
0
0
? ? ? ? ? ? ? 46 plan6 47 plan7 48 plan8 49 plan75 50 plan85 20171127_110319 1 2

Designer:
mzisserson

Project Category:
Tower Speakers

Project Level:
Intermediate

Project Time:
20+ Hours

Project Cost:
$500 – $1,000

Project Description:
The Vegatrons are an amalgam between a 1985 vintage Radio Shack “Optimus-45” 10” 3-way with an open back midrange, a 1994 vintage Cerwin Vega DX-5 12” 3-way, modern speaker drivers, modern crossover and design technique, and they are wrapped up in an old-school, stealth-like package. When put in place the Vegatrons will look like original Cerwin Vega DX- 5 loudspeakers which have been weathered with time, however when the play button is pressed, an updated 10” 3-way with a u-baffle midrange will sing truly making this retro-fit more than meets the eye!

Design Goals:
In 1993 a 13 year-old boy from “The Ocean State” began a long-lasting love affair with music. For a number of years, this young man listened to a great deal of music through a pair of Radio Shack “Optimus-45” 10” 3-way loudspeakers which were handed down to him from his older brother who later would become a Lieutenant Commander in the US Navy. In short, this is basically how my loudspeaker journey began.
The “Optimus-45” sounded great! As time wore on, however, they faded to the background and when the woofers suffered their ultimate fate of rotting foam, the midranges were then slapped in a shoe-box that became my first center speaker for a pro-logic surround sound system. The “Optimus-45” was a classic example of a box-on-the-floor/monkey coffin loudspeaker that was anything but handsome. Yet with an open-back midrange and separate controls for the tweeter and midrange, it had its merits, and for its time very good fidelity.
A part of the goal is to capture some of what this loudspeaker use to do, which in my head now 25 years removed from last hearing them simply means: “Sound good.”
One of the loudspeakers I lusted over as a late-teen before discovering the world of “high-end” loudspeakers was the classic 1990’s big-box store monolithic loudspeaker: The Cerwin Vega DX-9. This 15” 3-way monkey coffin blew me out of the water at the time! I use to frequent the local, now defunct Circuit City with a hand-full of CDs just to listen to them in the off-chance the stereo guys would let me hang out for a while.
Perusing a local thrift store, there was an old, beat-up pair of the DX-9’s little brother, the DX-5 that was marked as “Not Tested” and had a price tag of $6.99 for the pair. I knew this was the moment I have been waiting for to pay homage to the old-school loudspeakers I loved so dearly but with a new-school, high performance twist!
The goal of the visual effect, with the full understanding that monkey-coffin loudspeakers will never have a high spousal acceptance factor, is to have the grills and cabinets preserved as the original loudspeaker appeared when buttoned-up. The Vegatrons will simply look like an old pair of Cerwin Vega DX-5’s. Remove the grills and this old-school dog’s breakfast will transform on command into a modern, high performance loudspeaker.
The final goal of the Vegatron build is to pull-in the spirit of loudspeaker design and DIY community. It was humble beginnings like mine where an early appreciation for great sound gave birth to many DIY Loudspeaker builders. Through this community, I received the midranges as a secret Santa gift from the Parts Express “Tech Talk” forum which ultimately is just one small representation of the unity this quirky hobby has. Finally, this community has shown incredible creativity, tenacity, and closeness over the years that I would like to represent in the essence of this design.

Driver Selection:
The heart and soul of the Vegatrons is the 3”, full-range Tang Band W3-2141. I received a pair of these from my 2016 Tech-Talk forum secret Santa during the 2016 holiday season. These lil’ guys tout an underhung motor, and a dual purpose phase that acts as a distortion lowering shorting path as well as a phase plug that extends frequency response. The W3-2141 also has impressive 87dB efficiency through its effective range and an 8 Ohm nominal rating. The underhung motor will also be a big distortion-reducing element. From underhung drivers I have worked with in the past, it seems this motor type typically has great transient performance, too.
To capitalize on the W3-2141 and to maximize dispersion, the Vifa NE19VTA ¾” soft some tweeter will carry the treble. This small, but advanced tweeter has remarkable texture and detail while maintaining low distortion and a smooth overall presentation. It is also fairly robust for a small tweeter and can cross lower than average if necessary.
Anchoring the whole system is the Dayton Audio 10” RS270-4 reference series woofer. This 4 ohm woofer is newer to the Reference series line-up. Dayton did a nice job controlling the top-end break-up modes of this woofer which allows for crossover flexibility, and while the breakup modes are still there, they are much less of a bother than on most other metal cone woofers. The reference series drivers are proven performers and they offer a balance of fidelity and value that approaches some of the well-known Scandinavian driver offerings.

Enclosure Design:
Since the Vegatrons are a retro-fit design, all of the enclosure constraints were dictated by the pre-existing Cerwin Vega DX-5 cabinets. After removing the woofers and seeing what I was up against for volume, I then chose a woofer that I felt would maximize fidelity with an ideally flat tuning when boundary reinforcement was considered.
I found it quite the challenge to optimize the volume of the enclosure while balancing all of the required bracing and a midrange chamber for the open back, “U-baffle” midrange. As with any ground-up enclosure design bracing, dampening, and absorbing needed to be used to assure detrimental internal reflections and external cabinet vibrations were controlled.
Since “reference” level fidelity was a major goal, it was also important that the vented alignment adhere as close as possible to a B4 (Butterworth, fourth order) alignment. In the case of a B4 alignment this means the port mass is equivalent to the driver’s moving mass so they ultimately have the same acoustic output through their working ranges generating a very uniform response.
While baffle reflections get some help with wool felt, there is little that can be done about the heavy diffraction from the cabinet as a result of the in-set baffle.
The open back, or U-Baffle midrange presents its own challenges, but was a necessary element of the Optimus 45 loudspeaker I wanted to capture. In order to use up the least amount of space inside the DX-5 enclosures, I needed the chamber to the back of the loudspeaker to be as small, rigid, yet self-dampening as feasibly possible from a DIY-er in their garage. The enclosure material came as a surprise while leaning on a fork-lift at work. Behind the driver’s seat was a roll of stretch-wrap used for wrapping items on pallets together for safe transport. The core of the stretch wrap is a high-density cardboard that is 3/8” thick with a 3” inner diameter. Perfect! A small ring of Acousta-stuff sits in the end of each midrange enclosure to aid with dampening.

Enclosure Assembly:
Start with a box. After “gutting” the DX-5’s of the rotted woofers, tweeters, sweet midranges I held on to, and baffle via jig saw and flush-trim router work, I was left with a ¾” thick, particle board box. Careful measurements were taken and spare dowels used as “go/no go” gauges to assure the inner dimensions were correct as this was ultimately going to be the dimensional requirements of the new baffle.
Using the old dado cut line from the original baffle as a guide, I created a frame from one inch square dowels so my new baffle could have a place to sit and glue-in. Since both the new and old baffle were ¾” material, everything would align properly allowing for the factory grills to be replaced and inset as they originally were.
Since the rear-baffle would have the same dimensions as the front, once I knew where the midrange would be, it was just a matter of measuring the same location on the rear and cutting a 3” hole with a hole saw. After cutting the cardboard tubing to length, I used my chop-saw set at a 22.5 degree angle to make slits in the cardboard which I then filled with silicone to further assist with dampening. Expanding polyurethane glue was employed assure any air-leaks were sealed attaching the tube to the baffle prior to install.
To keep the whole structure as rigid as possible, I pre-drilled screw-holes all the way around the baffle and into the supporting frame. I then glued the baffle to the frame and bracing, using the screws as both a decorative feature, and as clamps, since a straight glue-and-clamp would have been tricky due to the inset front and rear baffles.
A rasp took care of enlarging the existing port hole to fit the Parts Express 2.5” flared port which was conveniently located at the bottom-rear of the enclosure, and the original mid-range grills were used to cover the exit of the mid-range enclosure.
Lastly, I ordered some ¼” thick, dense wool felt to go over the midrange and tweeter cut-outs to aid with the control of baffle reflections and a few spikes to remind everyone that the Vegatrons are more than meets the eye!

Crossover Design:
The crossover of the Vegatrons was going to take a little more work than a standard 3-way to assure the drivers were properly matched to at least 30 degress off-axis utilizing the U-Baffle midrange. Also, with the proximity of the woofer to the floor, full baffle step compensation would not be required to achieve an acceptable response.
Unfortunately, when working with driver that can propagate their back-wave into the room, proximity to boundaries are more meaningful and a perfect simulation with on-axis measurements typically will not always produce the desired result. What is more important is the loudspeaker’s response within a given, factored space (spatial response) which in the Vegatron’s case is a window up to three feet on tweeter center from a side wall, and up to three and one half feet from the rear wall. Anywhere within this window, the Vegatrons will perform very well.
The aforementioned space the window covers seems to be where most speakers lie in most rooms. In order to maximize power response and prevent beaming from the rear of the mid-range chamber which can generate undesirable side-effects, the crossover points were selected by examination of far-field axial measurements out to 45 degrees off axis, and spatially averaged measurements within their desired window of use. Since the RS270-4 has a solid pass-band, I slung a good deal of the lower mid-range onto it which also helps relieve some of the acoustic demand off the 3” midrange. Further, it helped even out the off-axis response as the U-baffle midrange’s response turns more cardioid in nature at lower frequencies. When the dust settled, the legs and waist of this machine met a little less than 500Hz, though slightly asymmetrical.
Between the W3-2141 3” midrange and the NE19VTA 3/4” tweeter, the crossover was considered in similar fashion as the W3-2141 and the RS270. In order to minimize beaming out of the rear of the midrange enclosure, the crossover was kept low enough to stay well outside of the piston band response of the midrange, but high enough to assure no strain comes to the NE19, though this was quite easy since it is a very robust small format tweeter. The arms and head of the Vegatron machine meet symmetrically at 2800Hz.
The Vegatrons ran great on my 15 year old, “8 ohm” receiver so I am confident their impedance will not present an issue to just about anything despite them being a “4 ohm” speaker since the minimum impedance is 3.7 ohms and not reactive. They are relatively efficient, too, shaking out around 87dB 1W/1M, making them sing well with less watts. A high quality 25+ watt amplifier would easily make these come to life!

Tips & Tricks:
Built in to the above text!

Conclusion:
The Vegatrons are truly more than meets the eye! It was neat to design a “reference-level” loudspeaker into the shell of an old-school monkey-coffin. Best of all: Using the TB Speakers W3-2141 full-range drivers that were gifted to me by an unknown DIY-er via the Parts Express “Tech Talk” forum’s Secret Santa, making something old new again, getting creative, and paying homage to the loudspeakers of yore truly captures the essence and spirit of why I love to design and build loudspeakers.
Sonically they are wonderful; the presentation is very spacious and laid-back, though they are not missing resolution. The B4 cabinet alignment provides articulate bass that seamlessly integrates with the rest of the speaker, but does not have the typical “under-tuned port boom” making the sonic characteristic more akin to a sealed enclosure than what is typically expected of a vented one. A walk around the room provides very uniform sound with little sonic change. The flexibility of having a window they work well in helps make them less sensitive to placement, and I am flat-out bummed I will likely never build new cabinets for these relieving the in-set baffle to get rid of the measurable diffraction artifacts…Even if the derogatory sonic effect of these artifacts have been studied and are debatable.
I have gifted many of my designs away over the years; however these are going to be keepers for my personal speaker cache. So many elements came together for these they just have an undeniable cool-factor every time I look at, and listen to them. My final thought is simply a “thank you” to Parts Express for giving me the opportunity to continue to grow in this great hobby by selecting me as part of this year’s design team. Keep listening!

About the Designer:
Michael Zisserson is a member of the 2017 PEDT

Project Parts List:

Dayton Audio RS270-4 10″ Reference Woofer 4 Ohm
Peerless by Tymphany NE19VTS-04 3/4″ Silk Dome Tweeter
Dayton Audio DSS2-BC Black Chrome Speaker Spike Set 4 Pcs.
Penn-Elcom 9120 Rubber Cabinet Foot 0.88″ Dia. x 0.31″ H
Mini Gold Plated Insulated 5-Way Binding Post Set 2 Red 2 Black
Speaker Cabinet Port Tube 2-1/2″ ID x 8-1/2″ L Flared
Sonic Barrier 1/2″ Acoustic Sound Damping Foam with PSA 18″ x 24″

Small Cube 10” Band Pass (LS10-44)

$
0
0
pic1_front pic2_upside pic3 pic8 pic7 pic6 pic4 pic10 pic13 pic12 pic9 imp_260mm pic5

Designer:
HILO

Project Category:
Subwoofers

Project Level:
Advanced

Project Time:
8-20 Hours

Project Cost:
$100 – $500

Project Description:
Very compact (0.64cu ft.), flat frequency response and clean sound subwoofer design was successfully completed with 4th order band pass enclosure. The characteristic of band pass frequency response and DVC (Dual Voice Coil) Driver enables just add and parallel connection with current poor-bass stereo such as PC speaker systems. Dayton Audio LS10-44 10” unit fits for my compact enclosure design.

Design Goals:
I had an idea to built 2.1 channel desktop speaker system and sub woofer system for my car. I hate to hear the harmonics of subwoofer’s distorted sounds. So I decided to build band pass enclosure for this purpose. In car use requires some loudness to win the road noises. Deep bass and over 100dB maximum SPL with small enclosure is a final target of my project.

Driver Selection:
Choosing a unit which has a following features…
– Not so much expensive
– Durable
– Small basket space
– Over 10mm Excursion
– Can produce over 100dB SPL.
I simulated various units with “Basta!” software. Finally I decided to use Dayton Audio LS10-44 for this project.

Enclosure Design:
This encloser is my 3rd band pass box project. I used design software, which named “Basta!” by Tolvan Data. I put the parameters and submit the specs to cover the frequency range from 38Hz to 100+ Hz with allowing some ripples (within 3dB). Cut and try with small box volume design was reached to reasonable size for my placement space.
To built with small footprint, I tilt the unit inside of enclose.

Enclosure Assembly:
The most important thing of 4th band pass enclosure building is a perfect sealing and strong construction of front (vent) side. I used only 12mm thickness plywood, but I laminated FRP (Fiberglass Reinforced Plastic) inside of enclosure. As a result of this, total weight of this speaker system is only 9.4kg. (Includes LS10-44 weight 4.9kg) Dimensions are 11.8” x 11” x 12.5”. Flared Port is 56mm inside diameter with 260mm length PVC pipe.

Crossover Design:
Band pass enclosure has Hi-Cut features by itself. But there are port resonant peak will produced in mid-high frequency range. So I used with active channel divider for my 2.1 channel speaker system.

Tips & Tricks:
PVC pipe ends are flared to reduce the wind noise. The way to this modify end. Bake PVC pipe end and rotating it put on the bottleneck. This is easiest way to do this modification.

Conclusion:
The output sound is clear and pure fundamental of bass without harmonics. Even if the amplifier was clipped. Maybe most of users are hard to identify the presence of subwoofers. This characteristic will fits for 2.1chanell speaker system. Simply parallel connection to existing audio system will be an easiest way to challenge use of this subwoofer.

About the Designer:
I have been interested in DIY Car and Home Audio over 20 years. My hobby project activities are stated in my homepage. You can search and visit my homepage which named “CyberPit HILO”. (Sorry, most of my pages are in Japanese)

Project Parts List:

Dayton Audio LS10-44 10″ Low Profile Subwoofer Dual 4 Ohm

home speakers the hit

$
0
0
img_0834_1 img_0836 iphone_093 save

Designer:
rory crossland

Project Category:
Tower Speakers

Project Level:
Beginner

Project Time:
20+ Hours

Project Cost:
$100 – $500

Project Description:
Home speakers that are as loud as a Pro Audio but still sound great even on a 200 watt home stereo. But to get as loud as pro audio PA speakers do. you must have the wattage to push them as my pics show of the amp rack

Design Goals:
low cost, efficient even at low watts ie home stereo amp of 200 watts and the ability to drive with a pro audio amps a crown 2500 watt for subs and 1500 watt highs w/ dual 31 band EQ

Driver Selection:
295-032 Dayton Audio PA310-8 12″ Pro Woofer
290-525 Eminence ASD1001 1″ HF Titanium Horn Driver 1-3/8″-18 TPI
295-030 Dayton Audio PA255-8 10″ Pro Woofer
295-015 Dayton Audio PA165-8 6″ PA Driver Speaker

Enclosure Design:
sealed and rear loaded folded horn

Enclosure Assembly:

sealed and rear loaded folded horn

Crossover Design:
260-152
266-446
work fine for home stereo amp but couldn’t hang with the PA crown amps so i use the pro audio 31 band EQ pic doesn’t show the 31 band EQ it show a dbx but i switch it out for the easy to use 31 band EQ

Conclusion:
way better then expected had several musician and a sound engineer loved the way they cover all the frequencies

About the Designer:
just a nobody from nowhere

Project Parts List

Dayton Audio PA310-8 12″ Pro Woofer
Eminence ASD1001 1″ HF Titanium Horn Driver 1-3/8″-18 TPI
Dayton Audio PA255-8 10″ Pro Woofer
Dayton Audio PA165-8 6″ PA Driver Speaker
Dayton Audio XO3W-500/4K 3-Way Speaker Crossover 500/4,000 Hz
Parts Express 100 Hz Low Pass 8 Ohm Crossover

Prototype

$
0
0
img_3305 img_3319 img_3321 img_3311 img_3115 img_3288 img_3262 img_2982 img_2967 img_2899 img_2906 img_2989 img_3280 img_3285 img_28941

Designer:
GKT Designs Co.

Project Category:
Portable Speakers

Project Level:
Beginner

Project Time:
8-20 Hours

Project Cost:
$100 – $500

Project Description:
This project is roughly 24×5.75×5.75″. 2-4″ Dayton drivers, 2-1/2″ tweeters , 2-1″ ports, crossed at 3500.

Design Goals:
Like many others I wanted to see how much I could squeeze out of the boombox shape. I wanted good looks, great sound reproduction, and the flexibility to use it for everything. Portable, TV, Alexa, home stereo… One unit.

Driver Selection:
295-424 Dayton Audio DS115-8 4″ Designer Series Woofer

Enclosure Design:
The enclosure design is simple but, I wanted to keep things refined. A lot of portable/boombox projects I see tend to cut corners when it comes to the finishing and the the back. The box is made from poplar and using simple butt joints. The PE recommended internal vol is .09. I am real close to that once you factor in the displacement from the drivers and batteries.

Enclosure Assembly:
The box is made from poplar and using simple butt joints. glue, and screws on the rear panel. I used a simple black rubble handle from PE as well as 1″ rubber feet which I feel it the right look for this one.

Crossover Design:
Nothing special here. Pre made off of Amazon… 3500 cross point.

Tips & Tricks:
Slow down. Pre assemble everything you can. Then go back and do the finishing work. I hate making dings and dents on the final finish!

Conclusion:
This one turned out nice. I did have room for all my electronics for once! I now have my template to base all future builds off of.

About the Designer:
Lighting contractor by day. Maker of cool things via nights and weekends. Dallas, TX.

Project Parts List:

Dayton Audio DS115-8 4″ Designer Series Woofer Speaker
Goldwood GT-302 1/2″ Mylar Dome Tweeter
Dayton Audio KAB-250A 2x50W Class D Audio Amplifier Board with Bluetooth 4.0
Dayton Audio KAB-LED Red/Green/Blue LED Package for Bluetooth Amplifier Boards
Dayton Audio KAB-BE 18650 Battery Extension Board for Bluetooth Amplifier Boards
Dayton Audio KAB-AB L-type Aluminum Bracket for Bluetooth Amplifier Boards
Dayton Audio KAB-FC Function Cables Package for Bluetooth Amplifier Boards
SPST Square Push Button Switch Click On/Click Off
18650 2600mAh Li-Ion Flat Top Battery 3-Pack

MicroSat

$
0
0
img_8223 20170826_10.21.38 20170826_11.04.17 20170826_11.52.11 20170910_13.17.29 20170919_20.26.04 crossover_v2_distortion crossover_v2_measurement crossover_v2_schematic

Designer:
Wogg

Project Category:
Bookshelf Speakers

Project Level:
Intermediate

Project Time:
8-20 Hours

Project Cost:
Under $100

Project Description:
Compact 2 way satellite speakers for use with a subwoofer.

Design Goals:
The primary goal for this design is to provide accurate +-3dB response from 20kHz down to 100Hz. The primary purpose was not to be a stand alone full range speaker, but to pair with a subwoofer to handle all content below 100Hz, specifically my Indy 8 powered sub. This had to be done in a compact enclosure to fit as easily as possible into a tight room. The design was intended to use against a wall with minimal response adjustments, but also be able to operate on a stand without losing too much mid-bass. Aesthetically the design had to look as good as I could make it with a hybrid real hardwood dark stain and gloss black combination.

Driver Selection:
Targeting the Denovo mini speaker knock down cabinets available from Parts Express gave me an enclosure volume to work with. Many woofer models were ran in the small enclosure, ultimately the DA115-8 was chosen for a good sealed alignment that will get close to 100Hz when assembled. The ND16FA-6 tweeter was chosen for the top end due to its smooth response and compact installation footprint

Enclosure Design:
I lack a table saw to accurately make suck small dimension cuts, making the CNC pre-cut panels of the Denovo cabinet an easy design. Assembly is much easier and more accurate without dealing with my typical 1/16″ minimum tolerance on cuts. The baffle was made separately, both due to the outside diameter of the DA115 being too large to accommodate the round over on the provided baffle, and in order to use a natural wood finish for the completed project. The DA115-8 woofer models with a nearly ideal Qtc of 0.697 and a F3 of 124Hz in the tiny 0.04 cu ft box.

Enclosure Assembly:
The Denovo box was remarkably easy to glue up. Simply applying Titebond glue and using painters tape to hold it all together to dry was sufficient to get the box together without gaps. Clamps would cut down a little tolerance wiggle from the joints, but were not required. The baffle was intended to be removable, so a set of 45 degree corners were glued in flush with the baffle edge in order to accommodate threaded inserts. The threaded inserts were installed right in the corner meeting points of the cabinet edges and the 45 degree corners.

The baffle was made from a poplar board. I used some machine screws that I cut and grinded to a point to provide reference holes for the mounting bolts. Using an outline of the cabinet, I measured and marked the center points for the woofer and tweeter.

The woofer and tweeter holes were cut on the full length board, since it was easier to swing a Jasper jig around on more board than the tiny cut baffles. The tweeter hole was made with a 1.25” forstner bit on a drill press. The bit is actually slightly small for the ND16 tweeters, necessitating a little bit of work opening the hole. A 1/2” disk sanding attachment on a drill will do the job with minimal deformation of the round hole if you’re careful. The board was long enough to accommodate a single screw up on the baffle when the drill press grabbed the board and ruined one of the mounting holes. With the holes cut, the boards were rough cut just over sized to the cabinet and bolted on.

I made a router table with a simple 1/2” plywood board drilled to fit my hand held router from underneath. A flush trim bit was used to cut the baffles to match the cabinet dimension.

Pro tip: don’t leave as much wood as I did when doing this, and use a higher quality spiral flush trim it. You’ll get much smoother corners that way. A 1/2” round-over was applied to the front baffle, but could not extend to the woofer area, so a fence board was clamped in place to stop the router at a consistent spot on both baffles.

Once together, the drivers were test fit and some breathing room was opened behind the woofer using a simple hand rasp and files.

The finish is in 2 parts. The MDF cabinets were primed, painted, wet-sanded, and polished to a gloss black. I had never done a wet sanded gloss black finish before, so this was a learning experience. It took several rounds of paint and sanding to quit sanding through and into the primer again.

The Poplar baffles are stained a deep expresso and finished with a semi-gloss poly. The finishing part took quite some time, as I had not tackled these types of finishes before. Ultimately it took about 4 rounds of finishing, sanding back down, refinishing, and repeating the whole process to get a satisfactory result.

Crossover Design:
The crossover was planned using the Dayton FRD and ZMA files before the drivers were even purchased. Using free tools including Response Modeler, WinPCD, and XSim the speakers were modeled with a 2 way 2nd order electrical filter plus a notch filter on the woofer to suppress the breakup of the aluminum cone. The tweeter padding was added both before and after the filter, I found that adjusting values on both sides allowed me to better match the phase between the drivers.

Once the cabinets were finished, the drivers were installed and tested using a breadboard version of the crossover outside of the cabinet and measured with ARTA. The rear of the cabinet was left with a hole waiting for the terminal cup, but this would affect the low end primarily leaving the crossover region of 3-4kHz unaffected for measurement. The actual measurements led to a minor tweak to the capacitor values and padding resistors to bring the response within to my +-3dB requirement and improve the reverse null measurement that indicates the phase is well aligned between woofer and tweeter.

Ultimately I spent a lot of time making quasi anechoic measurements on these speakers and adjusting the crossover. My measurement environment isn’t ideal, but in comparative measurements with other speakers I have in the house this design performs well. Particularly when compared to the incredibly inexpensive Dayton B652’s these will be replacing, this design is a quantum leap above. On the right we have the frequency response of the B652 in purple compared to the MicroSat in yellow. The B652 suffers from a major response variance from 4-6kHz resulting from minimal crossover and interactions between the tweeter and woofer.

With the values finalized, the crossovers were built up on pegboard and mounted in the rear of the cabinet.

Final measurements were taken to validate the design. There is a bit of a difference between the L and R finished speakers, but performance is still good and listening doesn’t reveal any of issues I’m seeing in the measurements. At a future date, I may dig into the crossover to see if there are component issues, but for now I’m enjoying them.

Tips & Tricks:
Most of the learning involved in this build revolved around the finishing portion of the cabinet build. Tips include:
For gloss black finishes using enamel, ensure the paint layer is very think to avoid wet sanding back down to primer. Do not do this in layers of wet coats, instead keep coats reasonably thin, and apply repeated layers with 24 hours in between to ensure the enamel is cured. Otherwise, the paint is too thick to cure properly and takes weeks or months to properly harden.
For stain and poly on Poplar, do not over sand the bare wood. Leave some roughness for the stain to soak in. Use fine steel wool or 600 grit paper to smooth prior to poly application. Use high quality brushes to apply your poly and minimize bubbles. Use the same 600+ grit or 000 steel wool to smooth between poly coats.
Ultimately, the best tip for finishing is to be patient, read directions, and research on line to hear what others have already experienced.

Conclusion:
Final Response Measurements were taken at 85dB and 20″ away. The impulse response was gated to eliminate reflections, making the measurement valid from about 300Hz up. On the left is the on axis response with an overlay of the tweeter reversed. The drop in response indicates the tweeter and woofer are largely in phase, resulting in cancellation as they hand off to each other. On the right we have a distortion measurement showing less than 1% at 85dB across the whole spectrum.

With these in place and powered by the Indy 8 subwoofer / 2.1 amp, I’m very pleased with the whole system. These satellites have a very clean output, excellent dispersion and imaging, and plenty of output for a small room. The combination of the Indy 8 sub and the MicroSat speakers make a perfect Bose killing stand-alone machine for under $300 total investment.

About the Designer:
Paul Graves has been designing woofers since he was a teenager. I’ve also worked on amplifier designs for 25 years and have built and currently use several prototype pieces of audio equipment, primarily for my life as a bass player.

Project Parts List:

Dayton Audio DA115-8 4″ Aluminum Cone Woofer
Dayton Audio ND16FA-6 5/8″ Soft Dome Neodymium Tweeter
Denovo Audio Knock-Down MDF 0.04 cu. ft. Micro Bookshelf Speaker Cabinet Pair
Dayton Audio DNR-4.0 4 Ohm 10W Precision Audio Grade Resistor
Dayton Audio PMPC-2.0 2.0uF 250V Precision Audio Capacitor
Dayton Audio DMPC-0.10 0.10uF 250V Polypropylene Capacitor
Dayton Audio 0.25mH 20 AWG Air Core Inductor Crossover Coil
Dayton Audio 1.2mH 20 AWG Air Core Inductor Crossover Coil

DM-4 Active Reference Series Speaker

$
0
0
20160322_070621 20160416_161312 20160508_184348 20160905_140416 20160910_120447 20160916_213106 20161227_094430 20161228_123422 20170402_131504 20170408_204632 20170421_073616 20171123_114646 all_three_measured_together first last

Designer:
Dan Marx

Project Category:
Tower Speakers

Project Level:
Advanced

Project Time:
20+ Hours

Project Cost:
$500 – $1,000

Project Description:
The DM-4 Active Reference Series Speaker is an audiophile-grade floor standing speaker system based on a selection of 8″ and 7″ Dayton Audio reference series paper cone drivers and the famous RS28F soft dome tweeter. The speakers are designed for use in a dedicated 2-channel audio setup with a 6-channel amplifier and an active DSP crossover.

Design Goals:
The design goal was to build a no-compromise speaker system using only Dayton Audio drivers in a dual-enclosure setup with some aesthetic influences borrowed from other well-known commercial hi-fi speakers. The idea being to showcase what can really be accomplished with a relatively inexpensive set of drivers from our favorite speaker building resource. The reference series speakers can be made to look and sound fantastic once built into a well-designed cabinet that compliments their design characteristics and finished with some quality woods, paint, stain and clear coat.

Driver Selection:
The speakers consist of two separate cabinets for ease in manufacturing, cutting and assembly. The lower cabinet houses a pair of Dayton Audio RS-225P-8 8″ Paper Reference Drivers wired in parallel for a nominal 4 ohm load. The drivers were selected because they contain all of the best elements of a great 8″ woofer: cast aluminum basket, aluminum vc former, low inductance, low moving mass, high xmax, low-loss rubber surround, solid aluminum phase plug, dual short-circuit paths and to steal the description from PE themselves contain “a proprietary paper cone formulation combining natural paper pulp and synthetic Kevlar® and glass fibers to create an advanced non-woven fiber composite that delivers the perfect combination of excellent detail and smooth, natural sonic character, plus a distinctive, classy look.” Since this driver is in a family of reverence drivers, there are multiple driver sizes which meant picking a 7″ woofer/mid for the midrange was easy and provided a cosmetic and acoustic match to the 8″ woofer. The midrange is the RS180P-4 driver and was selected for the same reasons as the 8″ however since it will be handling the midrange region of sound, has a slightly higher upper operating frequency than the 8″ and therefore allows easy transition to the RS28F-4 tweeter. The tweeter was picked for its ability to be crossover over extremely low with a low fs and low moving mass which provides low distortion and great on and off-axis frequency response. It’s a favorite tweeter among speaker enthusiasts because of its relatively low cost compared to its exceptional performance. Plus is matches the other drivers from PE’s reference series line with the all-black aluminum faceplate and other features. The grill protects the dome from the probing fingers of little ones which in my house have destroyed more than just a single pair of tweeters.

Enclosure Design:
The lower enclosure is a standard 4th order vented cabinet with a net volume of 78L and tuned to 32 Hz using a 4″ Precision Port. The cabinet is constructed of 3/4 MDF with multiple window bracing and cross braces throughout. The bottom and back panels are 1.5″ thick and the front panel is 1.75″ thick. The internal walls are damped with carpet pad, cotton batting and polyfill batting. The cabinet is glued and screwed together using wood glue and 2″ dry wall screws. The front panel uses an extra 1/4″ piece of MDF to allow the drivers to be flush-mounted. A Jasper Jig was used to cut the cutouts in the this ¼” baffle board to provide a perfect fit to each driver. This took some trial and error to get just right though!

The upper cabinet design is a little more complex, with a 14 degree sloped front baffle, the midrange and tweeter are brought into near perfect physical acoustical time alignment. The sides of the cabinet are tapered at 7 degrees towards the top to prevent parallel internal walls and help to reduce unwanted internal standing waves. The sloped sides also add to the overall aesthetics design of the speaker. All of the edges on both cabinets are chamfered at 45 degrees to reduce the effects of edge diffraction. The sides of speakers are covered in a 1/4″ birch veneer which increased the panel thickness to 1” which are stained gray while the rest of the cabinet is painted black. A polycrylic top coat finishes off the enclosures for that clean, professional, high-end look.

Enclosure Assembly:
The assembly of the four enclosures took about two years to complete. This was not a weekend project. This was one of those projects that sat in the garage and got worked on every once in a while on weekends for a couple of hours as time permitted. The assembly went like most of my projects, slow and steady. I made my fair share of mistakes along the way, but with the end game a little closer each day, I pushed on.

Crossover Design:
While a passive crossover could be designed for this speaker, today it utilizes a pair of MiniDSP units with the 4-way Advanced Crossover plugin from MiniDSP. An Emotive UPA-700 provides 100 watts per driver (yes, even the tweeter and 50 watts to each 8” woofer) of discrete, raw, dedicated power. The crossover points are 170 Hz and 1700 Hz with 24 dB/octave slopes and Butterworth filter types. There is some EQ adjustment on the midrange and the woofers but mainly just to balance the speakers in the room. The Dayton drivers have excellent overall balance and frequency response and do not need fancy notch filtering to sound great. There is roughly a 4 dB shelf filter to account for baffle step losses. There is no time electrical time alignment adjustment and all drivers are wired and operate acoustically in-phase with one another.

Conclusion:
Overall these speakers exceeded my expectations as far as aesthetics and acoustics. Even when I’m not listening to music, I just enjoy having them in the house, they portray a sense of sophistication and worth that far exceeds the actual material dollars put into them. I can’t put a price on the sweat labor that went into them though, I’d say several hundred hours at least, but when you’re doing something you love, whose really counting hours?
The speakers have been dialed in for a completely flat response from 29-20,000 Hz ±2 dB (give or take). With that kind of neutral response they play a wide range of music flawlessly without seeming stressed. Vocals sound natural and full, the tweeter is crisp and clean and the bass is tight and deep. These speakers image very well casting a decent soundstage beyond the position of the speakers in the room. They sound warm and clear and can play quite loud with arguably very low levels of distortion. There is a wide acceptable listening area with no obvious single point sweet spot. I can listen for hours and enjoy every minute. I have enjoyed listening to my favorite tracks over and over and experiencing the music like I never have before. Even though the Reference Series speakers are meant to be Dayton Audio flagship drivers, they are by no means the best you can buy in the industry, but in this setup they showcase what a remarkable value they can offer, when installed into the right enclosure, powered with a good amplifier and the right crossover. If it does get better than this, it’s going to have to cost a lot more to get there and how much better you can actually get is debatable. While these drivers have seen their way into many speaker projects, this is just one more example of a combination of Dayton’s reference speakers and how truly great they sound together. The sky’s the limit with what you can do with them especially with a little imagination and creativity.

About the Designer:
My name is Dan Marx and I’ve been designing and building speakers for over 25 years. And I’ve been purchasing products from Parts Express for about just as long. I’m an Electrical Engineer by trade and a DIY enthusiast by night. I’m married with 4 children and I love to play guitar and piano, I love writing music and watching movies and just spending time with my family and last but not least…designing and building speakers.

Project Parts List:

OPEN BOX Dayton Audio RS225P-8 8″ Reference Paper Woofer 8
Dayton Audio RS28F-4 1-1/8″ Silk Dome Tweeter
Dayton Audio RS180P-4 7″ Reference Paper Woofer 4 Ohm
Dayton Audio BPP-G Premium Binding Post Pair Gold
Parts Express #6 x 1″ Deep Thread Pan Head Screws Black 100 Pcs.
Parts Express #8 x 1″ Deep Thread Pan Head Screws Black 100 Pcs.
Audtek Electronics SKRL-14-50 14 AWG OFC Speaker Wire 50 ft.
Dayton Audio DBPP-BK Double Binding Post Plate Black Anodized
Precision Port 4″ Flared Speaker Cabinet Port Tube Kit
Jasper Circle Jig Model 240
1/4″ (16-14) Female Disconnect Crimp Terminal Blue 50 Pcs.
Parts Express Speaker Gasketing Tape 1/8″ x 1/2″ x 50 ft. Roll

Virtual Pipe Organ Sound System

$
0
0
figure1_tone_cabinets figure2_console figure3_plate_amp figure4_completed_plate_amps figure5_preamp_crossover figure6_installed_preamp_and_host_computer figure7_flared_tuning_port

Designer:
Scott Reaser

Project Category:
Loudspeakers/Cabinets

Project Level:
Intermediate

Project Time:
20+ Hours

Project Cost:
$500 – $1,000

Project Description:
Sound system for Hauptwerk Virtual Pipe Organ conversion of Wicks Opus 6028 1985 Console. Twin ported tone cabinets with electronic crossover and plate amps.

Design Goals:
Covers 16Hz to 18Kz capturing the shake of pedal pipes and bark of horizontal trumpets.

Driver Selection:
This is a biamped system. Woofers are Dayton Series II ST 385-8 (15 inch) #295-130. H.F. drivers are Pyle Pro Audio PDB512 bolt on units #292-2546. Exponential horns are Dayton H812 #270-304.

Enclosure Design:
Ported tone cabinets are resonated at 16.3 Hz with 4 inch Precision Flared Ports #268-352

Enclosure Assembly:
Enclosures are made from 6 pieces each of 2 x 4 x 3/4 MDF. Front and back are full size pieces. Sides are trimmed 3 inches in depth. The bottom matches size of vertical parts. The top has a 3/4 inch overhand, and is cove-routed to match console trim pattern. Battens are 1 x 2 inch (nominal) stock.

Crossover Design:
This is a 4 channel system using Linkwitz-Riley 4th order crossover set at 1 Khz. Audio kits EC-24. Tone cabinet plate amps are dual mono amp LM-3886 kits from Chipamp. Torroid power transformers are Avel Y236652 250VA units #122-625.
Sound is generated from the custom computer units hosting Hauptwerk with a M-Audio 2496 low latency stereo sound card.

Tips & Tricks:
MDF finishes to look like hardwood by first doing dry brush streaks with a dark oil stain (MinWax Dark Walnut 2716). This is followed by an overall coat of MinWax Red Walnut 225. Final appearance comes from 3 coats of MinWax water based gloss urethane varnish.

Conclusion:
The tone cabinets capture the presence and tonal range of a pipe organ as envisioned.

About the Designer:
Retired Skunk Works aerodynamics engineer.

Project Parts List:

Dayton Audio ST385-8 15″ Series II Woofer
Dayton Audio H812 1″ Exponential Horn 100×60 2-Bolt
Pyle PDB512 1″ Titanium Horn Driver 8 Ohm 2/3-Bolt
Precision Port 4″ Flared Speaker Cabinet Port Tube Kit
Avel Lindberg Y236652 250VA 25V+25V Toroidal Transformer
Penn-Elcom 5291 2″ Swivel Caster
MDF 2x4x3/4 sheets 12 total
M-Audio 2496 low latency stereo sound card
Audio Kits EC-24 stereo 4th order electronic crossover
Chipamp LM3886 mono amp kits (4), power supplies (2)

Sound Dream

$
0
0
20171224_171202 20171224_171030 20171224_170944 20171212_142144 20171212_144420

Designer:
Martin

Project Category:
Tower Speakers

Project Level:
Beginner

Project Time:
8-20 Hours

Project Cost:
$100 – $500

Project Description:
After visiting my father for thanksgiving it occurred to me that he needed new speakers. I wanted these speakers to be tall in stature but lightweight and relatively small in size and offer the best sound quality possible

Design Goals:
I wanted the best sound I could get for cheap as possible.

Driver Selection:
after using two 3 inch drivers in my last bluetooth speaker build I knew I wanted to use 3 inch drivers for full range. the new Dayton Audio PC83-8 3″ fit the bill perfectly, 295-156. worried that these 3 inch speakers may not go low enough so I also purchased two ND 105-8, 290-214. I crossed the 4 inch woofer at 150hz using a simple 1st order crossover

Enclosure Design:
each tower has 3 3inch speakers with front firing ports, while the 4 inch woofer has a rear firing port

Crossover Design:
4 inch woofer ND 105 used a first order crossover at 150hz to help emphasize the low end I knew the 3’s wouldn’t be able to capture

Conclusion:
After doing some listening tests I was blown away at my creation. I turned my subwoofer off and I was pleasantly surprised with how low these got while retaining full rich highs and mids.

About the Designer:
I’m still very new to this hobby but making huge progress every time I build a new set of speakers. Im not sure if its even a good idea to use this design, I’m sure a couple seasoned vets could let me know if I’m headed in the right direction.

Project Parts List:

Dayton Audio ND105-8 4″ Aluminum Cone Midbass Driver 8 Ohm
Dayton Audio PC83-8 3″ Full-Range Poly Cone Driver

Christmas Gift

$
0
0
img_1104 img_1105 img_1106

Designer:
Bob

Project Category:
Bookshelf Speakers

Project Level:
Advanced

Project Time:
20+ Hours

Project Cost:
$100 – $500

Project Description:
Bookshelf speakers

Design Goals:
Unique speakers with high quality sound and appearance

Driver Selection:
All Dayton Audio
1-1/8″ Classic Series Silk Dome tweeter 275-070
4″ Designer Series Coated Paper Cone Woofer 295-424
2-Way Crossover 260-148

Enclosure Design:
The top, bottom and sides of the enclosure are all reclaimed pine from a deck that was torn down. The joints are mitered with splines for reinforcement. The front and back faces of the enclosure are plywood with the front permanently epoxied in place.

Enclosure Assembly:
The speaker cover is carbon fiber/epoxy composite which was cured in a mold custom designed for this project. The vent ports on the side of the speakers are also carbon fiber as are the vent tubes inside the speakers which are connected to the ports.

Crossover Design:
See Parts Express 260-148

Tips & Tricks:
A significant part of this project was done on a CNC router table.

It could all be done by hand as well, however, it requires some carpentry experience.

Conclusion:
The idea was to make great sounding speakers that are unique and visually appealing.

About the Designer:
The designer is an engineer and composite parts designer/manufacturer in the aerospace industry. The goal was to put some of those characteristics in the bookshelf speakers to make them ‘one-of-a-kind.’

Project Parts List:

Dayton Audio DC28F-8 1-1/8″ Silk Dome Tweeter
Dayton Audio DS115-8 4″ Designer Series Woofer Speaker
Dayton Audio XO2W-4.5K 2-Way Speaker Crossover 4,500 Hz

Beta MTM Towers

$
0
0
beta_tower_back beta_tower_front beta_tower_inside

Designer:
4Matdesign

Project Category:
Tower Speakers

Project Level:
Intermediate

Project Time:
8-20 Hours

Project Cost:
$100 – $500

Project Description:
Combine the Tritrix MTM kit with custom “beta” plywood enclosures showcasing the 14 ply end grain on the speaker front. Clean and simple design.

Design Goals:
Wanted speakers to match a new receiver, Yamaha RN-303. This unit does not have variable loudness, only Bass/Treble control but love the power (100w), wifi capabilities, phono input and 2 channel output. Needed speakers to fill the midrange I wasn’t hearing from the BR-1 kit I replaced. Also use this system for TV and wanted a speaker to watch movies news etc as well as LP records and spotify (digital)

Driver Selection:
300-700 TriTrix MTM TL Components Only Speaker Kit Pair

Enclosure Design:
Based on the design available knock down kit, I replaced the MDF with 3/4″ phenolic plywood. At 14 ply with a finished surface on both sides this material is stable and dense without needing lamination or painting. Decided to showcase the vertical by leaving the edge of the plywood exposed on the front and back resulting in a narrow visual look. To make this happen the verticals and top needed to be mitered not but-joined

Enclosure Assembly:
Kreg pocket screws. Silicon caulk on all internal seams. Router recessed speakers using the Jasper circle jig.

Crossover Design:
300-700 TriTrix MTM TL Components Only Speaker Kit Pair

Other Resources:

destroyer_cab_2_wire

Tips & Tricks:
Buy the router circle-jig if you are making your own cabinets!

Conclusion:
These speakers do what I was hoping for. Bring the sound to listening height without stands and naturally fill the mid-range without adjusting the receiver. I never touch my Bass/Treble setting now.

About the Designer:
Fabricator with a degree in Architecture. second Speaker build,BR-1, and 6 small BlueTooth stereos.


Tang Band Bluetooth

$
0
0
bluetoothspeaker_large 20171220_115353 20171127_173116_large 20171212_193554_large 20171212_193619_large

Designer:
David Ng

Project Category:
Portable Speakers

Project Level:
Intermediate

Project Time:
8-20 Hours

Project Cost:
$100 – $500

Project Description:
Tang band 4″ Titanium speakers

Design Goals:
Compact and elegant.

Driver Selection:
Tang band 4″ Titanium speakers
Part # 264-848

Enclosure Design:
First time building a speaker box. Originally I wanted to do a ammo box design, but changed my mind after I received speakers. I figured if I was going to put all that time into it, I would might as well make it appealing to the eye. Ended up using sapele for top and bottom, and maple for the sides, front and handle

Conclusion:
It was a fun project and I definitely will build more.

About the Designer:
My first time building a speaker box, but definitely not my last. Never had any experience in it at all. I didn’t realize how many variables were involved.

Project Parts List:

Tang Band W4-1337SD 4″ Titanium Driver
Speaker Cabinet Port Tube 1″ ID x 4″ L Flared

NinjaBox v1

$
0
0
shot_4 shot_3_maya shot_3 shot_2 shot_1

Designer:
Steven M. Turner

Project Category:
Portable Speakers

Project Level:
Intermediate

Project Time:
8-20 Hours

Project Cost:
$100 – $500

Project Description:
My first speaker build. I rounded all the corners by hand and did not have access to a table saw.

Design Goals:
Be self powered, have a great sound signature, look stylish, and be able to transport easily.

Driver Selection:
295-309, 275-040, 295-498

Enclosure Design:
Made with 1/4″ Baltic Birch plywood and reinforced with 3/4″ x 1.5″ on the inside. I used a Fender Amp handle because of the clean design yet strong construction and 1″ feet so I don’t have to worry about uneven ground.

Enclosure Assembly:
I used Gorilla Wood Glue and then 3/4″ finishing nails for extra assurance.

Crossover Design:
After learning more afterwards, I learned that the crossover I chose doesn’t really do anything due to the impedance difference of the speakers. Therefore making the crossover point irrelevant.

Tips & Tricks:
Always leave some overlap when cutting your panels so that you have enough to work with when it comes time so sand everything flush to each other. You can always take material off but you can’t add more back on.

Conclusion:
For this being my first build involving electronics, I am extremely happy with how my boombox came out. It sounds and looks great with over 15hrs of battery life per charge.

About the Designer:
Studying to enter the video game industry, I enjoy doing projects involving woodworking when I have free time as well as building computers. I also enjoy the satisfaction after completing a project and knowing you built it all from just a pile of wood and components.

Project Parts List:

Dayton Audio DC160-4 6-1/2″ Classic Woofer Speaker
Speaker Crossover 2-Way 8 Ohm 5,000 Hz 150W
Dayton Audio SD175-PR 6-1/2″ Passive Radiator
Dayton Audio ND28F-6 1-1/8″ Soft Dome Neodymium Tweeter

Silkie Ref desk bookshelf

$
0
0
20171230_101058 20180108_222720 20180111_135516 20180115_002515 1516085847657395459725

Designer:
JSTAN

Project Category:
Bookshelf Speakers

Project Level:
Beginner

Project Time:
8-20 Hours

Project Cost:
$100 – $500

Project Description:
build the best bookshelf speakers for under 200 dollers. one of my little ones poked a hole in my bowers and wilkins CM9 tweeter. i wanted to see what i could build for the price of replacment.

Design Goals:
wanted to fit the crossover tweeter and port into a .1 square ft ported box as suggested for the driver i picked out

Driver Selection:
Part # 275-070

Part # 295-353

Enclosure Design:
made with 3/4″ MDF. internal dementions 4x6x9 inches. i decided to port on the bottom so i raised the front 1 higher than the reer making them point 8° up. the 3/4 inch port comes up between the mid/bass and the reer mounted crossover

Enclosure Assembly:
purchased 2 2×2 3/4 inch panels of mdf. drew out the planned cuts with a little extra room to account for the blade. i cut a 1/4 inch trench with my router for all my pieces to fit together. for the side panels i cut the trwnch and then cut the angle for the front. i counter sunk the front baffle and screwed them in sealing with 1/8 inch foam rather than glewing together so i could make adjustments. i used some old packing foam i had at work and cut a sham cloth and wraped it around the port for extra sound dampening. i painted them teal because i found it in the oops paint at home depot and could not pass up the deal

Crossover Design:
using x-sim and the data from PE i created a 2nd order crossover at around 1900 Hz. the woofer seemed to have a higher response so i added a 4.5 ohm resister to create a flat response. i later clipped the resister after testing because i could only hear the tweeter. i will probuble add a small resister to bring down the tweeter a bit more.

Tips & Tricks:
i cut the circles by attaching a scrap piece of wood to the bottom of the router and measured the radious of the circles required.

Conclusion:
a great project i learned a lot allong the way and found i was able to fix mistakes quickly.

About the Designer:
i work as a calibration repair technician with 10 years expierence. i currently own a pair of bowers and wilkins CM9 towers and wanted to get as close if not better than the sound of them.

Project Parts List:

Dayton Audio RS125-8 5″ Reference Woofer
Consolidated Stranded 16 AWG Hook-Up Wire 25 ft. White UL Rated
Parts Express Speaker Cabinet Port Tube 1-3/8″ ID Adjustable
Parts Express Gold Plated Binding Post Pair
Blue Perforated Large Hole Crossover Board Pair 3.5″ x 5″
Mills 4.5 Ohm 12W Non-Inductive Resistor
Dayton Audio 0.40mH 20 AWG Air Core Inductor Crossover Coil
Dayton Audio 0.50mH 20 AWG Air Core Inductor Crossover Coil
Dayton Audio PMPC-8.2 8.2uF 250V Precision Audio Capacitor
Dayton Audio PMPC-6.2 6.2uF 250V Precision Audio Capacitor
Dayton Audio DC28F-8 1-1/8″ Silk Dome Tweeter

Walnut/Maple Bluetooth

$
0
0
43cc9590c28346229dc4c5f3208a7c7b img_0632 img_0654 img_0658 img_0692

Designer:
Jeremy Hazelton

Project Category:
Home Electronics

Project Level:
Intermediate

Project Time:
8-20 Hours

Project Cost:
$100 – $500

Project Description:
An aesthetically pleasing, quality sounding full-range bluetooth speaker (with the option for a powered sub) to be used for home listening. Something that looks as good as it sounds

Design Goals:
Great looking, fine furniture grade craftsmen style… that also sounds great and allows for expansion.

Driver Selection:
# 264-957 Tang 4″ Full Range Drivers

# 300-781 Dayton WF60PA w/ Bluetooth

Enclosure Design:
1/2″ Walnut face and rear plate, 3/4″ Maple Plywood case, with Walnut edge banding. Sealed enclosure.

Conclusion:
Pictures aren’t great, mostly snapped with my iPhone during the build in my basement (not in my shop, as I was surprising my wife for Christmas). This project came out great, and I’ll certainly build another one or two, though I will likely switch to an internal amp with rechargeable battery option and skip the subwoofer out option.

About the Designer:
Just a dude with a few tools (never enough tools) who wants nice things, but can’t afford to pay someone else to build them.

Project Parts List:

Tang Band W4-2142 4″ Paper Cone Full Range Driver 8 Ohm
Dayton Audio WF60PA 60W Class D Full Range 2.1 Plate Amplifier with Wi-Fi and Bluetooth 4.0 aptX

Active Portable Line Array

$
0
0
20170914_155758_resized 20170918_151939_resized 20170918_152743_resized 20170918_155456_resized 20170919_141421_resized 20170919_150517_resized 20170920_144519_resized 20170920_145634_resized 20170920_145639_resized 20171110_142602_resized

Designer:
SRL Loudspeakers

Project Category:
Loudspeakers/Cabinets

Project Level:
Intermediate

Project Time:
8-20 Hours

Project Cost:
Over $1,000

Project Description:
This project entailed building two (2) 12″ powered line array style PA speakers utilizing the best materials, components, and construction techniques.

Design Goals:
Build an enclosure that had very high SPL, power handling, and excellent fidelity. Maintain small size and weight while still having relatively low Fb and high SPL. Utilize line array wave guides for minimal vertical dispersion and greater on axis response.

Driver Selection:
Part # 290-589

Part # 290-527

Enclosure Design:
Enclosure was designed with two (2) separate chambers: the woofer chamber and the compression driver chamber. This made it much easier to prevent leakage through the wave guides or attenuation face plate. Box volume was 1.75 cubic feet with an Fb of 53Hz.

Enclosure Assembly:
5/8″ Baltic Birch plywood. Entire enclosure is held together with beach-wood biscuits,staples, and glue. This method while taking longer actually ensures a stronger bond and zero chance of vibration and resonant frequencies from fasteners coming loose.

The only fasteners that were used were 10-32 T-Nuts and grade 8 SHCS’s to hold the drivers in place. Truss head screws were used to mount the Penn-Elcom handles and jack dish into place with foam gasket around the flanges.

Crossover Design:
Dayton Audio PMA800DSP 2-Way Plate Amplifier 800W 2-Channel with DSP and Bluetooth – 1,500 Hz Crossover

Conclusion:
While this project was very time consuming, it yielded a product far superior than any big name PA speaker that could be purchased. We utilized the finest materials, construction methods, and Eminence Drivers for a high quality product. This design is very unique in the sense that there are next to no PA speakers in the line array format using wave guides like this. These speakers have such controlled response and significantly high output that they can be set very far from the audience without the high frequency breakup associated with standard wave guides. These wave guides only have 10-15 degrees of vertical spread which results in next to no ceiling or floor bounce. This gives the end user more flexibility when setting up a venue.

About the Designer:
SRL Loudspeakers (founded 2017)

We were founded on guitar iso-cabinets and quickly moved into designing and building sound reinforcement cabinets for DJ’s and mobile musicians. While lead times aren’t our selling point, our quality and tonal characteristics speak for themselves.

Project Parts List:

Dayton Audio PMA800DSP 2-Way Plate Amplifier 800W 2-Channel with DSP and Bluetooth – 1,500 Hz Crossover
Eminence Kappalite 3012HO Neo 12″ Speaker Driver
Eminence NSD:2005-16 1″ Neo Titanium Horn Driver 16 Ohm 2-Bolt
L-Pad Knob and Faceplate for 3/8″ Shaft
Parts Express Speaker L-Pad Attenuator 100W Mono 3/8″ Shaft 8 Ohm
Speaker Cabinet Port Tube 3″ ID x 4-1/2″ L
Viewing all 739 articles
Browse latest View live


<script src="https://jsc.adskeeper.com/r/s/rssing.com.1596347.js" async> </script>