![finished_crop_small]()
![Angle Front_s]()
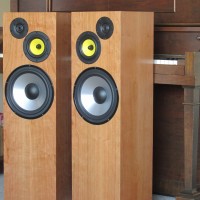
![Upper Front_s]()
![Cabinet Finish_m]()
![Corner_c_s]()
![Crossover_m]()
![Driver Cutouts_s_m]()
![F_B_S assembly_m]()
![Front test_m]()
![Inner cuts_m]()
![Side_s]()
![Speaker 2018 wood_s_m]()
![Lumotas Crossover Layout]()
![lumotas_box_dimensions]()
![lumotas_impedance]()
![lumotas_schematic_2]()
![lumotas_spl]()
Designer:
Brian B
Project Category:
Tower Speakers
Project Level:
Intermediate
Project Time:
20+ Hours
Project Cost:
$100 – $500
Project Description:
This is my second speaker design, the first also being a 3-Way that utilized low cost drivers no longer available. In this design, I used medium cost drivers that are currently available (as of April, 2018).
There are numerous excellent 2-Way designs available to build, so I set my mind on building a 3-Way (at least for this project). To me it always seemed a stretch for the low frequency driver in a 2-Way to produce excellent bass, good midrange, and provide good dispersion up to the tweeter crossover. Obviously, that has been accomplished in many 2-Way designs, but typically at the expense of driver cost (high), low efficency, and/or high crossover cost.
So a 3-Way seemed like it might be a better approach (or at least as good anyway at this price point). Of course, with a 3-Way you add a third driver and another (bandpass) crossover, which means they may not be any cheaper than a 2-Way with high cost drivers and fancy crossovers. But they still (in my judgment) offer some benefits regarding what’s expected of each driver.
I always liked the idea of the driver producing the critical midrange frequencies not being tasked with producing low frequencies that require large cone exercursions with a smaller driver. Plus, lower mass and better dispersion characteristics of a midrange driver would seem to be much better suited as you get close to the tweeter frequencies. And a larger driver seems much better suited to produce the low frequencies, especially if it doesn’t need to stretch much into the midrange.
That’s how I arrived at my (perceived) need and desire to design a 3-Way. For better or worse.
Design Goals:
I wanted to use mid priced drivers, because they tend to sound better, and tend to make the crossovers a little less complex. I also hoped to keep both the driver cost and the crossover cost below $100 each for each speaker. That would mean a total cost of electrical parts of less than $400 per pair.
I generally prefer speakers without stands, which meant tower type enclosures would be needed to accommodate the enclosure volume required by a large woofer. I also wanted the enclosure to be fairly easy to build, and wanted to avoid sloped or curved panels, and mitered corners.
I also wanted a system SLP in the upper 80dB range so that volume levels filling a larger room wouldn’t require a high power amplifier. And with that higher sensitivity, I was also hoping for a dynamic speaker that was nice and lively.
Lastly, I wanted a speaker that produced a full sound, at least as far as most recorded music. To suit my needs, I wanted good, but not necessarily very low bass. Other sonic characteristics were more important to me than producing very low frequency bass. To that end, I decided to use a sealed enclosure for the bass driver. I generally prefer the sound of sealed enclosures even though they give up some bass on the low end. I find them somewhat more musical, and since the roll off is more gradual, they don’t give up quite as much bass below the rolloff frequency.
Driver Selection:
Since I wanted the midrange driver to handle frequencies down to at least 300Hz, I thought a midrange driver of about 5” would be appropriate. And since the midrange and tweeter would be in their own internal enclosure, I wanted the midrange driver to be well suited to a very small sealed enclosure. HiVi’s F5 seemed to fit the bill, had favorable reviews, and had been used in some very good designs already, so I chose it for the midrange.
I probably spent the most time selecting the woofer. I wanted a woofer with a sensitivity of at least 87dB, and one that would work well in a sealed cabinet of less than 2 cubic feet. I wanted to use a 10” driver if I could find one, with an 8” or 9” as possible back-ups. Dayton’s DA270-8 appeared suitable.
For the high frequencies I wanted a driver that would be sweet without being harsh. And I also wanted one I could cross over fairly low if needed. With good reviews, dual chamber and low resonant frequency, the Peerless XT25TG30-04 seemed like it might be a good fit for this design.
Enclosure Design:
To keep the enclosure design simple, it’s just a tall rectangular box measuring (outside dimensions) 38 1/2” tall by 11 1/4” wide by 10 3/8” deep. The upper front of the cabinet is blocked off internally creating a sealed enclosure for the midrange and tweeter. The midrange/tweeter enclosure’s internal dimensions are 8 1/2” tall by 9 3/4” wide by 3” deep. MDF was used for all cabinet panels and braces.
A 4’X8′ sheet of MDF is barely enough to construct a pair of the enclosures. This should allow enough for one window brace and one or two of shelf braces. If you want to add more braces, you’ll likely need more than just the one sheet of MDF. I made a small mistake cutting out the sides and had to buy some additional material.
I flush mounted the drivers. Doing so makes for a tight mounting of the F5 midrange (as far as depth). The internal 3” depth of the mid/tweeter box is just enough to accommodate the F5. If you countersink the midrange too deep, there will be interference at the back of the internal enclosure. You may want to move the mid/tweeter enclosure back rearward another 1/8” -1/4” to avoid this possibility if flush mounting the drivers.
I used screws (no glue) to secure the bottom panel of the enclosure since I mounted the crossover there. The crossover could possibly be mounted in an area behind or below the woofer instead, if desired.
The size of the enclosure and the use of 3/4” MDF makes for a heavy speaker. According to my scales, the completed speakers weigh 54 lbs. each.
Enclosure Assembly:
I used 1 1/2” convoluted foam inside the mid/tweeter box behind the tweeter and on the sides where there was room without interfering with the drivers. I used some left over 1/8” auto headliner material to line the remaining parts of the mid/tweeter box. I suppose thin foam or mattress pad would work as well as the headliner material. Then I added some loose polyfill as well.
I also used the headliner material in the main enclosure in the areas beside, behind, and immediately above the woofer. Then the woofer box was also stuffed loosely with polyfill.
I mounted the crossover to the bottom panel of the enclosure, and the terminal cup was mounted on the back about 7” or so off the bottom.
Iron-on cherry veneer (Cedan brand) was used to cover the MDF cabinet on the front, top, and sides, and a few coats of polyurethane completed the finish of the cabinets. I found the iron-on veneer somewhat difficult to work with. The adhesive didn’t seem to stick well and I had to reheat/reglue and in some cases add additional glue to areas along the edges.
Crossover Design:
To keep the design as simple as possible and keep the crossover cost down, I elected to use simple 2nd order filters. Resistive padding was added to the midrange and tweeter to balance them to the woofer output.
I used WinPSD for the crossover design, along with FPGraphTracer and Microsoft Paint as needed to create FRD and ZMA files for the drivers.
Crossover frequencies are approximately 300 Hz and 2000 Hz. A better crossover might include a notch filter around the peak in the F5 response at 1.5kHz. But since I was satisfied with the sound achieved without it, I didn’t try one.
The modeled on-axis frequency response looks somewhat hot on top. However, the off axis response of the tweeter is attenuated more than many drivers. With the 30 degree off axis response of the tweeter substituted into the model, the modeled frequency response appears much flatter.
The modeled system impedance is between 4 and 5 ohms over much of the range, but doesn’t dip below that anywhere. So most amps should be able to drive this speaker without any issues.
The 4 ohm resistors in the tweeter crossover and the 5.6 ohm resistors in the midrange crossover are connected in parallel to achieve the desired padding along with adequate power dissipation. I haven’t had any issues with the resistors overheating during my listening. If you enjoy taxing your hearing, you might want to increase the power dissipation of those padding resistors.
Tips & Tricks:
I’m not aware of many ways to reduce the cost of the design, except for possibly replacing the 22uF poly cap in the midrange crossover with an electrolytic. That would save about $8 per speaker. I generally like to include some poly capacitance in the midrange high pass since electrolytics aren’t always very effective over a thousand hertz. Using the poly cap may reduce midrange roll off of what would otherwise be a strictly electrolytic series capacitor up to, and somewhat beyond, the tweeter crossover frequency.
If I were building these again, I might consider relocating the drivers somewhat, putting the midrange and tweeter more in line vertically. Their current placement allowed a simpler mid/tweeter enclosure, with just two inner panels, a full width back panel and a shallow bottom panel. Lining them up more vertically would require a third side panel for the mid/tweeter enclosure. It would also require locating the woofer a few inches lower in the front panel. If I were to pursue this change, I would still maintain a non-symmetrical location of the tweeter and midrange relative to the cabinet edges. They would not be centered exactly over each other, nor in the middle of the front panel.
I listed the time for the project at over 20 hours. I had over 20 hours in them, but if you are good at woodworking and choose a simpler finish, perhaps a pair can be built in less than 20 hours.
Conclusion:
I’m very happy with the results of this project. Most of the goals were met and I consider the sound of these speakers very good (given the cost). The cost of the drivers is a little over $200 per pair, and the crossover cost is $160 per pair. So total material costs are about $400 per pair, including the enclosure wood, plus the enclosure finish. The cherry veneer and finish I chose for the enclosures added about $80 for the pair.
The one area where I didn’t meet my design goals was sensitivity. While I was hoping for a sensitivity in the mid to upper 80s, the design ended up in the low to mid 80s.
I didn’t realize how much I was enjoying the sound of these speakers until I took the apart and started the veneering and finishing the cabinets. I couldn’t wait to get them back together. To me the speakers sound very natural and I find myself enjoying the music itself when listening to them. I chose the name “Lumotas” from the Finnish word “lumota” which means enchant or charm.
The speakers seem very good at clearly reproducing the various instruments and voices, both separating them and making them sound very natural. However the locations of the variousinstruments and voices on the soundstage aren’t as quite as well defined on these as on good small monitor type speakers. They seem capable of easily filling a medium size room with sound, at least the 13′ X 21′ one they currently occupy. However, I seldom listen at high volumes so they might not be a good choice for high volume listening in larger rooms. Keep in mind that the F5 midrange isn’t a high power driver, being rated at 45 Watts RMS.
About the Designer:
I’m a retired EE, and spent most of my 35 years of employment designing circuits for plane, train, and automotive products.
Project Parts List: