![]()
![]()
![]()
![]()
![]()
![]()
![]()
![]()
![]()
![]()
![]()
![]()
![]()
![]()
Designer:
Bill Ferrell
Project Category:
Bookshelf Speakers
Project Level:
Advanced
Project Time:
20+ Hours
Project Cost:
$100 – $500
Project Description:
Bookshelf 3-Ways for our RV to go with new Pioneer in-dash stereo.
Design Goals:
I wanted sturdy, professional-looking, high-quality, 3-Way-vented, bookshelf speaker systems. These will sit in the back part of a Class C RV and be the main speakers for the new in-dash head unit. They will be on long cables to allow them to be taken outside the RV when desired.
Low Frequency Response: at least 35 Hz @ -3dB point
Power Handling: 100 Watt RMS (new Pioneer in-dash head unit is 55 w/x4-channel, RMS).
Mid and High Frequency Response: at least the same amplitude as the low frequency response; can be more because my hearing of high frequencies is diminishing and I can roll the mids and highs off using the head unit.
Driver Selection:
Woofers – Part #: 295-198, Dayton Audio DCS165-4 6-1/2″ Classic Subwoofer 4 Ohm
Midranges – Part #: 295-422, Dayton Audio DS90-8 3″ Designer Series Full-Range Driver 8 Ohm
Tweeters – Part #: 275-045, Dayton Audio DC25T-8 1″ Titanium Dome Tweeter
Enclosure Design:
Used BassBox Pro to design the cabinets.
Cabinets – Part #: 300-7064, Denovo Audio Knock-Down MDF 0.56 cu. ft. Bookshelf Speaker Cabinet
Cabinet external dimensions = 16″ H x 8.5″ W x 11″ D
Unfinished Interior volume = 0.56 cu. ft.
Finished interior volume = 0.507 cu. ft., after subtracting midrange enclosure, interior brace, crossover, woofer, tweeter and vent interior volumes.
Vent dimensions = 1.375″ ID x 7.394 Length
No stuffing used.
Fb = 31.2 HZ
F3 = 32.86
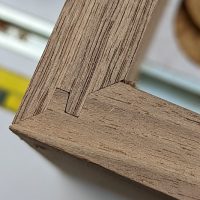
Enclosure Assembly:
Straightforward enclosure assembly, with following notes.
Glued and clamped all joints, making sure all interior seams had plenty of glue along the entire length of the seam.
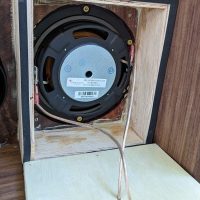
Midrange enclosure is a Pyrex 1-cup glass bowl, pn 7202-10, available in most department stores. I attached it to the back of the front baffle board using a nice bead of GE silicone sealant on both the inside and outside of the rim of the bowl. Mounted the midrange enclosure to the baffle board before assembling the enclosures.
Painted the assembled enclosures with 6 coats of black, high-gloss lacquer before assembling crossover and wiring, drivers and vent to the cabinet.
After mounting the drivers and screwing them down, I used Permatex pn 8158, Black Adhesive Sealant, Silicone RTV, to form a bead all the around the joint between the outside edge of the frame of the drivers and the front of the baffle board. Also used this on the rear connection panel and the vent tube.
Crossover Design:
Crossover – Part #: 260-210, Parts Express Speaker Crossover 3-Way 8 Ohm 800/5,000 Hz 100W
Tips & Tricks:
Using the Pyrex bowls as midrange enclosures – cheap and strong, only about $3 each, plus some RTV.
Conclusion:
These systems more than met my design goals and expectations. Can’t wait to hit the road this summer!!
See attached frequency response graph, -3db down point is 27.61 HZ. Not too shabby!
About the Designer:
I’ve been building speaker systems since high school in 1972. First book was by David B. Weems, “Designing, Building, and Testing Your Own Speaker System”, which introduced me to TS parameters (a new and revolutionary idea at the time!) and a calculator design process. I was hooked!!
Project Parts List:
|
Part #
|
Description
|
Qty
|
|
295-198
|
Dayton Audio DCS165-4 6-1/2″ Classic Subwoofer 4 Ohm |
1
|
|
295-422
|
Dayton Audio DS90-8 3″ Designer Series Full-Range Driver 8 Ohm |
1
|
|
275-045
|
Dayton Audio DC25T-8 1″ Titanium Dome Tweeter |
1
|
|
300-7064
|
Denovo Audio Knock-Down MDF 0.56 cu. ft. Bookshelf Speaker Cabinet |
1
|