Quantcast
Channel: Parts Express Project Gallery
Viewing all 740 articles
Browse latest View live

FH-5 Art and Folded Horn

$
0
0

Designer:
John E Henderson

Project Category:
Bookshelf Speakers

Project Level:
Intermediate

Project Time:
20+ Hours

Project Cost:
$100 – $500

Project Description:
Hi. I am asking for input on this design. Please don’t laugh! This thing took on a life of its own. I will explain.

My idea was to add some sound to a painting. For example, I wanted to paint a mountain river on a stiff piece of wood and add the sound of babbling stream by adding an exciter to the back. The project grew into what you see below. It is now a wall mounted speaker with a painted baffle.

Since I knew so little about DIY speakers, I hit the internet to do some research. I found myself enthralled by speaker design, and my idea of something simple morphed into a 6 month adventure into the world of audio design. I decided on a design with a single driver that I would incorporate into the painting. Remember, this started as an art project. I liked a design I found in a forum called a folded horn. I copied it, then modified it a bit to suit my project. Since I know nothing of the principles involved, I did make sure that the dimensions of the horn did not change from the original. I wish I knew who to credit for the design, but I don’t. I will say, bless all of you guys that so willingly share your designs.

The result is well beyond my expectation for sound quality, but I can’t help thinking they could be better, especially on the low end (of course).

I power them with a Dayton Audio Amp and a Dauk tubed preamp with tone control.

My ears are the only instrument I have with which to measure the sound, and the Hit Makers my only reference. I find it very difficult to describe sound, but I will give it my best shot. Keep in mind that I know very little about audio design, so…

First, they are considerably louder than the Hit Makers, and the sound clarity was at least equal to them. The Hit Makers had a richer bass, but not nearly the presence. My speakers just fill the room (12 x 12) with music that is crystal clear, where the Hit Makers have a much more defined point of origin. Does that make sense?

When I listen to (Lets say, School, by Supertramp) with the tone control bypassed, I just don’t get the thumping notes I hear with the Hit Makers. However, when I turn the bass up on the preamp, they really come alive. They don’t’ have the same crispness in the bass notes that I would like to hear, but a solid response nonetheless. Overall, I really can’t believe how good they sound when I adjust the tone to my liking.

By the way, I tried them without the horn. I left the inside empty and sealed box. It sounded different, but I don’t think it was better. The bass may have improved a touch, but the overall sound was not as good to my ears. Again, it is hard for me to describe, but after a while they felt like they were screeching at me with just the sealed box. With the horn insert installed, they just seemed much smoother and less fatiguing to my ears.

Design Goals:
1. Incorporate the driver into the art work.
2. It needed to be light enough to hang on a wall.
3. It needed to sound decent.
4. Staying under $250 for the set was a must.

Driver Selection:
Parts Express Part #264-958 Tang Band W5-2143 5 inch full range.

Enclosure Design:
Folded Horn cut from sheet foam in plywood cabinet. The inside dimensions are 30 x 15 x 3 inches and they weighs 15 pounds each. They mount to the wall using French cleats, and I use a rubber backing to keep it snug. The idea is to help reduce vibration since they are intentionally lightweight.

Enclosure Assembly:
Cut by CNC, Glued and screwed. I have added pictures of several of my designs to this point, and an image of the inside of the box.

Crossover Design:
na

Tips & Tricks:

Conclusion:
My intent is to make several of these for an art show later in the year, and I want them to sound as good as possible without changing the dimensions too much. Again, the project is supposed to be more about the art than the sound. It just morphed into a sound project instead.
I guess my question is: What would you do to improve this design?

About the Designer:
I am a retired graphic designer. I have minimal experience with DIY speakers. My only successful attempt to this point is a “Hit Makers” kit I built many years back, and a half dozen old radio conversions. I mention this so you know that technical talk is going to be meaningless to me. But, if anyone has any ideas or comments, I would love to hear them.

Project Parts List:

Tang-Band-W5-2143-5-Paper-Cone-Full-Range-Driver-8-Ohm-264-958

Amazing line source

$
0
0

Designer:
Amazing loudspeaker

Project Category:
Freestyle Speakers

Project Level:
Advanced

Project Time:
20+ Hours

Project Cost:
Over $1,000

Project Description:
These are a tribute to bob carvers als1000 speakers

Design Goals:
3-d imaging and soundstage

Driver Selection:
Dayton planer ribbons and 6.5″ buyout speakers

Enclosure Design:
Sealed

Enclosure Assembly:
Wood and glue

Crossover Design:
Hand picked 6bd – 18db slopes

Conclusion:
Sound incredible!!

About the Designer:
Bob carver a physicist that loves all things audio. I studied under his direction on speaker theory and application.

Baby amazing line source

$
0
0

Designer:
Baby amazing line source

Project Category:
Tower Speakers

Project Level:
Advanced

Project Time:
20+ Hours

Project Cost:
$500 – $1,000

Project Description:
A smaller line source speaker design based on bob carvers ALS-1000 line source speakers .

Design Goals:
3d imaging and sound stage

Driver Selection:
Dayton planer tweeters and 6.5″ buyout Dayton speakers

Enclosure Design:
Sealed

Enclosure Assembly:
Wood and glue

Crossover Design:
6db to 18db

Conclusion:
Incredible sounding with free air woofer towers using a Dayton apa1200dsp to drive said woofers

About the Designer:
Bob carver is a physicist that loves all things audio. I studied under him on speaker theory.

Fabric and leather

$
0
0

Designer:
Fabric and leather

Project Category:
Bookshelf Speakers

Project Level:
Beginner

Project Time:
20+ Hours

Project Cost:
$100 – $500

Project Description:
Fabric and leather. Brass corners and furniture nails along the sides. Black glass on top

Design Goals:
Something different, inspired by suitcases

Conclusion:
Fun, but lot of work

About the Designer:
Norwegian

Project Parts List:

Samba MT Bookshelf Speaker Kit with Knock-Down Cabinet

Subwoofer

$
0
0

Designer:
Philip Nigro

Project Category:
Subwoofers

Project Level:
Beginner

Project Time:
8-20 Hours

Project Cost:
Over $1,000

Project Description:
Dayton audio subwoofer

Design Goals:
Match bookshelf speakers

Driver Selection:
295-463

Enclosure Design:
10” sub with dual passive radiator

Enclosure Assembly:
Kit

Crossover Design:
None

Conclusion:
Awesome

About the Designer:
Typically low budget looking for high quality sounds

Project Parts List:

Powered Dayton Audio Reference 10″ Subwoofer Kit with Dual Passive Radiators & 500 Watt DSP Plate Amp

Abrams 1

$
0
0

Designer:
Abrams

Project Category:
Freestyle Speakers

Project Level:
Intermediate

Project Time:
8-20 Hours

Project Cost:
$500 – $1,000

Project Description:
Speaker build

Design Goals:
To achieve the sound of a floorstander but the form of a bookshelf

Driver Selection:
EPIQUE 180

Enclosure Design:
Front ported , simple reflex

Crossover Design:
2 way crossover

Tips & Tricks:
Ask, consult, deliberate and then do what you think is best. There is a lot of good advice out there which I found in the tech talk forum.

Conclusion:
Big sound from not a tower

About the Designer:
I am a surgeon by profession but Audio DIY is my hobby. Made another tower TL speakers and amps. Enjoy it very much

Project Parts List:

Epique E180HE-44 7″ DVC MMAG Extended Range Subwoofer 4 Ohm per Coil

Walnut Dreams

$
0
0

Designer:
Bobby Kinstle

Project Category:
Portable Speakers

Project Level:
Advanced

Project Time:
20+ Hours

Project Cost:
$500 – $1,000

Project Description:
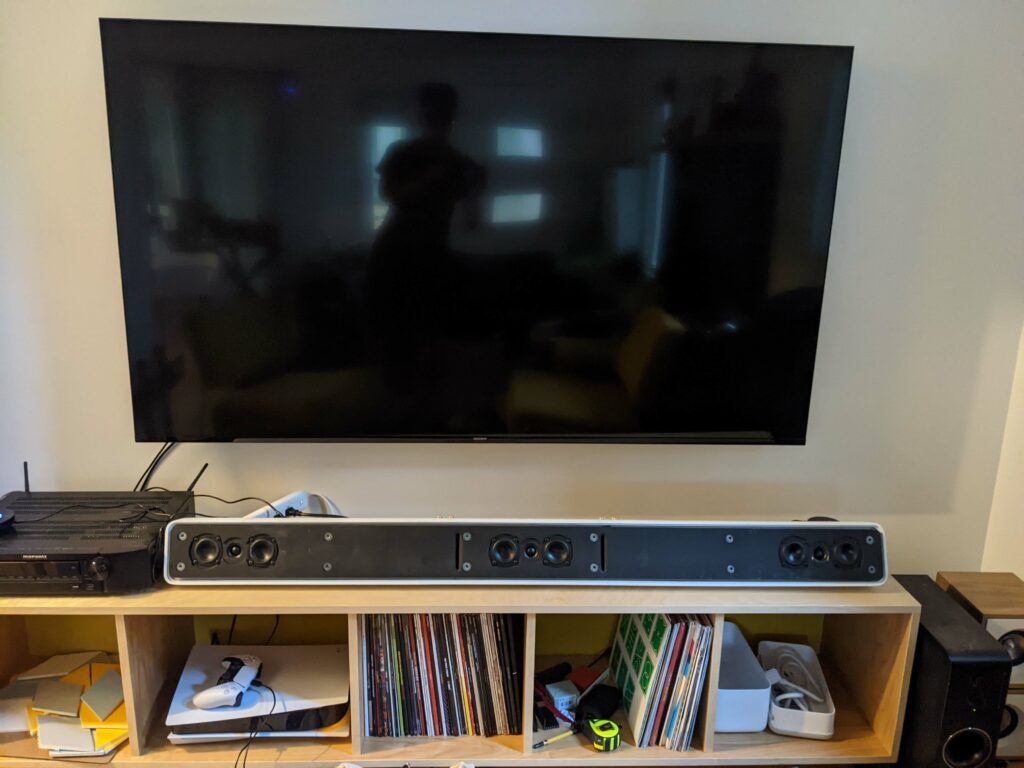
This is a portable high quality 3 way Bluetooth Speaker for a music teacher who wants to evaluate his students in remote learning as well as enjoying high quality music. It was very important to cover the full capabilities of the instruments, especially Violin, Piano, and Cello.

Design Goals:
Design Goals
1. Be battery powered
2. Cover the entire frequency range of musical instruments
3. Be able to play over 100dB
4. Have enough armor to take on the NYC subway
5. Solid high figure black walnut

Driver Selection:
The heart of the system is the Peerless GBS135F25AL02-04 5-1/4″ midrange. This along with the 4-1/2” little brother offer tweeter level crispness on midrange detail, most especially evident in string instruments, but also really cover the human vocal range with authority and without harshness. If you were a music teacher you could hear what brand of rosin your students were using.

For Bass I selected the Dayton Audio LW150-4 6″ Low Profile Woofer. It was a toss up between this and the Tangband 4.5” subwoofer. The TB would play deeper, but it needed 4x the power and weighed a lot more. The Dayton slim woofer was able to meet the required frequency range just fine. Note, the Dayton woofer has some strange characteristics in its “ideal” box size and actually performs much better in an undersized box. Undersized to 8.1L flattens the bass response and even gives it a little boost from 50-100hz which saves power.

For the tweeter I selected the Vifa/Peerless DQ25SC16-04, 1″ Titanium Dome Tweeter because it had a reputation for playing flat to very low crossover points. I found the tweeter sounded pretty thin below 2.8hz which forced me higher than the 2.1khz I originally planned on. This tweeter also has lots of sibilance that had to be corrected in the DSP.
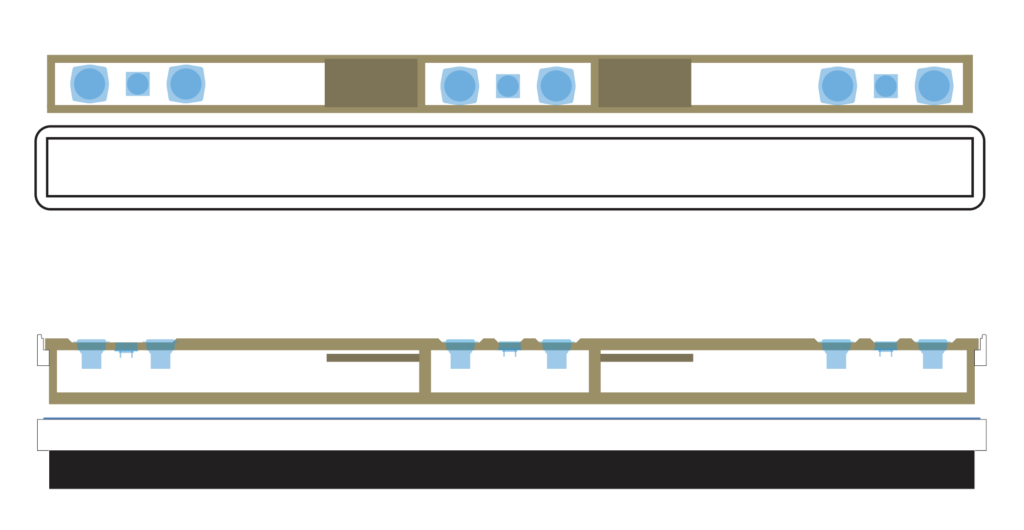
Enclosure Design:
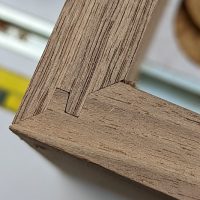
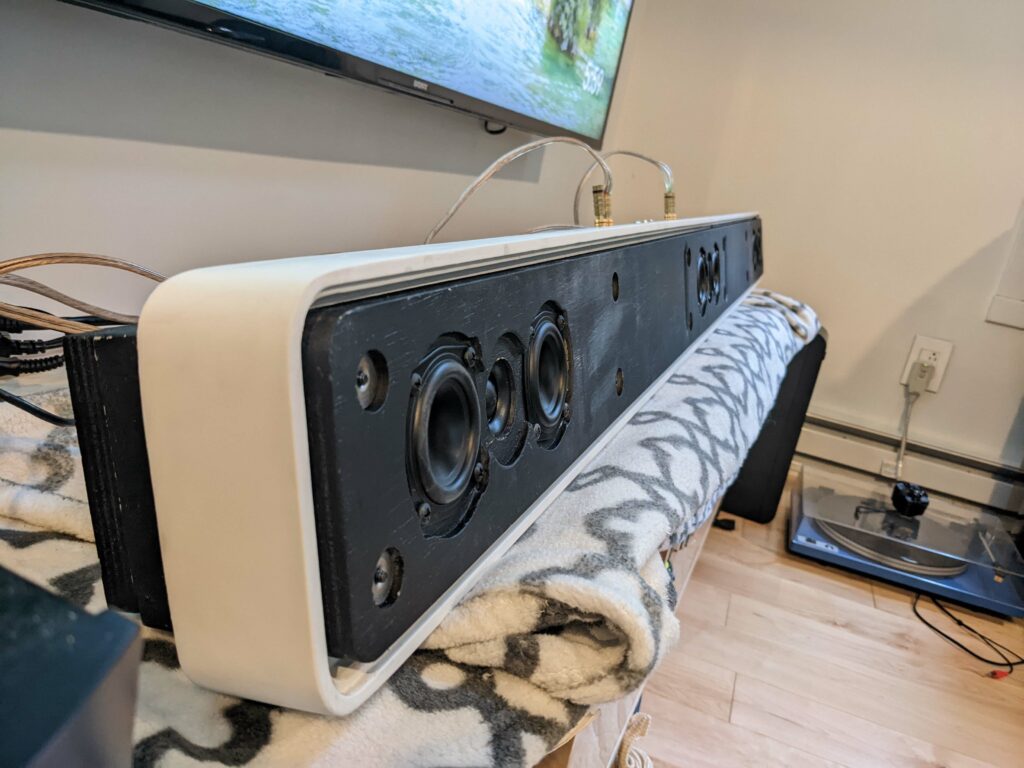
The enclosure is made from a single slab of high figure black walnut. No MDF, no veneer. It’s a standard box with lock miter joints in the corners for extra strength. The front and rear faces sit 3mm recessed to protect from scratches and provide a nice cosmetic look. Every outside corner has a metal cap to protect from damage and the outside 4 corners of the box frame are chamfered 45 degrees again so the sharp corners on the lock miter joints won’t take damage from being bumped into things. The end user intends to take this speaker places and make it work. Not just a beautiful thing to sit on the shelf. All drivers have metal protection grills. Internal volume after subtracting the port and midrange sub enclosure is 8.4L. Accounting for driver displacements and the battery board brings it closer to 8.1L. Enclosure tuned to 48Hz. For portability I added a soft synthetic leather handle and to keep it from shaking the table too much I added some rubber feet. Final finish after sanding to 320 was Osmo Polyx Oil which is a super durable treatment for hardwood floors that can be easily applied in a dusty shop.
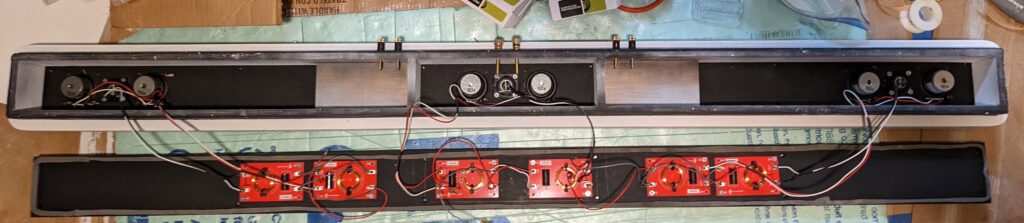
Enclosure Assembly:
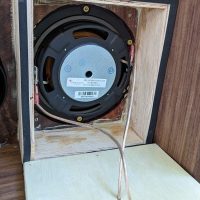
I glued the box together with band clamps and Titebond 3 wood glue. The front panel is held in with metal L brackets and sealed with silicone all around its perimeter. The rear panel sits on a shelf with threaded inserts for the screws to really clamp down on. It’s sealed with gasket tap on the inside edge of the rear panel. The midrange sub enclosure is made of plywood and secured with screws in case I ever need to replace it. The midrange sub enclosure has a moderate amount of poly fill to prevent reflections. This limits the bottom usable crossover frequency of the midrange to 200hz.

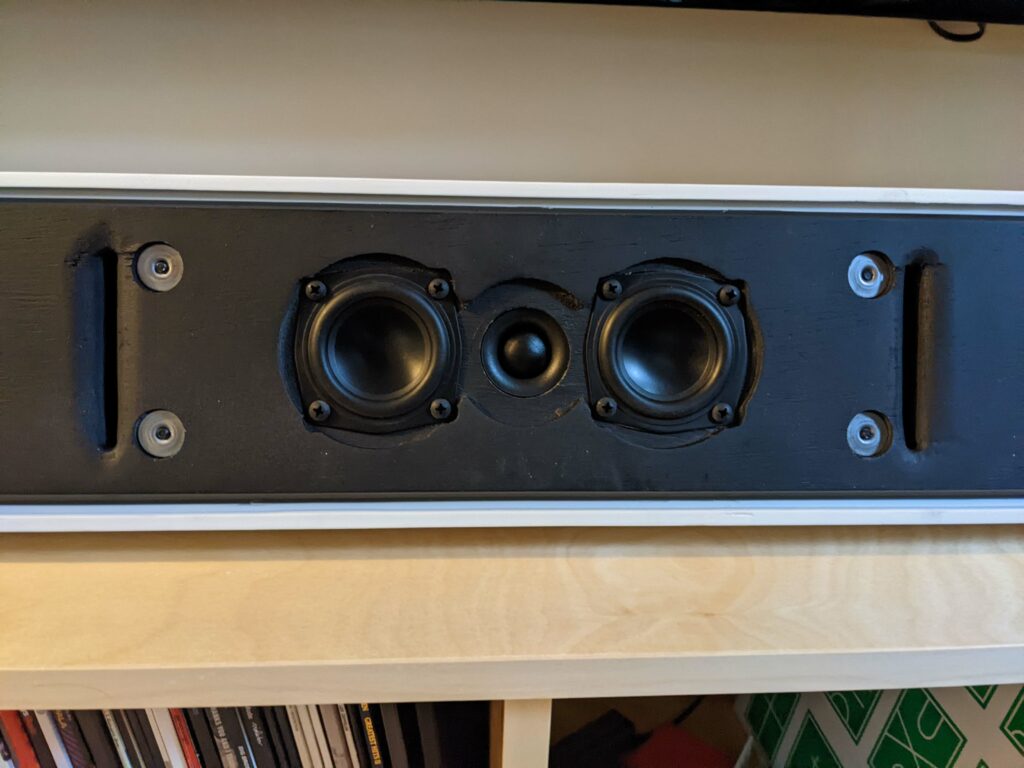
The woofer, tweeter, and port are mounted on the front but the midrange is mounted on the back side because it’s frame is unattractive, and because the dome protrudes substantially. I decided not to cut a recess pocket for the tweeter because the faceplate was a perfect fit inside the grille cover and the two locked together into a very strong structure. To compensate for the tweeter moving forward, I freehand cut a recess pocket in the back side allowing the midrange dome to protrude forward of the front panel and have the same acoustic center as the tweeter. Because of the grille I wasn’t concerned with edge diffraction effects.

Mounting the port was very challenging. I like the precision port products because they roll in and out so smooth and you can mount them close to the walls but I needed 7” of pipe in between and PSP doesn’t make elbows. I used a normal ABS 2” pipe elbow and ABS cement to join them together. It’s not a perfect fit because the PSP tube wall is much thinner than a normal Sch40 ABS pipe.
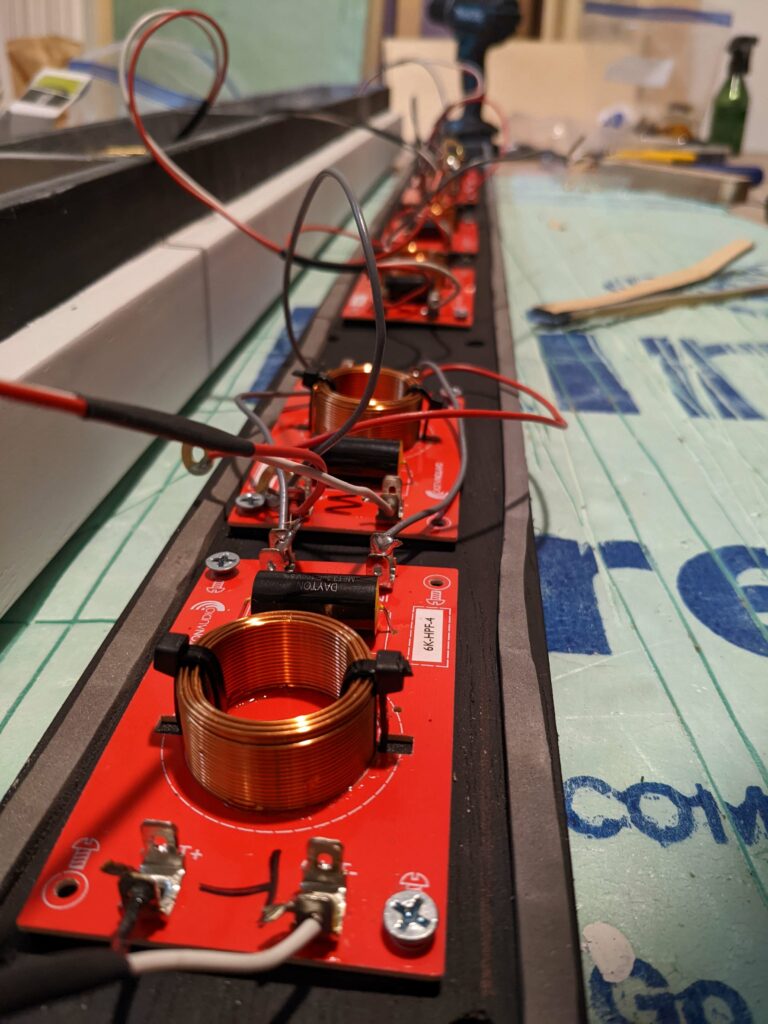
Crossover Design:
Instead of a passive crossover I opted to use the new 4 channel DSP amp from Dyaton KABD-4100. They have a 3 way speaker template which I modified to include an analog input EQ (because the analog input sounds dull compared to Bluetooth) and I deleted the POT controls for individual channel output volume. I opted for 4th order Linkwitz Riley alignment on all the drivers because I had to cross the midrange/tweeter higher than I originally planned (2.1khz vs 2.8Khz) because I felt the tweeter sounded thin at its lower range. Also, the midrange had some nasty breakup at 4.5Khz that I needed to stay well away from.

I think active crossovers are the way of the future for powered speaker design. The DSP is incredibly powerful, and you can fix your mistakes with a few keystrokes. Even professional speaker designers say they usually have some trial and error in a good 3 way design. I don’t have a big wall of high quality crossover components to swap in and out to try. For using the DSP, I set up my measurement mic and play some test tones. First, I adjust the speaker for a flat response and then tweak by ear for personal taste. I always try to use the minimum amount of corrections to get to the final product. After that I listen to a lot of music on it and see if I find any aspect annoying, then sleep on it, and make another pass of minor corrections the next day.

The tweeter has a large cap to protect it. I’m not ready to fully trust software not to break things yet.

Tips & Tricks:
1. DSP lets you do crossover topologies that would be incredibly expensive or impractical to build with passive components. On battery powered projects software crossover can as much as double your battery runtime on a complex setup like this
2. Apply a high pass filter below the F3 of the woofer. This will protect the woofer from mechanical over extension trying to play notes that it can’t play anyway. This lets you listen at much higher volume levels with less distortion.
3. Apply a low pass filter to tame cone breakup
4. Using steep crossover slopes minimizes driver overlap and the often difficult problems they can create
5. Use a calibrated measurement mic for tuning like the Dayton Omnimic or UMIK-1. Tune the speaker reasonably towards a flat response first, and then adjust for your personal taste second. If the speaker if for another person, tune it for their taste with music they like to listen to.
6. Don’t calibrate a speaker at the tail end of having a head cold.
7. Always use a high quality battery board with individual cell monitoring and balance charging. Cheapo lithium battery systems are a house fire waiting to happen.
8. When applying a finish like Osmo, sand the wood as smooth as it will take, usually 240-320 depending on the wood. Generously rub the oil on every surface (including the back side so it doesn’t warp the panels). When areas look dry, push oil form the wet areas for a good 10-15 minutes. Then using a buffer pad on a random orbital sander or polisher buff the surfaces smooth and let harden overnight. Apply a second coat a few days later if desired for more sheen but never a third coat or it will feel waxy. The final color won’t be visible for about a week.
9. High figure woods like walnut often have numerous internal cracks, rotten areas, and inclusions that you will have to deal with. It’s just the way it is. For deep cracks I used ultra thin CA glue to run all the way through the crack until it came out the bottom. This stabilizes the weak areas of the wood. For large cracks, voids, and rotten wood I carefully cleaned out all the bad wood I could get and then filled the area with Starbond black thick CA glue and accelerator. This is a fantastic product just be sure to follow their directions and be patient. I spent 3 evenings filling cracks and voids before breaking down the slab too much, and even then had some surprises when I cut new holes like the rectangular cut out on the back.
10. When you have only one shot at making the perfect cut out in your expensive material, make the shape first on a piece of scrap wood and then stick it over the fancy wood with double sided tape and use the scrap as a template with a flush trim top bearing router bit.
11. Always use a high quality router circle jig like the one from Jasper Tools.
12. Find a handle that’s soft to touch but has a stiff core inside to help distribute the weight of your fingers.
13. Lock miter joints are a pain to set up but fantastically strong and never walk off during glue up.
14. Band clamps are great too but corner clamps help hold things in perfect 90 degree angles while clamping.
15. You can never have too many clamps.

Conclusion:
The speaker sounds fantastic. It smashed the design goals for musical instrument ranges. I don’t think I would use this tweeter again as it has some strong sibilance problems around 6K that thankfully I was able to fid in the DSP. Strings and vocals are just incredible. My favorite cello pieces give me goosebumps. The battery board works great and provides quite a long runtime even at pretty darn loud levels. I love that it can charge from 5V to 24V and that it even included a car cigarette lighter port adapter with the battery board kit.

Walnut is a fantastic material to work with. I was privileged to work with some high end parts and materials on this project and advanced my skill considerably.

About the Designer:
I grew up in the Mojave Desert in a small community of scientists, craftsmen, and engineers. We were the kind of people who didn’t accept “it’s impossible” or “you can’t do that”. If I want something that doesn’t exist, I’ll just make one. Now I’m a thermal engineer in the computer industry and I currently hold 17 patents worldwide.

Project Parts List:

295-255

264-1468

325-212

142-107

027-352

268-348

325-434

120-055

325-116

260-7706

260-371

269-2100

292-526

262-302

260-540

Peerless-GBS-135F25AL02-04-5-1-4-Aluminum-Cone-Woofer-4-Ohm

Dayton-Audio-LW150-4-6-Low-Profile-Woofer-4-Ohms

Peerless-DQ25SC16-04-1-Titanium-Cone-Tweeter-4-Ohm

Dayton-Audio-LBB-5v2-5-x-26650-Lithium-Battery-Charger-Board-Module-21V-with-Charge-Protecti

5-Pack-26650-5000mAh-Li-Ion-Flat-Top-Rechargeable-Battery

47uF-100V-Non-Polarized-Capacitor

Precision-Port-2-Flared-Port-Tube-Kit

Dayton-Audio-KABD-4100-4-x-100W-Bluetooth-Amp-Board-with-DSP

24-VDC-5A-Switching-Power-Supply-with-2.5-x-5.5mm-Plug

Dayton-Audio-KAB-PMV3-Panel-Mount-for-KAB-v3-Boards-with-Function-LED-and-Install-Kit

Penn-Elcom-9120-Rubber-Cabinet-Foot-0.88-Dia.-x-0.31-H

6-Economy-Speaker-Grill

5-1-4-Economy-Waffle-Style-Steel-Speaker-Grill

Visaton-Grill-for-FRS8-Series

Penn-Elcom-H1008-Black-Leather-Look-Strap-Handle-8.57-Long

Speaker-Gasketing-Tape-1-8-x-3-8-x-50-ft.-Roll

1

1

1

1

1

1

1

1

1

1

1

1

1

1

1

1

Little Infinity

$
0
0


Designer:
Heldesign

Project Category:
Bookshelf Speakers

Project Level:
Intermediate

Project Time:
8-20 Hours

Project Cost:
Under $100

Project Description:
Bookshelf speakers based on Infinity SM 85 crossovers for my son’s room and his Kenwood RXD-C3 compact system

Design Goals:
The idea was to reuse some crossovers from Infinity SM 85 speakers. Due to the limited space available, they were made with 6-inch drivers, which would look modern and attractive with a good sound.

Driver Selection:
I used a 6-inch midwoofer and a 1-inch tweeter with a small base to accommodate the design I had already developed. They had to be 4 ohm like the Infinity originals. I chose a Peerless by Tymphany BC25SC06-04 1″ Textile Dome Tweeter and a 6-1/2″ Poly Cone Woofer 4 Ohm Midbass

Enclosure Design:
The design I developed is trapezoidal to avoid some internal refractions with a reflex port on the back and a cover that will help me hide the edges of the woofer in a contrasting tone with the box. Use dark brown veneer on the box with a gloss lacquer finish and an almond-tone metallic vinyl for the lid.

Enclosure Assembly:
The box was assembled using only carpentry glue, it was made of 15mm MDF for the whole box and it was lined with gloss catalyzed lacquered Oak veneer. The top was also made of MDF and finished with metallic almond vinyl.

Crossover Design:
used a couple of Infinity SM85 speaker crossovers

Tips & Tricks:
Nothing should be wasted, reuse as much material as possible. the minimum thickness of the box material must be 18 mm. Always try to do the best possible finishes, you will not regret it.

Conclusion:
I achieved my goal, the boxes were modern, the sound is very decent, they complement the kenwood very well. The negative is that as I use 15 mm MDF there is a bit of resonance from the boxes, they have good padding material, I am thinking of reinforcing the interior walls but it would reduce the interior volume, for now I leave them like that, I am very satisfied.

About the Designer:
I am an Industrial designer, lover of good audio. I have been working with wood for some time.

Project Parts List:

6-1/2″ Poly Cone Midbass Woofer 4 Ohm
Peerless by Tymphany BC25SC06-04 1″ Textile Dome Tweeter

Lighted Boom Box

$
0
0

Designer:
Jeff Bright

Project Category:
Home Electronics

Project Level:
Advanced

Project Time:
20+ Hours

Project Cost:
$100 – $500

Project Description:
I had a piece of pine wood I cut using my log saw. It was so thin, you could see light through the sap lines. I saved it because I knew I was going to make something weird and cool. I don’t remember how this idea started, but I settled on a lighted boom box using this wood as a faceplate with white LED lights behind it. I built the cabinet out of particle board with 3 seperate compartments for a 2.1 system. I bought a Dayton DTA-2.1BT2, 2 Dayton Audio PTMini-6 Planar Tweeters, 2 Dayton TCP115-4 4″ Woofers, and 1 HiVi 5″ as a sub. Was on a budget on this project, and there was a ton of other choices, all being more expensive. I used a music controller for the lights. The result is nothing short of amazing! Everybody who sees it says the same thing, that is Fricken cool! Except they didn’t say Fricken! Yeah, I stole that!

Design Goals:
Make the weidest, coolest boombox ever.

Driver Selection:
Dayton DTA-2.1BT2, 2 Dayton Audio PTMini-6 Planar Tweeters, 2 Dayton TCP115-4 4″ Woofers, and 1 HiVi 5″ as a sub

Enclosure Design:
Particle board with 3 compartments for the 2 woofers and sub

Crossover Design:
woofers and tweeters crossed over at 4000hz

Tips & Tricks:
Making a particle board boombox with square edges is easy, making one with rounded edges is hard. I cut 3/4″ thick pieces 1″ x 8″ with angles on the long ends. Glued together, they made 1 180 deg turn. Then used a flap disc on a sisde grinder.

Conclusion:
This turned out pretty cool! I made for my wife and she said she is proud of it, not something she does often.

About the Designer:
Pilot and mechanic on a corporate jet. I built a log saw 15 years ago and have cut up hundreds of logs. I always have one of a kind, weird cuts of wood that I never know what I am going to do with, but eventually find a project.

Project Parts List:

Dayton Audio DTA-2.1BT2 100W 2.1 Class D Bluetooth Amplifier with Sub Frequency Adjustment
Dayton Audio PTMini-6 Planar Tweeter 6 Ohm
Dayton Audio TCP115-4 4″ Treated Paper Cone Midbass Woofer 4 Ohm
HiVi F5 5″ Bass/Midrange

Smoke and Fire Full Range

$
0
0

Designer:
Bobby Kinstle

Project Category:
Bookshelf Speakers

Project Level:
Beginner

Project Time:
8-20 Hours

Project Cost:
$100 – $500

Project Description:
This is a full range design intended to explore the concept of purist simplicity popular in some audiophile circles. I’ve seen similar designs online with drivers from Fostex, Aiyima, and Mark Audio and wanted to see what all the fuss was about.

Design Goals:
The main goal of the design was to cover an acceptable frequency range with good bass, clear mids, and detailed highs. My other goals where to teach myself how to build a box using all miter joints and the work on improving my painting and veneering skills.

Driver Selection:
I chose the MarkAudio Pluvia 7.2HD driver because it had a flat response to 30khz, which is amazing for a full range driver, and also in simulation played down to F3 at 43Hz. Frankly the simulation results were unbelievable to the point of assuming something had gone wrong, but I checked it a few different ways and kept getting the same answer so I decided to try it out.

Enclosure Design:
The enclosure is a simple box but every board has a 45 degree miter joint on all sides to conceal the board ends at the joints. It’s made of ½” MDF which is fine since this is a low power application. Internal volume is 15L which is the ideal volume in simulation for this driver. Port calculations said minimum port diameter of 1.25” but I went with a 2” port 7 inches long so I could use a precision port as those always make the bottom bass range so lusciously smooth. The bottom has 4 rubber feet. The electrical connections were mounted about one fist above the bottom and 2” apart so I’d have enough room to comfortably tighten them with a lot of force.

Enclosure Assembly:
I glued the top, bottom, and sides using painters tape to hold everything in position until I could get the band clamps in place and that worked pretty well. After that was dry I dropped in the front and back with mild clamping pressure so not to bow the box outwards. Circular cuts were made with a circle jig on my router and done before box assembly. I drilled 2 holes for the terminals slightly smaller than the knurl and then hammered them into position to form a tight seal and strong joint that will never spin when tightening.

Crossover Design:
None. Zip. Zilch. Nada. Nope.

Tips & Tricks:
Tips and Tricks
1. Don’t be afraid to experiment. Make mistakes. Learn why they happened, and then fix them.
2. Test finishes with materials like dyed veneer and let them sit for the FULL cure time listed from the manufacturer. My veneer changed color 3 days after application.
3. Contact cement isn’t strong enough for natural wood veneer.
4. Always check the wire hole orientation on the binding posts before hammering them in.
5. Metric drivers require metric circle jigs.
6. The best way to get a smooth finish is to apply sanding sealer, sand it smooth and paint. Skip the primer. Causes more problems than it solves.
7. Invest in an HVLP sprayer. It’s so much better than rattle cans.
8. Beware experimental projects that you intend to give to your friends afterwards. You might like them so much it’s hard to let go of them. Or you can visit your friends more often and ask them to play music.

Conclusion:
TL:DR These MarkAudio Pluvia drivers punch so far above their weight class that they risk hitting airplanes.

These speakers absolutely smashed it. I didn’t expect much from these drivers as I’ve always been a disappointed with full range drivers in the past. But I can’t think of a time I’ve been more pleasantly surprised by a speaker. The sound is rich, clear, and full. Highs are clean and not overly bright. Midrange is smooth and mellow. Vocals are a little forward. Violins and brass are buttery smooth. Cello is thick and meaty. Did I mention lows? The bass on these is simply astonishing. How can such a small speaker produce so much bass and still be clean? Reading this you won’t believe me until you’ve heard a set yourself. I’m listening to them as I type this and I still don’t believe it.

They sound great from 60-80dB and have a very wide dispersion. Highs are perfect up to 30 degrees off axis and still quite good to 45. They play fantastic in near and mid field and are perfectly at home on the desktop close by but also have no difficulty filling my 16×24’ living room. The sound character is very similar to the TangBand bamboo cone drivers. I haven’t found any music that sounds bad on them, even bass heavy EDM comes out great as long as you don’t turn it up too loud. Male and female vocals both sound fantastic but with a slight forward bias on male vocals. When I show these to people they think the much larger speakers next to them are making all the sound. Amplifier quality matters on these speakers a lot. Small chip amps sound a little harsh in the midrange with these but good class AB and better amps sound wonderful. They pair well with a small class A or tube amp too.

The lack of crossover components means these are super easy to build at a reasonable price. I think they would make excellent surround sound speakers in a 7.1 Atmos setup, even if you had full size mains.

About the Designer:
I grew up in the Mojave Desert in a small community of scientists, craftsmen, and engineers. We were the kind of people who didn’t accept “it’s impossible” or “you can’t do that”. If I want something that doesn’t exist, I’ll just make one. Now I’m a thermal engineer in the computer industry and I currently hold 17 patents worldwide.

FH-5 Art and Folded Horn

$
0
0

Designer:
John E Henderson

Project Category:
Bookshelf Speakers

Project Level:
Intermediate

Project Time:
20+ Hours

Project Cost:
$100 – $500

Project Description:
Hi. I am asking for input on this design. Please don’t laugh! This thing took on a life of its own. I will explain.

My idea was to add some sound to a painting. For example, I wanted to paint a mountain river on a stiff piece of wood and add the sound of babbling stream by adding an exciter to the back. The project grew into what you see below. It is now a wall mounted speaker with a painted baffle.

Since I knew so little about DIY speakers, I hit the internet to do some research. I found myself enthralled by speaker design, and my idea of something simple morphed into a 6 month adventure into the world of audio design. I decided on a design with a single driver that I would incorporate into the painting. Remember, this started as an art project. I liked a design I found in a forum called a folded horn. I copied it, then modified it a bit to suit my project. Since I know nothing of the principles involved, I did make sure that the dimensions of the horn did not change from the original. I wish I knew who to credit for the design, but I don’t. I will say, bless all of you guys that so willingly share your designs.

The result is well beyond my expectation for sound quality, but I can’t help thinking they could be better, especially on the low end (of course).

I power them with a Dayton Audio Amp and a Dauk tubed preamp with tone control.

My ears are the only instrument I have with which to measure the sound, and the Hit Makers my only reference. I find it very difficult to describe sound, but I will give it my best shot. Keep in mind that I know very little about audio design, so…

First, they are considerably louder than the Hit Makers, and the sound clarity was at least equal to them. The Hit Makers had a richer bass, but not nearly the presence. My speakers just fill the room (12 x 12) with music that is crystal clear, where the Hit Makers have a much more defined point of origin. Does that make sense?

When I listen to (Lets say, School, by Supertramp) with the tone control bypassed, I just don’t get the thumping notes I hear with the Hit Makers. However, when I turn the bass up on the preamp, they really come alive. They don’t’ have the same crispness in the bass notes that I would like to hear, but a solid response nonetheless. Overall, I really can’t believe how good they sound when I adjust the tone to my liking.

By the way, I tried them without the horn. I left the inside empty and sealed box. It sounded different, but I don’t think it was better. The bass may have improved a touch, but the overall sound was not as good to my ears. Again, it is hard for me to describe, but after a while they felt like they were screeching at me with just the sealed box. With the horn insert installed, they just seemed much smoother and less fatiguing to my ears.

Design Goals:
1. Incorporate the driver into the art work.
2. It needed to be light enough to hang on a wall.
3. It needed to sound decent.
4. Staying under $250 for the set was a must.

Driver Selection:
Parts Express Part #264-958 Tang Band W5-2143 5 inch full range.

Enclosure Design:
Folded Horn cut from sheet foam in plywood cabinet. The inside dimensions are 30 x 15 x 3 inches and they weighs 15 pounds each. They mount to the wall using French cleats, and I use a rubber backing to keep it snug. The idea is to help reduce vibration since they are intentionally lightweight.

Enclosure Assembly:
Cut by CNC, Glued and screwed. I have added pictures of several of my designs to this point, and an image of the inside of the box.

Crossover Design:
na

Tips & Tricks:

Conclusion:
My intent is to make several of these for an art show later in the year, and I want them to sound as good as possible without changing the dimensions too much. Again, the project is supposed to be more about the art than the sound. It just morphed into a sound project instead.
I guess my question is: What would you do to improve this design?

About the Designer:
I am a retired graphic designer. I have minimal experience with DIY speakers. My only successful attempt to this point is a “Hit Makers” kit I built many years back, and a half dozen old radio conversions. I mention this so you know that technical talk is going to be meaningless to me. But, if anyone has any ideas or comments, I would love to hear them.

Project Parts List:

Tang-Band-W5-2143-5-Paper-Cone-Full-Range-Driver-8-Ohm-264-958

Amazing line source

$
0
0

Designer:
Amazing loudspeaker

Project Category:
Freestyle Speakers

Project Level:
Advanced

Project Time:
20+ Hours

Project Cost:
Over $1,000

Project Description:
These are a tribute to bob carvers als1000 speakers

Design Goals:
3-d imaging and soundstage

Driver Selection:
Dayton planer ribbons and 6.5″ buyout speakers

Enclosure Design:
Sealed

Enclosure Assembly:
Wood and glue

Crossover Design:
Hand picked 6bd – 18db slopes

Conclusion:
Sound incredible!!

About the Designer:
Bob carver a physicist that loves all things audio. I studied under his direction on speaker theory and application.

Baby amazing line source

$
0
0

Designer:
Baby amazing line source

Project Category:
Tower Speakers

Project Level:
Advanced

Project Time:
20+ Hours

Project Cost:
$500 – $1,000

Project Description:
A smaller line source speaker design based on bob carvers ALS-1000 line source speakers .

Design Goals:
3d imaging and sound stage

Driver Selection:
Dayton planer tweeters and 6.5″ buyout Dayton speakers

Enclosure Design:
Sealed

Enclosure Assembly:
Wood and glue

Crossover Design:
6db to 18db

Conclusion:
Incredible sounding with free air woofer towers using a Dayton apa1200dsp to drive said woofers

About the Designer:
Bob carver is a physicist that loves all things audio. I studied under him on speaker theory.

Fabric and leather

$
0
0

Designer:
Fabric and leather

Project Category:
Bookshelf Speakers

Project Level:
Beginner

Project Time:
20+ Hours

Project Cost:
$100 – $500

Project Description:
Fabric and leather. Brass corners and furniture nails along the sides. Black glass on top

Design Goals:
Something different, inspired by suitcases

Conclusion:
Fun, but lot of work

About the Designer:
Norwegian

Project Parts List:

Samba MT Bookshelf Speaker Kit with Knock-Down Cabinet

Subwoofer

$
0
0

Designer:
Philip Nigro

Project Category:
Subwoofers

Project Level:
Beginner

Project Time:
8-20 Hours

Project Cost:
Over $1,000

Project Description:
Dayton audio subwoofer

Design Goals:
Match bookshelf speakers

Driver Selection:
295-463

Enclosure Design:
10” sub with dual passive radiator

Enclosure Assembly:
Kit

Crossover Design:
None

Conclusion:
Awesome

About the Designer:
Typically low budget looking for high quality sounds

Project Parts List:

Powered Dayton Audio Reference 10″ Subwoofer Kit with Dual Passive Radiators & 500 Watt DSP Plate Amp

Abrams 1

$
0
0

Designer:
Abrams

Project Category:
Freestyle Speakers

Project Level:
Intermediate

Project Time:
8-20 Hours

Project Cost:
$500 – $1,000

Project Description:
Speaker build

Design Goals:
To achieve the sound of a floorstander but the form of a bookshelf

Driver Selection:
EPIQUE 180

Enclosure Design:
Front ported , simple reflex

Crossover Design:
2 way crossover

Tips & Tricks:
Ask, consult, deliberate and then do what you think is best. There is a lot of good advice out there which I found in the tech talk forum.

Conclusion:
Big sound from not a tower

About the Designer:
I am a surgeon by profession but Audio DIY is my hobby. Made another tower TL speakers and amps. Enjoy it very much

Project Parts List:

Epique E180HE-44 7″ DVC MMAG Extended Range Subwoofer 4 Ohm per Coil

Walnut Subwoofer Cabinet

$
0
0

Designer:
Matt

Project Category:
Subwoofers

Project Level:
Intermediate

Project Time:
8-20 Hours

Project Cost:
$100 – $500

Project Description:
A long time ago I built some bookshelf speakers as part of a college class. They’ve been really great, but they’re small and I wanted some more bass response. My wife said if it matched the rest of the furniture that I could build one.
We have a lot of mid century modern style furniture so I was trying to go for that style here. it is made out of walnut plywood, and finished with danish oil. I went for a bass reflex design using a 10” woofer and a 3” vent. There is a 100 watt subwoofer amp on the back of the cabinet.

Design Goals:
Build a cabinet that looks like something you could buy in a furniture store.
Good response down to about 25-28hz.
Mid century modern style.
Budget concious, needs to be under $500 total.

Driver Selection:
Peerless 10” Woofer 264-1110
3” x 4.5” long port tube 260-404

Enclosure Design:
This is my own design, I looked up a few examples of mid century cabinets and went with that. Originally I was going to add a door onto the other side, and I may still do that, but sourcing walnut boards at a reasonable price is difficult for me.

The subwoofer enclosure is about 2.7 cubic feet. I kept the port tube at its full 4.5” length which gives a tuning frequency of about 30hz.

Crossover Design:
No crossover beyond the one built in to the amplifier.

Tips & Tricks:
Use a saw cut guide (long enough to cut a full 4×8 plywood sheet). If you’re like me you don’t have a full workshop, but a $30 saw guide can really help you to get straight square cuts.

When you glue use more clamps than you think you need!

Conclusion:
I have never built a subwoofer before, just smaller speakers, but I am pleased with how this looks and sounds. My wife and I spent a while listening to our favorite songs with the entire set up and she gives it her seal of approval!

About the Designer:
I started building speakers after taking a beginner loudspeaker design class in college. Since then I’ve various portable speakers, a surround sound setup (without a sub) and this subwoofer. Every time I start a new project I try to make sure I do a better job than my last project. I work as a programmer, but I am starting to accumulate a lot of woodworking tools now.

Project Parts List:

Part #DescriptionQty
264-1110

300-802

260-404
Peerless by Tymphany 830668 10″ Paper Cone SLS Subwoofer

Dayton Audio SA100 100W Subwoofer Plate Amplifier

Speaker Cabinet Port Tube 3″ ID x 4-1/2″ L
1

1

1

Passive sound bar

$
0
0

Designer:
Addy

Project Category:
Home Theater

Project Level:
Beginner

Project Time:
8-20 Hours

Project Cost:
$100 – $500

Project Description:
Simple and minimal passive sound bar with 3 MTM channels. Left and right channels are ported while center channel is sealed.
Project cost: around $320. I’ve had most of the parts pre-COVID, so I paid around $250.

Design Goals:
In order to achieve a minimalist home theater setup, I opted not to have a a bunch of speakers everywhere. However, any decent-sounding sound bars would cost upwards of $2000 and up. Also, with a 75″ TV, I wanted a wider soundstage, so I decided to build one at 60″ wide.

Since I already have a Marantz 7.1 AV receiver and subwoofer, it made sense to build one a 3-channels.

Most sound bars prioritize function vs form. I wanted the best of both worlds, so I wanted to go beyond just a black rectangle. I’ve seen a lot of DIY builds using wood, which are all amazing-looking, but my goal was to go ultra-modern.

I was inspired by the look of the Beosound Stage sound bar, with the soft corners, and narrow-depth bezel.

Using 3 pairs of ND65-8, there was no way I could make a DIY version that could output decent bass AND make it compact. The solution was to use a bit of optical illusion, and have the bezel appear small, yet contrasting against the rest of the enclosure, which has the bulk of the volume.

Yes, ND65s are full range, so why use an MTM configuration? It’s a great driver, but I really feel it lacks brightness, so I supplemented it with a tweeter.

Driver Selection:
ND65-8 Full range drivers x6
ND20FB4 Tweeters x3

Enclosure Design:
I used 100% plywood, with a lot of wood filler, but in retrospect, MDF would’ve been a much better choice since it’s dimensionally stable.

Crossover Design:
Since the ND65 can handle the heavy-lifting of most of the frequency spectrum, I chose to cross it higher at 6k, to save on Xover; going lower would drive up the cost of inductors.

I used 3 pairs of high pass + low pass boards crossed at 6k.

Tips & Tricks:
N/A

Conclusion:
I’ve used the ND65 drivers in the past in a mini boombox, but using two of these with a tweeter with a port really made this shine. All things considered, I am very happy with the way this turned out. As mentioned earlier, MDF instead of plywood would’ve looked a little cleaner, and less warping.

About the Designer:
I’m just a tinkerer, and started my first build with a boombox enclosure for an old pair of Polk T15, some Tolex, and a Lepai amp.

I’ve since been a lot more ambitious with different designs over the years, and finally built this sound bar to match the living room aesthetics, TV size, and to fill the room with good sound that I would never achieve with a sub-$500 store-bought version.

Project Parts List:

Part #DescriptionQty
290-206

275-035

260-1946

260-1948

091-1245

091-1250


Dayton Audio ND65-8 2-1/2″ Aluminum Cone Full-Range Neo Driver 8 Ohm

Dayton Audio ND20FB-4 Rear-Mount 3/4″ Soft Dome Neodymium Tweeter

Dayton Audio 6k-HPF-4 High Pass Speaker Crossover 6,000 Hz 12 dB/Octave

Dayton Audio 6k-LPF-4 Low Pass Speaker Crossover 6,000 Hz 12 dB/Octave

Dayton Audio BPA-38G HD Binding Post Banana Jack Pair Gold

Parts Express Binding Post Banana Jack with 1″ Thread 2 Pair Black Gold


6

3

3

3

1

2

Little Wonders

$
0
0

Designer:
Jon P.


Project Category:
Bookshelf Speakers


Project Level:
Beginner


Project Time:
8-20 Hours


Project Cost:

$100-$500


Project Description:
Point Source desktop speakers with full range drivers


Design Goals:
To design and build a pair of desktop speakers that look and sound great


Driver Selection:
PN 295-349 PS95-8 full range drivers Qty: 2


Enclosure Design:
1.1 cubic foot slot-ported enclosures tuned to approximately 68 hz.


Crossover Design:
N/A


Tips & Tricks:
Take care to make the cuts straight and line everything up right, and make sure to get the measurements right, especially on the port.


Conclusion:
I’ve ended up with a great looking pair of speakers that sound wonderful and have surprisingly good bass response for their size!


About the Designer:
I’m a very musically inclined guy who has been messing around with speakers pretty much all of my life. I’m married to a beautiful woman and have two great kids.


Project Parts List:

Part #DescriptionQty.
295-349Dayton Audio PS95-8 3-1/2″ Point Source Full Range Driver 8 Ohm3

Lauda 3-Way Center Channel

$
0
0

Designer:

 Colonel7


Project Category:
Home Theater


Project Level:
 Intermediate


Project Time:
8-20 Hours


Project Cost:

$100-$500


Project Description:
A 3-way active center channel for television watching and home theater. It has a custom finish to match an existing tv stand and console.


Design Goals:
Very wide horizontal dispersion and elimination of lobing (dead spots with volume significantly reduced) caused by traditional MTM center designs. The tweeter directly over the mid as part of the 3-way design eliminates that issue. This speaker is used in a very wide room at a far distance. Tv watchers sit across a 12 foot wide line of listening positions about 14 feet from the tv. Woofers do not need to be bunched together because of the listening distance and summation.


Driver Selection:
 All bought at Parts Express. Woofers are 5” Visaton W130s-4 wired in series (no longer available). Midrange is a 3” Tectonic BMR TEBM46C20N (PE Part # 297-2157) for clarity and the tweeter is the very wide dispersion Peerless BC25TG15-4 (Part # 264-1040). The speaker is powered by the new KABD-430 (Part # 325-430) 4-channel amplifier. Woofers are powered by 2-channels bridged and tweeter and mid each have their own channel.


Enclosure Design:
The cabinet is 24” W x 8.5” H x 9” D, sealed. It is particle board due to cost. The top is removable due to me experimenting between passive and crossovers and trying out a ported design first. The mid has its own internal wood enclosure stuffed with alternating poly-fill and denim. Behind and around woofers is lined with 1/2 inch Sonic barrier (Part #260-520). I matched the cabinet color as best as I could to the tv console using a semi-gloss paint and then took gray stain and dry brushed it very lightly with a chip brush to match the finish.


Crossover Design:
Asymmetric with 18db 3rd order Butterworth low pass for the woofer at 850 with mid picking up at 900 for 2nd order Linkwitz Riley and LR24 as well for the tweeter at 3500. Since the woofers are sealed they have an F3 of about 85 but 2 subwoofers round out the low end.


Tips & Tricks:
An easy way to not worry about sealing the mid’s wires and drilling into its own enclosure to fish them through is to use gasketed binding posts on the mid enclosure but inside the whole cabinet. A couple $ and much easier.


Conclusion:
This project came from a special request from my wife who wanted better clarity of sound and more volume of commentators voices for Formula 1 races – hence the Lauda. It works as designed and sounds great for music too. We’ve been asked how we bought a speaker and console together so it passes the eye test.


About the Designer:
Lifelong lover of audio and diy tinkerer who enjoys learning by doing. I’ve progressed from a speaker kit to building ported and sealed subwoofers, to designing my own 2-ways and now the 3-way. There is always something to learn so my next project will incorporate an open baffle for the mid.


Project Parts List:

Part #DescriptionQty.
292-564Visaton W130S-8 5″ Woofer with Treated Paper Cone 8 Ohm2
297-2157Tectonic TEBM46C20N-4B BMR 3″ Full-Range Speaker 4 Ohm1
264-1040Peerless by Tymphany BC25TG15-04 1″ Silk Dome Tweeter1
325-430Dayton Audio KABD-430 4 x 30W All-in-one Amplifier Board with DSP and Bluetooth 5.0 aptX HD1
260-520Sonic Barrier 1/2″ Acoustic Sound Damping Foam with PSA 18″ x 24″1
Viewing all 740 articles
Browse latest View live


<script src="https://jsc.adskeeper.com/r/s/rssing.com.1596347.js" async> </script>