Quantcast
Channel: Parts Express Project Gallery
Viewing all 739 articles
Browse latest View live

electronic CBT

$
0
0
wp_20151128_003 wp_20151206_001 wp_20151011_003 wp_20151017_003 wp_20151010_006 wp_20151010_002 wp_20150928_002 wp_20150919_003 wp_20150919_002

Designer:
Dean Arno

Category Division:
Open Unlimited

Project Description:
Two way miniDSP bi-amped 8″ woofer / 24 .5″ CBT tweeter array
each has :
3 Sure Electronics AA-AB32155 class D amps for the tweeters
1 Yuan-Jing TDA7293 85 watt Amp board for the woofer

Design Goals:
Use miniDSP’s for CBT tweeter steering (delay and shading) and miniDSP for 2 way crossover.
3 mini DSP’s total.

Driver Selection:
Dayton Audio DS215-8 Designer series 8″ woofer.
Dayton/Audio Artistry 1/2″ tweeters

Enclosure Design:
Closed Box

Enclosure Assembly:
Ash and Walnut hardwood sides, Ash hardwood / Baltic birch plywood laminate rear and speaker baffle

Crossover Design:
miniDSP


The Dayton Neo 10’s (DN-10’s)

$
0
0
dn10testing dsc03505 dsc03516 dsc03521 dsc03523 dsc03525

Designer:
Thomas Zarbo

Category Division:
Dayton Audio

Project Description:
The approach for this design was to have a full-range speaker in a non-traditional cabinet shape, but in an easy to build format. This is an easy-to-build speaker with a unique ‘look’ that fits in pretty much anywhere.

Design Goals:
In considering how I usually listen to music, I realized that I don’t often listen very loudly, which made me wonder if I could achieve full frequency reproduction in a fairly small and slender tower shape. Since overall SPL was not my goal, compromises could be made to allow for lower bass reproduction as well as a lower tweeter crossover point allowing for a cleaner midrange reproduction.

Driver Selection:
I chose the ND105-4 for the woofers, and the ND28F-6 as the tweeter. A smaller neo tweeter is often paired with these woofers, but I wanted to minimize the amount of midrange reproduction for the woofers, as they have massive excursion… and the beefier ND28F tweeter allowed for that lower crossover point.
Also, this is a passive radiator design, using the Dayton SD270-PR Passive Radiator with a total of 20 grams of weight added.

Enclosure Design:
The enclosure is deceptively easy to build. It is constructed of 3/4″ MDF with the exception of the front baffle, which is 3 layers of 1/4″ MDF, easily glued up and bent in one operation. The box is roughly 35″ high, 6″ wide, and 14″ deep. The bottom angles are all 90 degrees, and the top angles are both 96 degrees to keep things simple.
The area where the drivers are is flat, the curve begins below them, and continues to about 4-5″ before the bottom, keeping things nice and simple. This box can be constructed with a circular saw, router, and jig saw.

Enclosure Assembly:
I glued up the top, back, and bottom boards to one side, along with the 4 braces in one operation.
Before gluing up the second side, I created a small board of 1/4″ MDF to house the crossover, and drilled holes in the bottom of the enclosure to make it easier to install the crossover after construction.
Then I glued up the other side to that assembly after dry. I cut out the holes for the Passive Radiators mirroring each other, then added the cross brace behind the PR for additional strength.

Crossover Design:
The crossover is still under development, but will likely be a second order for the woofers with a .5 coil on the lower woofer, as well as a fourth order filter for the tweeter given it’s lowish crossover point.


Conclusion:
I wanted a full-range mini-tower speaker that could fit in almost anywhere, but be fairly easy to build for the novice. The gentile curve on the front adds interest and creates an interesting box that excels at distributing sound up to the listeners ears regardless of where they are in the room, or what they may be doing. This F3 of this speaker is 41 Hz, and with the passive radiator placed so close to the ground, the bass is not lacking at all… no subwoofer is necessary. The down side is that this system will only play medium-loud before maximum excursion is reached, so maximum output is somewhat limited. They do play fairly loud before complaining however, and have a full-range satisfying sound overall.


Cherry π’s (Cherry Pi’s)

$
0
0
cherry_pi_1 OLYMPUS DIGITAL CAMERA OLYMPUS DIGITAL CAMERA OLYMPUS DIGITAL CAMERA OLYMPUS DIGITAL CAMERA OLYMPUS DIGITAL CAMERA OLYMPUS DIGITAL CAMERA OLYMPUS DIGITAL CAMERA OLYMPUS DIGITAL CAMERA

Designer:
Ron Erickson

Category Division:
Open Unlimited

Describe your Speaker Design:
TMWW fully active 3-way.

Design Goals:
SOTA active system with the best drivers I could afford.

Driver Selection:
Vifa NE225W-08
BG Neo8-S
Raal 10-70D

Enclosure Design:
1.5 cu.ft. sealed woofer enclosure with separate enclosure for mid and tweeter mounted on standoffs.

Enclosure Assembly:
Baltic birch plywood panels veneered with quarter sawn cherry with cherry hardwood edges. Woofer cabinet is internally braced, lined with cotton insulation and stuffed with Acousta Stuf polyfill. The Mid-Tweeter cabinet is the same except it needed no bracing.

Crossover Design:
Active crossover is created with Ultimate Equalizer software running on a DIY computer using a Delta 1010LT multi-channel sound card. Crossover points are at 400Hz and 4000Hz with 48db/oct LR slopes. UE software also does EQ based on measured driver response. It has the capability to compensate for room response but that feature will not be used for the contest as there will be no opportunity to take in room measurements.

Conclusion:
I couldn’t be happier with the capability and sound quality of this system. When I demonstrated them at DIY Iowa 2013 one attendee told me it was the best speaker demo he had ever heard anywhere.

Build thread. http://techtalk.parts-express.com/forum/tech-talk-forum/58628-grinnell-or-bust?239377-Grinnell-or-Bust=


Studio Monitors

$
0
0
20160306_134537 20160320_160154 20160311_111513 20150422_144654 20150422_144629 img_2240 20151028_154146 20151028_154217 img_4316 20151210_122307 20151227_121039 freq_response_monitors studio_monitors_back studio_monitors_back_speakon studio_monitors_side

Designer:
Studio Monitors

Project Category:
Bookshelf Speakers

Project Level:
Advanced

Project Time:
20+ Hours

Project Cost:
Over $1,000

Project Description:
2 way bookshelf speakers Bi-Amped with active crossover and speaker protection circuit. and power supply ( all external )

Design Goals:
will serve me as my main studio monitors , with uniform frequency response and a range of 20 kHz-50Hz

Driver Selection:

Morel TiW 638Ft Part # 297-101
Morel CAT 308 Part # 277-082

Enclosure Design:
For the design of the box i used the recommendation of part express site Optimum Cabinet Size for sealed box and the help of .BassBox 6 Pro. The box made from 19mm birch ( all sides) and glued together. the drivers are flush mounted. the desing plan made with the help of sketchup program.

Enclosure Assembly:
The design plan I sent to a Langer who prepared a CNC machine plan.

Crossover Design:
I chose to go Bi- Amp so i ordered 4X QUAD 405 clone amp kits ( Class AB ) from ebay. for the crossover i chose a 4th order linkwitz riley active crossover that i ordered from Elliott Sound Products and added to all this , speaker protection kit ( as well from ebay )

Conclusion:
happy to say that for my first project i get better result than i expected. compare them in pro studio acoustic environment with YAMAHA NS10M and got overall good feedbacks from the house technicians. made some measurements ( frequency response graphs included)

About the Designer:
Student graduate of sound engineering

Low Noise Cables

$
0
0
img_sm0025 img_sm0026 img_sm002211 img_sm002110 img_sm00022 img_sm00085 img_sm00116 img_sm00137 img_sm00168

Designer:
John Hollander

Project Description:
This project makes 2 low noise interconnects from a preamp to an amplifier.

Design Goals:
I noticed some noise from my power amplifier the other day which lead me to investigate making some new interconnects. There is information on the web showing how Star Quad wiring reduces the noise on the microphone cables, which is ideal for interconnects between a preamp and amplifier.

Driver Selection:
This project uses “Balanced” connections between the amplifier and preamp. Balanced connections have 3 wires and use XLR end connectors.

Parts Express carries Belden’s Star Quad cable. This cable has the 4-conductor twisted pair wires and the braided outer sheath required for Star Quad cabling.

Neutrik male and female XLR connecters were also used.

Enclosure Design:
Cable protection
Left alone the black Belden cable insulation would look like any other interconnection cable. As these cables are “special”, they are covered in blue Techflex Braided Sleeving.

Enclosure Assembly:
Cable Assembly, Sequence of assembly

Measure or mock up interconnection wire length. Leave an extra about 5 cm of wire to enter each connector. Cut wire to length.

Measure and cut the Techflex about 5 cm shorter than the length of each wire.

Push the Techflex on the cable. The technique can be seen on You Tube. The sequence is with hand-1 hold the cable; push the Techflex on with hand-2; Hand-2 pinches the Techflex and
cable together creating an expanded bubble of Techflex over the cable; Hand-1 release the cable allowing the Techflex to collapse and move down the wire.

Center the Techflex on the cable. You will notice the Techflex will be shorter than its original length.

Use about a 4 cm piece of heat shrink tubing to secure the ends of the Techflex. Center the heat shrink tubing half on the cable and half on the Techflex. Use a longer piece of heat shrink tubing if you want the tubing to show outside of the Neutrik connector.

Slide on the Neutrik connector ends. The hard plastic wire clamps are split and can be added over the wire later. They are difficult to move over the Techflex.

Cut the Belden wire insulation and heat shrink tubing down to the wire braid. The wire braid is easily cut so be careful as we need the braid. The pictures show cutting the heat shrink plus cable to a length of 3 cm.

Remove the insulation. Unravel the wire braid using a pointed tool. Twist the wire strands together to form the ground wire. Cut the paper and strings from the cable and unravel the twisted wires.

The twisted cable pairs are mostly blue and mostly white. Straighten the wires. Cut all the wires including the new ground wire to a length of about 2 cm.

Strip about 1 cm of the 4 insulated wires. Twist together the mostly blue wires, then twist together the mostly white wires. You should now have three connection points; bare Ground wire, mostly Blue wire, and a mostly White wire.

Inspect the Neutrik connectors and notice the terminals are labeled 1, 2, and 3 on both the male and female ends. Solder the Ground wire to #1, White wire to #2, Blue wire to #3. Inspect the connections to ensure no small wires are loose.

Straighten the wires, snap over the wire the Neutrik internal plastic wire clamp. Slide down the Neutrik top cap and screw into the connector end.

Crossover Design:
Use an electrical meter to check that the connector pins and receptacles are connected correctly.

Products Used
Part # 092-304 Neutrik NC3FXX Male XLR Connectors
Part # 092-307 Neutrik Female XLR Connectors
Part # 102-1270 Belden Brilliance 1192A 24 AWG 4C Star Quad Mic / Line Cable
Part # 082-328 Techflex 1/4″ Expandable Sleeving

Tips & Tricks:
Leave enough room to strip the wires.
It may be helpful to trim the bare wires after they are twisted together.
Use masking tape to hold items steady so they can be soldered
Use kitchen jar opener sticky pads to hold and screw the connector pieces together.

About the Designer:
I’m a former design engineer turned manager, so I use speaker building as a creative outlet. I have been building speakers for 15 years+

The Granite Titanic’s

$
0
0
surrontop_zpsf2921485 subwgranite poly4_zps5b4b1113 morebracing_zps7a71494a dsc00006 dsc00007 basesandspacers_zps293beb2b boxesdryfit_zps3f43eedd

Designer:
Thomas Zarbo Jr.

Project Description:
I had two 12″ Titanic MK2 subwoofers from a previous project that needed a home and I decided to build a dual-sub setup. This design uses quality materials and is also dual-use… the subs also serve as end tables.

Design Goals:
I wanted these subwoofers to be modestly sized, but also to look unique and higher-end. I wanted a durable, but beautiful top for these subs since they would also serve as end tables… and after consulting with a local kitchen remodeling center, I decided to have two granite ‘toppers’ created for the tops of these cabinets. I priced solid surface materials such as “Corian,” but because they came only in 1/2″ thick pieces, they would have to be built up to the finished size and would actually cost more than the two granite toppers I ended up using.
I also wanted to go smaller in size, and for these subs, that meant sealed. I ended up using a Crown 1,500 watt pro-amp to power these subs with, and with the built in crossover/processing available on that amp, I was able to get outstanding low-end output, even in a sealed cabinet.

Driver Selection:
As I stated previously, this project happened because I had two older Titanic MK2’s that needed a home. I actually started out with 4, but used two in projects for friends and relatives. Although a few generations old, the Titanic MK2 12″ subwoofer has high excursion and plays fairly clean, even by today’s standards. They are meant for home theater and don’t mind pounding out low bass all evening long if needed.
I suspect that the 12″ Ultimax driver would be an almost direct replacement for the ‘discontinued’ Titanic driver since it’s knock-down cabinet that PE sells is approximately the same volume as my boxes.

Enclosure Design:
The design for the enclosure is straightforward except for the extremely large 3″ roundovers on the corners. I don’t have a router bit big enough to make a 3″ roundover, and even if I did, I wouldn’t dare use it! That’s over a 7″ wide piece of very sharp metal spinning inches from the fingers… and folks on the Tech Talk board are already aware of my slight phobia [intense respect] of the router table as it is. I purchased the 3″ roundovers from an online supplier who makes them out of several layers of glued-up MDF. They come with rabbits on each side ready to accept a 3/4″ piece of material. These large roundovers give this speaker project an unusual and kind of classy look in my opinion, and they are easy to work with. Just cut pieces the same length as the sides, glue and strap clamp together, keeping the cabinet square. The Walnut veneer I used for these had no trouble whatsoever conforming to the large curve on these boxes.
I chose the dimensions of these boxes carefully… They are wide enough to look like they belong on the side of a sofa or recliner, shallow enough depth-wise to be placed near a wall and not intrude much into the living space, and tall enough to hold a table lamp or surround speaker at a good height.
The cabinet dimensions are 14″ deep, 26″ long and 21″ high including granite toppers. There is a 1/2″ thick MDF ‘spacer’ between the cabinet and the top, and between the cabinet and the base which is inset approximately 1/2″. This provides a nice ‘break’ between these elements. Also, this gap hides the slight differences in dimensions between my cabinet and the granite pieces.
The cabinet is constructed of 3/4″ material, Particle board and MDF which mates with the prefabricated roundovers as outlined above. I also elected to further line the cabinets with 1/2″ MDF for added stability. Bracing was added to further stiffen the enclosure as pressures inside the cabinet are fairly extreme at high volumes… and I wanted a ‘dead’ cabinet
Except for the base, everything not veneered was painted with a quick coat of Rustoleum ‘Painters Choice’ laytex, which can be brushed on easily, dries quickly, and best of all – adheres and seals MDF and Particle Board end grain.
The company I used to get the two granite toppers also rounded the edges with a 3″ radius, to match my cabinets, and they also created a small bevel on the top so there would not be a sharp angle on the top of the granite topper. They also did a wonderful job of polishing it, it looks like a black glass mirror — pictures don’t even do it justice. The down side is they cost $300 for both of them. I believe them to be worth it, however as this is a project we will keep for years to come.
If you don’t want to spend the money on real granite tops for these, a pretty good second choice is to glue up a 3/4″ and 1/2″ piece of MDF, and machine it similar to my granite toppers. Then apply lots of BIN Shellac base primer to the tops to get them perfectly smooth before applying the paint of your choice. If care is taken, they can be wet sanded and polished to a super-shiny surface similar to the sheen of these granite toppers. It’s a lot of work though, and they will offer almost no protection against moisture and dings.

Enclosure Assembly:
I used Gorilla Glue (polyurethane glue) for most MDF panels. I like it because of its ability to fill in tiny gaps and it’s squeeze-out means no caulking is necessary. Cabinets that fit well are air tight when glued up with Gorilla glue. Clamping the enclosure with strap clamps worked well and with either the top or bottom glued up at the same time keeping the box square during clamping was a breeze.

Crossover Design:
The crossover is taken care of in the Crown amp, and there are enough options in the menu to be able to get great bass in almost any room situation. Using the previous generation Crown amp, I needed to use an ART Cleanbox to get the subwoofer LFE output gain raised enough for the Crown to work with it; but the newer Crown 1,500 watt amp has built in swichable gain, so that is not an issue anymore.

Tips & Tricks:
The base is slightly about 1/2″ wider than the cabinet all around at the top, and it tapers to create a larger base than the main cabinet at the bottom. I sealed the base very well before painting it with Rustoleum textured paint. Lots of light coats is the key… if it is too thick it will run, and you will have to start over. I top coated with several coats of gloss black and it looks fantastic. It’s held up fine for the 2 years or so we’ve had them.
Also, the fact that these cabinets do not have corners means that you will have no natural spot where the veneer will end at. I used two main pieces on each cabinet, one for the front, another for the back. I then placed another matching piece of veneer large enough to cover the remaining 2-3″ gap, and made two cuts with a sharp utility knife cutting through both layers of veneer in one pass. Lifting up the underlying veneer on both front and back pieces yielded an raw piece of cabinet exactly the same size as the patch I just made. I applied glue to the remaining strip of veneer and ironed it right on. As the veneer shrunk from the heat, a small gap was created in a few places. Using color matching wood filler took care of the gap, and after a through sanding and several coats of wipe-on poly, you can’t even see where the filler piece of veneer is.
Overall, I can say my wife and I really like the look and sound of these cabinets, and we have received many compliments on how they look and perform. The substantial cost of the granite toppers made us think hard about spending the money, but in the end, we have created two beautiful and functional pieces of furniture that we plan to keep for many years… so in that light, the extra money was more than worth it.

About the Designer:
I was a graphic artist in the newspaper industry for over 16 years before going back to college 10 years ago to pursue a degree in teaching. I currently have a master’s degree and have taught preschool in southern NJ for 7 years. I’ve had to continue learning in life to stay viable career-wise, and I’ve enjoyed the learning process regarding designing measuring and building speakers as well. If you were to ask me ‘so, what do you do?’ I would probably answer “I’m a teacher,” but inside I know the truth… I’m a speaker builder. The first set of speakers I built all by myself were probably not the best sounding – especially since they were 3-way speakers with nothing but a single capacitor on the tweeter, but at age 14 or so, I thought they were fantastic… My father and I repur

Trójkąt

$
0
0
MAIN l33 l35 1 l37 lr_and_50uf_cap_10ohm_2_feet_2 trojkat_xo

Designer:
Chris Narkiewicz

Project Description:
Trójkąt is a very compact speaker that can be used as a computer, bookshelf, or surround speaker. It can be oriented vertically or horizontally, the shape isn’t “tippy”, making it safer for use where there are children or pets. Although a “full range” speaker, it can be paired with a subwoofer to fill in the low bass.

Design Goals:
I wanted to build a small, full range speaker using the Vifa TC9FD, and I wanted to place it in an unusual cabinet.

Driver Selection:
264-1062 Peerless by Tymphany TC9FD18-08

Enclosure Design:
The enclosure is a sealed cabinet, roughly .10ft or 3 liters internal volume. The top of the triangle is truncated. The base is 6.5″ wide, the height is 8.5″, and the long side is 9.75″. the angles are 90 degrees, 60 degrees, and 30 degrees. Cabinet depth is 8″.

Enclosure Assembly:
The enclosure is made from .75″ plywood, as that is what I had on hand. Thinner .50″ plywood or MDF would work fine for a cabinet of this size, and allow you to build the cabinet a little smaller, or build to the same external dimensions, giving a larger internal volume.

This panels for this project were a little more difficult to cut than the usual 90 degree angles, but more quick and simple to assemble. I used normal butt joints, held together with Titebond wood glue and 23 gauge pin nails. Because of the unusual angle, I did not use clamps. Instead, I carefully aligned each joint after applying glue, and carefully pin nailed them together. The front and rear baffles were cut slightly oversize, then cut with a flush trim router bit. I cut a small chamfer on the front and rear baffles. The rear panel is removable, allowing access to the crossover. The driver hole was cut with a 3″ holesaw, and the backside of that hole chamfered so the Vifa can breathe.

The finish is satin white spray paint over a rolled on primer base, and the cabinets are stuffed with poly fill.

Crossover Design:
The Vifa TC9FD is a smooth driver, and the crossover is simple and adjustable to different rooms and personal taste. An inductor and resistor are paralleled to compensate for baffle step losses. I settled on a .75mh inductor and a 10 ohm resistor, but values between 8-12 ohms should be suitable, depending on the speakers location. The series capacitor rolls off a peak in the low end, smoothing the response, and allowing them to play louder with less distortion and excursion. I chose a 50uf value, but feel free to experiment with a higher or lower value, or no cap at all.

Tips & Tricks:
Be careful when installing binding posts that they are far enough apart. In a cabinet this small, I spaced them 1″ from each other, and the solder tabs on the posts could contact if they came loose. I bent the tabs upward, eliminating the possibility of a short.

About the Designer:
I enjoy building things, taking things apart, modifying them, and designing or re-designing things. Usually mechanical or electrical items. I have been building speakers for 10-15 years.

Work in progress

$
0
0
img_3856 img_3857

Designer:
Guses

Project Category:
Home Theater

Project Level:
Beginner

Project Time:
8-20 Hours

Project Cost:
$100 – $500

Project Description:
3 x BR1 component kits with custom sealed cabinets

Design Goals:
Good sound to go with my wall to wall projector screen.

About the Designer:
First time delving into the world of speaker building, lots of fun!


Premios

$
0
0
p1040105edited p1040064 p1040062 premios_final_rta final_xo_published modeled_fr_at_22.5_degrees modeled_impedance_impedancephase modeled_phase vb_response_dayton_esoteric_es180ti8_3

Designer:
Dan Neubecker (dlneubec)

Project Category:
Freestyle Speakers

Project Level:
Intermediate

Project Time:
20+ Hours

Project Cost:
$500 – $1,000

Project Description:
Premios are a high performing, stand-mount, passive 2-way speaker utilizing top notch, yet cost effective drivers, some of the best available to DIYers on the market today.

Design Goals:
The main goal was to design a relatively compact, stand-mount speaker, with state of the art drivers that can effectively cover a frequency range of sub-30 Hz to 20 kHz. A smooth power response and wide off axis dispersion were equally important factors. Low distortion and engaging sound that would draw in the listener were also high priorities. The aesthetic was intended to be unique yet doable for the typical woodworker, though well outside the standard box shape. The shape is reflective of the functional benefits the design choices provide, i.e. form follows function.

Driver Selection:
Woofer: The new Dayton audio, ES180ti – 7″ Esoteric Series Woofer 8 Ohm, was the first choice to anchor the bottom end. This driver is both beautiful to look at and can dig to an F3 of around 29 hz with this enclosure size/box tuning configuration. Distortion is impressively low and driver breakup is very well controlled and easily addressed in the crossover, allowing for a crossover in the 2 kHz range. The bass is authoritative and midrange very engaging.

Tweeter: The Transducer Lab N26CFR-A 1” dome tweeter. There are many tweeters that could have been selected to work with this woofer at the targeted crossover point. I’m very familiar with the Transducer Lab tweeters having used them in several previous projects. They are all very robust, extremely low distortion transducers with unusually smooth on and off axis frequency response and wider dispersion than even most ¾” domes. Frequency response is only down about 6 decibels at 60º off axis at 10kHz and only around 12 dB at 18 kHz. Off axis response is extremely smooth and well controlled. Sensitivity is quite high, though this is not really critical for this design. I happened to have a pair of the N26CFR-A, carbon fiber domes sitting on the shelf and seemed the most obvious match to the carbon fiber ES180ti woofer.

Enclosure Design:
The enclosure design is a reflection of the acoustic benefits of non-parallel sides for reducing internal standing waves; slanted, tapered and chamfered baffles for reduced edge diffraction, smoother frequency response and potentially better imaging. The enclosure shape also reflects a desire to provide an aesthetic outside of the typical box look, though still not too difficult for the average woodworker to construct. The enclosure volume was optimized for optimum low frequency extension.

Tuning is 32 Hz with a slot port 9.17” long, yielding a predicted F3 of 29.17 Hz. The box sides are 3/4” mdf reinforced with additional 1/2” pieces and window-type bracing. In addition, a constrained layer damping system consisting of 3/16” rubber flooring and 1/4” hardwood plywood is glued to the center of the larger unsupported interior panels to further deaden enclosure walls. A single horizontal layer of 3.5” Ultratouch denim insulation, the width and depth of the box, is placed central to the enclosure, above the first window brace.

The slot port was designed to be incorporated in the base of the speaker and exits to the rear. A unique twist for this design was that the slot port is only 3-sided. The intent is to maximize the interior volume of the speaker, while utilizing the stand it sits on as the 4th side of the slot port.

The baffle is made from 2 pieces of 3/4” mdf, which allows for the chamfering provided. The rear of the baffle was carefully chamfered to provide plenty of room for the woofer to “breathe”. The front baffle has about a 1/8” wide x 1/4” deep” reveal cut along the box interface to hide the seam and to provide visual interest.

As primarily an aesthetic choice, I went with the large, carbon fiber binding posts for this enclosure. They are not quite deep enough to get through the 3/4”walls, plus 20mm veneer, etc. so I had to counterbore the interior side a bit at the binding post locations to reduce thickness.

Enclosure Assembly:
Construction adhesive was standard Titebond wood glue throughout. The box sides were all cut with 45º joints, so the panels could be folded together, making no butt joints visible from the sides. There panel was inset with rabbit joints and body putty (bondo) was used at the rear panel interface with the box sides to hide the seams. Bondo was also applied to the chamfers. Top and bottom roundovers on the baffle were initially started with a roundover bit and then sanded further to smooth the transitions.

Wood backed; 20mm thick maple burl veneer was adhered to the box exterior using contact cement. Because this type of veneer leaves visible seams, which I wanted to hide, I went with a guitar burst-type finish that used two types of transtint dye (black and red mahogany) to provide a lighter center panel with darker edges. A process of multiple layers of dye application and sanding more toward the center was used starting with several coats of black dye, followed by several coats of red mahogany dye, with sanding in between was used to create the burst effect. There are several YouTube videos around that illustrate this approach. The final finish was numerous coats of water based satin poly with sanding between coats and then wet sanded, polished, buffed and waxed to get the final smooth, fairly glossy finish.

The baffle was paint is several layers wood glue/water mix, followed by primer, sanding between all, followed by several coats of Krylon Rust Protector Metallic Finish, copper color, sprayed on with the typical rattle can, lightly sanded in between and then clear coated. This color was selected to pull out the copper hues in the dyed maple burl veneer. The slot port in the base of the speaker was painted with black DuraTex, using a fine foam roller.

Crossover Design:
Crossover point is around 1950 hz, with somewhat asymmetrical slopes, though fairly close to LR4, the tweeter about halfway between 3rd and 4th order and woofer between 4th and 5th order slopes. Crossover slopes are approximately 2nd order between the mid and tweeter and 4th order between the woofer and mid. All drivers are wired with standard polarity. A notch filter was utilized on the woofer to shape its response coming into the crossover as well as down into the stop band. This allowed the both the frequency response and power response to be tweaked for a smoother overall result. The in initial inductor on the woofer is an iron core, to cost effectively reduce insertion losses. Remaining inductors are all air-core and caps are all polypropylene. The total parts used in the crossover design are 10, however that includes the 3-part notch filter. Full baffle step was included in the design. Power response is quite flat, with a slight slope downward as frequency increases, as evidenced by measured RTA in room results. Impedance stays above 8 ohms throughout.

Tips & Tricks:
The 3 sided slot port that uses the stand as the fourth side is a unique design feature of the Premios I’ve not seen incorporated elsewhere.

Conclusion:
This was a fun and rewarding design and build. The build has its challenges, with the angled, slanted panels, but went fairly quickly. These small stand-mount speakers, though low sensitivity, dig extremely deep even when compared to many larger floor standers, yet have a smooth engaging midrange and some of the best sounding highs you will hear in any speaker. Though there are spl limits one will reach with a single 7” driver, modelling indicates a pair of these will be able reach around 100 dB before exceeding xmax, for anything other than sub 30hz content.

About the Designer:
Dan is a member of the Parts Express Speaker Design Team. He has been designing and building speakers for over 10 years and has designed and built and/or developed crossover designs for more than a dozen award winning speakers during that time. He brings to the hobby a love for both audio and woodworking.

Parts Used:
2 – Part # 295-397: Dayton Audio ES180Ti-8 7″ Esoteric Series Woofer 8 Ohm
http://www.parts-express.com/dayton-audio-es180ti-8-7-esoteric-series-woofer-8-ohm–295-397
2 – N26CFR-A: Transducer Lab 26MM HM Carbon Fiber Dome Tweeter
1 – Part # 091-3620: Carbon Fiber-Wrapped Gold-Plated Five-Way Binding Posts Two Pair
http://www.parts-express.com/carbon-fiber-wrapped-gold-plated-five-way-binding-posts-two-pair–091-3620
1 – Part # 260-540: Parts Express Speaker Gasketing Tape 1/8″ x 3/8″ x 50 ft. Roll
http://www.parts-express.com/parts-express-speaker-gasketing-tape-1-8-x-3-8-x-50-ft-roll–260-540
1 – Part # 260-111: Acry-Tech DuraTex Black 1 Quart Roller Grade Cabinet Texture Coating Kit
http://www.parts-express.com/acry-tech-duratex-black-1-quart-roller-grade-cabinet-texture-coating-kit-with-textured-3-r–260-111
1 – Part # 081-440: Parts Express #6 x 1” Deep Thread Pan Head Screws
http://www.parts-express.com/6-x-1-deep-thread-pan-head-screws-black-100-pcs–081-440
1 – Part # 081-425: Parts Express #8 x 1” Deep Thread Pan Head Screws
http://www.parts-express.com/parts-express-8-x-1-deep-thread-pan-head-screws-black-100-pcs–081-425
2 – Part # 266-556: ERSE 2.5mH 18 AWG I Core Inductor Crossover Coil
http://www.parts-express.com/erse-25mh-18-awg-i-core-inductor-crossover-coil–266-556
2 – Part # 255-250: Jantzen Audio 1.0mH 18 AWG Air Core Inductor Crossover Coil
http://www.parts-express.com/jantzen-audio-10mh-18-awg-air-core-inductor-crossover-coil–255-250
2 – Part # 255-042: Jantzen Audio 0.70mH 20 AWG Air Core Inductor Crossover Coil
http://www.parts-express.com/jantzen-audio-070mh-20-awg-air-core-inductor-crossover-coil–255-042
2 – Part # 255-032: Jantzen Audio 0.40mH 20 AWG Air Core Inductor Crossover Coil
http://www.parts-express.com/jantzen-audio-040mh-20-awg-air-core-inductor-crossover-coil–255-032
2 – Part # 027-135: Audyn Cap Plus 2.2uF 800V Double Layer MKP Metalized Polypropylene Foil Crossover Capacitor
http://www.parts-express.com/audyn-cap-plus-22uf-800v-double-layer-mkp-metalized-polypropylene-foil-crossover-capacitor–027-135
2 – Part # 027-117: Audyn Cap Q4 8.2uF 400V MKP Metalized Polypropylene Foil Crossover Capacitor
http://www.parts-express.com/audyn-cap-q4-82uf-400v-mkp-metalized-polypropylene-foil-crossover-capacitor–027-117
2 – Part # 027-118: Audyn Cap Q4 10uF 400V MKP Metalized Polypropylene Foil Crossover Capacitor
http://www.parts-express.com/audyn-cap-q4-10uf-400v-mkp-metalized-polypropylene-foil-crossover-capacitor–027-118
2 – Part # 027-120: Audyn Cap Q4 22uF 400V MKP Metalized Polypropylene Foil Crossover Capacitor
http://www.parts-express.com/audyn-cap-q4-22uf-400v-mkp-metalized-polypropylene-foil-crossover-capacitor–027-120
2 – Part # 004-9.1: Dayton Audio DNR-9.1 9.1 Ohm 10W Precision Audio Grade Resistor
http://www.parts-express.com/dayton-audio-dnr-91-91-ohm-10w-precision-audio-grade-resistor–004-9.1
2 – Part # 004-25: Dayton Audio DNR-25 25 Ohm 10W Precision Audio Grade Resistor
http://www.parts-express.com/dayton-audio-dnr-25-25-ohm-10w-precision-audio-grade-resistor–004-25
UltraTouch denim or other acoustic fill material as described.

300w stereo indestructible 12in pelican case speakers

$
0
0
13939935_10157932389275377_241306860_o 13918869_10157932388525377_1779788790_o 13978276_10157932388960377_624995289_o 13931639_10157932388270377_1830259765_o

Designer:
shanebou24

Project Category:
Portable Speakers

Project Level:
Intermediate

Project Time:
8-20 Hours

Project Cost:
$100 – $500

Project Description:
Boom proof 12in coaxial speakers with Bluetooth, radio, flash or SD card built in and a line in with 5v for charging phone

Design Goals:
I set out to make a robust speaker I can leave outside and throw around with all the bells and whistles. I have “mill speck connectors that you cant plug in wrong, Bluetooth, radio, flash or SD card built in and a line in with 5v for charging phone. All powereed but 600w rms amp

Driver Selection:
12in coaxial speakers wharfedale

Enclosure Design:
2x pelican 1600
1x pelican 1400

Enclosure Assembly:
simple as possible

Crossover Design:
Dayton Audio XO2W-2.5K 2-Way Speaker Crossover 2,500 Hz

The Dayton Audio line of 2-way crossovers were designed using a second order (12 dB/octave) Linkwitz-Riley alignment. Dayton Audio metallized polyester film capacitors are used in both the high and low-pass sections.

Conclusion:
These speakers are very loud and do sound quite good. I do wish I added a port to them, I think I will do this in the future.

About the Designer:
I’ve been a live sound engineer for the last ten years.

Products Used:

Sure Electronics AA-AB32191 2x300W TAS5630 Class-D Amplifier Board
Part # 320-309

Mean Well MW NES-350-48 48 VDC 7.3A 350W Regulated Switching Power Supply
Part # 320-3143

Dayton Audio XO2W-2.5K 2-Way Speaker Crossover 2,500 Hz
Part # 260-142

Bluetooth MP3 Decoding Board Module w/ SD, USB 2.0, FM – Black + White

From eBay:

1x Military Gold 5-Pin Twist Male & Female Connector,M5P

1x Military Gold 3-Pin Twist Male Female Connector,M3P

2x Military 4-Pin Male Female Cable Power Connector,C4P

Cherry π’s

$
0
0


cherry_pi_4 OLYMPUS DIGITAL CAMERA OLYMPUS DIGITAL CAMERA OLYMPUS DIGITAL CAMERA OLYMPUS DIGITAL CAMERA OLYMPUS DIGITAL CAMERA OLYMPUS DIGITAL CAMERA OLYMPUS DIGITAL CAMERA OLYMPUS DIGITAL CAMERA OLYMPUS DIGITAL CAMERA OLYMPUS DIGITAL CAMERA OLYMPUS DIGITAL CAMERA OLYMPUS DIGITAL CAMERA 14gated1mcherrypimeasurement

Designer:
Ron Erickson

Project Category:
Tower Speakers

Project Level:
Advanced

Project Time:
20+ Hours

Project Cost:
Over $1,000

Project Description:
TMWW fully active 3-way.

Design Goals:
My goal was to create a state of the art fully active speaker system using the best drivers I could afford using Ultimate Equalizer software. I took my design cues for the cabinets from the beautiful art deco radios of the past.

Driver Selection:
I attended DIY Chicago 2011 and fell in love with the Raal 10-70D tweeters I heard in a system there. While pricey I just had to have them. I’d used the BG Neo3 tweeters and heard systems with the BG Neo 8’s and liked them so I decided to use the BG Neo8-S 264-752 for the mid. I was looking for a woofer or woofers to go with them and found that the Vifa NE225W-08 264-1138 modeled well and came highly recommended by PE forum members so I bought 4 of them when they were on sale.

Enclosure Design:
The enclosure design is comprised of a 2 cu. ft. sealed woofer cabinet with a smaller cabinet mounted on stand offs to house the midrange and tweeter. The cabinets were constructed of quarter sawn cherry veneer over ½” Baltic birch plywood with the front of the woofer cabinet done in ¾” stock with all edges, stand offs and feet made of solid cherry.

Enclosure Assembly:
I assembled the fronts, tops, bottoms and backs into basic boxes using double rabbet joints with ¾” square cleats inside each corner to reinforce them before removing most of the corner joint with a 1¼” round over router bit on all corners. ¼” dados were cut into the 4 inside panels on each box and plywood strips were glued into the slots and multiple cross braces were glued in. I used the iron on glue method to glue the veneer completely around each box. I finished all four boxes with Natural Watco Danish Oil.

The plywood side panels were cut, veneered and finished with the edges taped to keep the finish off the edges. I cut a piece of 4/4 solid cherry into strips and trued up the edges on a router table using it like a jointer to get all the 1” square edge trim. I added a 45 degree cleat to the panel cutting jig I use on the table saw to cut 45 degree angles on the edge trim. I cut undersize blanks of plywood to stack under the finished sides so that the panels were just slightly recessed from the edge trim while I glued the edges around the sides. Once the edges were glued on I stood the glued up panels on edge and ran them through the router table with a top bearing bit to get the edge stock almost flush with the plywood panel and then sanded them the rest of the way flush.

The standoffs were made from solid blocks of cherry with simple 45 degree chamfers on all four edges. I made a wooden drill template for the hole layout and used it to drill the holes in the cabinets and standoffs. The holes in the standoff were done on a drill press and a pair go all the way through the block so wires could be fed to the mid/tweet box. The feet were made by putting a 1” round over on each end of a piece of 5/4 cherry and then cutting it into 1 5/8” wide strips. I put a long auxiliary fence on my router table and clamped stops to it and over several passes removed the recess on the bottom of each foot. The top edge of each foot was then chamfered with a 45 degree router bearing bit. All the holes were drilled to mount the feet to the cabinets. The spacers and feet were all finished and test bolted together with deck screws and flat washers.

The woofer holes were cut in the woofer cabinets and rebates were cut using a template clamped to the box and a router with a top bearing bit. The side panels were then glued to the boxes. The panels were made slightly oversized and were trimmed with a router and flush trim bearing bit to conform to the box and round overs. A 45 degree bearing bit was then used to put a chamfer on the edge of the each box. The mid/tweeter boxes were assembled the same way after the cut outs and rebates were cut. After the woofer cabinets were assembled cross braces were installed to brace the large side panels.

I created the rear connector panel by veneering a plastic electrical box cover and mounting 3 pairs of jacks on it. It was fastened from the inside in a cutout in the back of the woofer box.

Both cabinets were lined with 1.8″ UltraTouch denim insulation and stuffed with Acousta-Stuf polyfill.

Outside cabinet dimensions are 12″W x 21″D x 16.5″T (2 cu. ft. internal) for the woofer cabinet with outside dimensions of 10″W x 8″D x 17 1/4″T for the Mid/Tweeter cabinet on 3″ risers.

Crossover Design:
The active crossover is implemented using Bodzio’s Ultimate Equalizer software running on a PC I built using an ASUS M5A78L-M LX PLUS motherboard, AMD FX-8350 Black Edition Vishera 8-Core 4.0 GHz CPU and multi-channel M-Audio Delta 1010LT sound card. Crossovers are 48db/oct LR set at 450 and 4000Hz. At home the woofer is EQ’d down to 25Hz with an 18db/oct roll off and I can use features that compensate for the room below 200Hz and run all digital in. At the MWAF the room EQ feature was bypassed, the woofer EQ was set at 35Hz and analog inputs were used. There is a 6.8uF cap in front of the tweeter for protection.

Tips & Tricks:
When wrapping veneer around a box like I did in this project I needed to make a seam where the ends met. Using the iron on method you leave the ends unfastened and overlapped and use a straightedge and utility knife to trim both ends at once. I found that when I ironed the veneer down it would shrink and leave a gap. The solution was to cut up some coat hangers and lay several pieces of wire under one end of the veneer while I cut the joint. That left one end of the veneer a little longer so that when it shrank the ends still met and the joint was invisible.

When I glued the sides on I was worried that they would float on the glue and get misaligned when I was trying to clamp them. I dry fitted the box on the side and used a drop of hot melt glue to fasten a wooden biscuit used for biscuit joints in each corner of the side panel. That way I could apply the glue and the side would not wander when I applied the clamps.

When cutting the rebates for the mid and tweeter the radius of the router bit must match the radius of the faceplate.

Conclusion:
The system is everything I hoped it would be. In my 10 x 12 listening room I can get bass I can feel and balanced uncolored sound with a great image in the sweet spot. The system was well received at DIY Iowa 2013 and finished 2nd in the MWAF Open/Unlimited category in 2016.

About the Designer:
Ron was educated in electronics, worked as a machinist and machine repair tech in the hydraulics industry before becoming a Systems Analyst at a community college. He is now retired.

Parts Used:
Tweeter Raal 10-70D
Midrange BG Neo8-S 264-752
Woofer Vifa NE225W-08 264-1138
Bodzio Software’s Ultimate Equalizer
UltraTouch denim insulation
Acousta-Stuf polyfill 260-330
ASUS M5A78L-M LX PLUS Motherboard
AMD FX-8350 Black Edition Vishera 8-Core 4.0 GHz CPU
M-Audio Delta 1010LT sound card (NLA)
Midrange and tweeter amps – SMSL SA-36A Pro amplifiers 230-212
Woofer amp – Harmon Kardon HK3480 receiver
Midrange faceplate from Meniscus Audio

Bob Ross Bass Breaker Klone

$
0
0
881 882 883 884 885 886 887


Designer:
Chris N

Project Category:
Guitar and Bass Speakers

Project Level:
Beginner

Project Time:
1-8 Hours

Project Cost:
Under $100

Project Description:
The Bob Ross Bass Breaker Klone is an affordable, easy to build, guitar cabinet.

Design Goals:
My goals for this project were to build a guitar cabinet that was a traditional black exterior, shorter than my existing cabinets, and a sealed cabinet.

Driver Selection:
I chose the Eminence Legend GB128 based on its good reviews, smoother, more extended low end compared to my other guitar speakers. It is also American built (with a British cone).

Enclosure Design:
The enclosure is a sealed back design, a little over 1 cubic foot, with a removable rear baffle. I like the look of the Fender Bassbreaker, and the cabinet is roughly based on it.

Enclosure Assembly:
The enclosure is made from 1×10″ pine, with .75″ plywood for the front and rear baffles. I assembled it with biscuits, glue, and pocket screws. I used a router to cut the driver hole, and rounded over the cabinet edges. The rear baffle is held in with screws. The grill is made from scraps of plywood, fit to the cabinet tightly. I used plaid fabric for the grill material, and stapled it in place. I made feet for the cabinet out of 1×2″ pine, with a 45 degree miter on each end.

The finish is a base coat of Kilz primer, with Rustoleum textured flat black paint on top.

Tips & Tricks:
I used a standard 1/4″ jack, and drilled a hold and counter bored it so the jack could be threaded through. A deeper jack made for this application, or a terminal cup would work just as well. The painting on the back came about because the back of a speaker cabinet is usually boring and unattractive, and I wanted to put something on there more interesting. Being a long time fan of Bob Ross, I filled the space with happy tree’s and water falls.

Conclusion:
I really like this speaker, the sound of it, and the proportions. I much prefer the sealed back to my open back cabinets. It is solidly built, with no rattles or buzzes.

About the Designer:
Building speakers is a happy means to an enjoyable end.

Parts Used:

Eminence Legend GB128 12″ Guitar Speaker 50W 8 Ohm
Switchcraft 11 1/4″ Mono Jack with Nut & Washer

Reflexions

$
0
0
p1040110 p1040024 p1040030 p1040033 prelim_plans1 reflexions_acousticphase reflexions_crossover reflexions_v2

Designer:
Dan Neubecker (dlneubec)

Project Category:
Bookshelf Speakers

Project Level:
Beginner

Project Time:
8-20 Hours

Project Cost:
$100 – $500

Project Description:
The Reflexions are a two-way, wide dispersion speaker designed to be placed on or very close to the wall. Due to the woofer and dual tweeters orientations, expectations are for a diffuse, but enveloping soundstage. They were initially contemplated as surround speakers; however, my speculation was that they might work well as small mains for smaller rooms or as great alternatives to soundbars. Being only 7.5” deep, 8.5” tall and 11” wide, they can hang on any wall or shelf with the space above open, or on the table adjacent to a flat panel TV sitting close to the front wall.

Design Goals:
The main goal was to design a compact, wide-dispersion near or on-wall mount. They are inspired by the Allison 4 speaker introduced in the late 70’s-early 80’s. The up firing, near wall presentation of the woofer is vintage Allison 2-way and combined with the dual tweeter layout, they made the four’s one of Roy Allison’s favorite 2-ways, not to mention the favorite 2-way of many Allison aficionados.

There are potential disadvantages of using widely separated dual tweeters, most likely revolving around the possibly of cancellations as you move off center. The question is not if there will be measurable cancellations up close, but are those significant in the far field? Some of the advantages are dual tweeters work half as hard to cover the same frequencies, dual motors are better for power handling and, in this orientation, make for very wide dispersion. Due to the up-firing woofer and wide firing tweeter positions, power response at the seated position is anticipated to be quite smooth. This driver orientation should be able to avoid the typical mushroom shaped power response that you get with all direct firing drivers. The near wall and up-firing position of the woofer combine to eliminate the notch in frequency response that most traditional stand mount or bookshelf speakers have. This approach will get the most sensitivity possible out of the design because the woofer d oesn’t require baffle step compensation due to the near wall configuration. Further, the near wall orientation significantly extends and enhances the bass frequencies, while allowing for a small sealed package.

Driver Selection:
Woofer: The proposed woofer is the Tang Band W5-1685 5” midbass driver. This paper cone driver has a massive magnet for a 5” woofer. Sensitivity will hopefully wind up around 87- 88 db 2.83v/m. The driver has a flat, extended response. It has a rise in frequency response toward the lower frequencies. This may allow this speaker to work reasonably well even when placed away from the wall.
http://www.parts-express.com/tang-band-w5-1685-5-underhung-midbass-driver–264-873

Tweeter: The dual tweeters are the Tang Band 25-1719S 1” Ceramic Dome. These tweeters have the benefit of a very small footprint, with neodymium magnets and a small face plate and should support a crossover point in the 2.3-3 kHz range. They will be wired in series as they are nominally 4 ohm drivers.
http://www.parts-express.com/tang-band-25-1719s-1-ceramic-dome-tweeter–264-865

Enclosure Design:
The enclosures were created from modified Parts Express supplied Denovo Audio knock-down MDF .23c.f. cabinets. Modifications were made to increase bracing, retain a removable back/bottom panel and to add 45º panels on which the tweeters are mounted. The central cross bracing was designed to add support to the very heavy woofer and to help distribute vibrations. A strip of speaker gasket tape was applied between the back of the driver magnet and the bracing.

Attached are the plans that indicate the overall dimensions and alterations.

Enclosure Assembly:
Using these knock down cabinets allowed the project to come together quickly from a construction standpoint. Construction adhesive was standard Titebond wood glue throughout.

The 45º panels were created by gluing in corner spanning pieces and then ripping the corner off with a table saw. Then 1/4” thick plywood panel was glued to the raw cut mdf. I suggest you cut the tweeter openings in the 1/4” plywood before gluing it them to the box and then boring out the tweeter body opening with a forstner bit.

The reveal along the bottom was cut with a v-shaped bit. It was an aesthetic choice to hide the seam of the removable panel built into the one side of the Denovo cabinet.

The crossover was attached to the top of the removable bottom panel, which is held in place with cap head bolts and hurricane nuts.

A couple of layers of 3.5” Ultratouch denim insulation were added to the box. One on each side of the driver and then a layer between the cross bracing, above the crossover.

The finish was entirely painted, after applying some body fill and primer to seal the mdf and help hide the seams. The sides and bottom were spray painted with two colors of Krylon gloss paint. The top was finished with rolled on black Duratex.

Crossover Design:
Crossover point ended up at about 2200 Hz, with approximately symmetrical LR4 slopes for both the woofer and tweeter. The drivers are wired in standard polarity, with the tweeters wired in series.
A small cap is paralleled with the series resistor on the amp side of the tweeter crossover to lift the upper end of the tweeter response. Though the MLS measurements indicate a notch in the response in the upper octave, the RTA measured in room results indicate that this does not occur at the listening position. The in woofer inductor is an 18 gauge air core. The tweeter inductor is a 20 gauge air-core. All caps are polypropylene. Power response is quite flat, with a slight slope downward as frequency increases, as evidenced by measured RTA in room results. Impedance is quite flat, ranging from about 5 to 16 ohms throughout. Impedance phase stays very smooth and roughly +30º to -20º above 120 Hz.

Tips & Tricks:
Chamfer the backside of the woofer opening between screw positions to make sure the woofer has room to breathe

Conclusion:
This was a relatively easy build and the sound these little guys put out is impressive. The low end is surprisingly strong and deep, given the 5” woofer in a sealed, 6.2 liter box, solid to at least 50 Hz when placed within 1” of the front wall, as designed. The soundstage is exceptionally wide, an interestingly, the imaging is quite sharp, not diffused as I anticipated. The dual tweeters allow the 2.2 kHz crossover to work very well, with no hint of strain. These speakers will work great for not only surrounds, but as mains for a smaller room implementation.

About the Designer:
Dan is a member of the Parts Express Speaker Design Team. He has been designing and building speakers for over 10 years and has designed and built and/or developed crossover designs for more than a dozen award winning speakers during that time. He brings to the hobby a love for both audio and woodworking.

Parts Used:
2 – Part # 264-873: Tang Band W5-1685 5” midbass driver
http://www.parts-express.com/tang-band-w5-1685-5-underhung-midbass-driver–264-873
2 – 264-865: Tang Band 25-1719S 1” Ceramic Dome tweeter
http://www.parts-express.com/tang-band-25-1719s-1-ceramic-dome-tweeter–264-865
1 – Part # 260-276: Parts Express Round Speaker Wire Terminal Cup 2-15/16″ Gold Spring-Loaded
http://www.parts-express.com/parts-express-round-speaker-wire-terminal-cup-2-15-16-gold-spring-loaded–260-276
1 – Part # 260-540: Parts Express Speaker Gasketing Tape 1/8″ x 3/8″ x 50 ft. Roll
http://www.parts-express.com/parts-express-speaker-gasketing-tape-1-8-x-3-8-x-50-ft-roll–260-540
1 – Part # 260-111: Acry-Tech DuraTex Black 1 Quart Roller Grade Cabinet Texture Coating Kit
http://www.parts-express.com/acry-tech-duratex-black-1-quart-roller-grade-cabinet-texture-coating-kit-with-textured-3-r–260-111
1 – Part # 081-440: Parts Express #6 x 1” Deep Thread Pan Head Screws
http://www.parts-express.com/6-x-1-deep-thread-pan-head-screws-black-100-pcs–081-440
1 – Part # 081-425: Parts Express #8 x 1” Deep Thread Pan Head Screws
http://www.parts-express.com/parts-express-8-x-1-deep-thread-pan-head-screws-black-100-pcs–081-425
2 – Part # 266-820: ERSE 0.70mH 18 AWG Perfect Layer Inductor Crossover Coil
http://www.parts-express.com/erse-070mh-18-awg-perfect-layer-inductor-crossover-coil–266-820
2 – Part # 255-030: Jantzen Audio 0.35mH 20 AWG Air Core Inductor Crossover Coil
http://www.parts-express.com/jantzen-audio-035mh-20-awg-air-core-inductor-crossover-coil–255-030
2 – Part # 027-103: Audyn Cap Q4 0.33uF 400V MKP Metalized Polypropylene Foil Crossover Capacitor
http://www.parts-express.com/audyn-cap-q4-033uf-400v-mkp-metalized-polypropylene-foil-crossover-capacitor–027-103
4 – Part # 027-113: Audyn Cap Q4 3.9uF 400V MKP Metalized Polypropylene Foil Crossover Capacitor
http://www.parts-express.com/audyn-cap-q4-39uf-400v-mkp-metalized-polypropylene-foil-crossover-capacitor–027-113
2 – Part # 027-162: Audyn Cap Q4 12uF 400V MKP Metalized Polypropylene Foil Crossover Capacitor
http://www.parts-express.com/audyn-cap-q4-12uf-400v-mkp-metalized-polypropylene-foil-crossover-capacitor–027-162
2 – Part # 027-434: Dayton Audio DMPC-18 18uF 250V Polypropylene Capacitor
http://www.parts-express.com/dayton-audio-dmpc-18-18uf-250v-polypropylene-capacitor–027-434
2 – Part # 004-4: Dayton Audio DNR-4.0 4 Ohm 10W Precision Audio Grade Resistor
http://www.parts-express.com/dayton-audio-dnr-40-4-ohm-10w-precision-audio-grade-resistor–004-4
2 – Part # 004-5.1: Dayton Audio DNR-5.1 5.1 Ohm 10W Precision Audio Grade Resistor
http://www.parts-express.com/dayton-audio-dnr-51-51-ohm-10w-precision-audio-grade-resistor–004-5.1
UltraTouch denim or other acoustic fill material as described.

Portable Tailgate Speaker

$
0
0
img_3675 img_3676 img_3811 img_3812 img_3813 img_3814 img_3815 img_3816 img_38101

Designer:
Nick

Project Category:
Portable Speakers

Project Level:
Beginner

Project Time:
1-8 Hours

Project Cost:
$100 – $500

Project Description:
I made this speaker set up originally for tailgates and outdoor events. I would hook up the speaker to my trucks audio amplifier and crank it. It did its job very well. I then decided to create a power bank to make this portable and useable anywhere an outlet is available. The enclosure of the amp and power supply was a $10 craftsman mini plastic toolbox.

Design Goals:
I wasn’t concerned with having extremely detailed sound quality because it was primarily going to be used at tailgates where enough volume is what’s really desired.

Driver Selection:

Two 8 inch heavy duty paper cone buyout woofers #299-2174

Two Pyle super tweeters #270-125

Enclosure Design:
Made from 3/4 inch plywood with about .6 cubic foot of internal volume.
It was originally a sealed inclosure but I decided to port it around 85hz to get a little more of the low end out of it.

Crossover Design:
When it’s hooked up to my trucks amplifier I use my Kenwood headunits settings and cross the lower end off at 120hz to prevent over excursion. The Pyle tweeters came with caps already wired in. When hooked up to the portable power bank there is no crossover being used other than the pre-wired caps on the tweeters.

Tips & Tricks:
Working with the plastic toolbox made making necessary holes a breeze and look clean.

Conclusion:
Everything works the way it should and the way it was intended.

About the Designer:
I look for an excuse to make any audio project

Project Parts List:

Wondom AA-AC11162 2x50W 4 Ohm Class D Audio Amplifier Board BT4.0 with Functional Cables
DL840-4 8″ Heavy Duty Treated Paper Cone Woofer 4 Ohm
Pyramid TW44 Heavy Duty Titanium Super Tweeter
Parts Express Square Speaker Wire Spring Terminal Cup

BoomboxByJr

$
0
0
img20160630wa0012 img20160628wa0001 img20160630wa0011 img20160630wa0015 20160605_210804 20160608_191833 20160617_172141 20160617_225731

Designer:
BoomboxByJr

Project Category:
Portable Speakers

Project Level:
Intermediate

Project Time:
8-20 Hours

Project Cost:
$100 – $500

Project Description:
Portable Bluetooth ammo can boombox
4 x hivi 3.5 inch drive crossover at 130hz
2 x dayton audio tweets @ 4000hz
3.5 pearless passive radiators
Sure 25 x 2 amp (speakers)
Sure 15×2 amp (tweets)
Sure Bluetooth module
2x usb charging ports

Design Goals:
Portable and loud

Driver Selection:
HiVi B3N 3″ Part # 297-428

Dayton Audio ND16FA-6 5/8″ Soft Dome Neodymium Tweeter Part # 275-025

Peerless by Tymphany 830878 3-1/2″ Passive Radiator Part # 264-1060

Enclosure Design:
Ammo can

Crossover Design:
Dayton Audio PMPC-5.6 5.6uF 250V Precision Audio Capacitor
Part # 027-234 for tweeters

330uF 100V Electrolytic Non-Polarized Crossover Capacitor
Part # 027-374 for speakers wired in parallel

Conclusion:
Not really a hard project a couples holesaws, drill bits, soldering station and a hot glue some patience and time.

About the Designer:
Hobbyist

Project Parts List:

HiVi B3N 3″ Aluminum Driver Round Frame
Dayton Audio ND16FA-6 5/8″ Soft Dome Neodymium Tweeter
Dayton Audio PMPC-5.6 5.6uF 250V Precision Audio Capacitor
Sure Electronics AA-AB32231 2x8W at 4 Ohm TPA3110 Class-D Audio Amplifier Board
Penn-Elcom F1633 Rubber Cabinet Foot 1.125″ Dia. x 0.5″ H
Acoustic Eggcrate Foam 2 Pcs. 2-1/2″ x 12″ x 12″ for Speaker Enclosures Only — Non-UL
2.1mm Metal Panel Mount DC Jack
3.5mm Stereo Panel Mount Jack
Sure Electronics AA-AB32165 2x25W at 6 Ohm TDA7492 Class-D Audio Amplifier Board Only
Sure Electronics AA-AB41136 Bluetooth 4.0 Audio Receiver Board aptX +EDR 12 VDC
330uF 100V Electrolytic Non-Polarized Crossover Capacitor

Diamond Sparkle

$
0
0
img_2169 img_2162 img_2209 img_2165 img_2164 img_2157 img_2158 img_2160

Designer:
Tiziano Diamanti

Project Category:
Bookshelf Speakers

Project Level:
Beginner

Project Time:
8-20 Hours

Project Cost:
$500 – $1,000

Project Description:
The Diamond Sparkle is a full band 2-way stand mount speaker, designed to avoid using a sub woofer, particularly tuned for music but great for movies as well.

Design Goals:
Design and build a 2 way speaker using a 8″ woofer. I wanted to experiment with an old school setup with one big woofer instead of multiple smaller ones. The inspiration also came from several studio monitors using an 8″ woofer from brands like Dynaudio, Emotiva and so on.

Driver Selection:
For the woofer I settled on the Dayton Audio DS215-8 because it has a flat response up to 2000Hz and it works well in a .78 cube feet enclosure.
For the tweeter, after much thinking I chose the Tang Band 25-1983, because some years ago I had a Focal car audio 2 way kit for my car and loved the reverse dome tweeter, and because with such a low FS I could afford to has a low cross frequency with the big woofer.

Enclosure Design:
I don’t have tools for working wood, so I bought the Dayton Audio TW-0.75MA. They are very well made. I used a company that has a CNC cutting machine to cut the holes and recesses for the drivers and to cut the hole in the back for the port tube. The bass reflex is tuned for 40 Hz. I had to modify the grills, adding an offset to the magnets, because the position of the screws for the woofers would interfere with them.

Crossover Design:
I chose the drivers to have a flat response at 90 db so that I wouldn’t have to worry about LPad circuits. The cross over is Audio Pipe 2000Hz (actual frequency seems to be 2100 Hz according to capacitors’ value).

Conclusion:
This was my first complete project of DIY speakers, I really had fun and I am having a lot of fun listening to the speakers. The bass and base are outstanding. The amount of details is incredible, for some songs was like rediscovering the record altogether. Both drivers need a good 20 hours of break-in.

About the Designer:
Tiziano is a software engineer, with a long standing passion for music reproduction, both home and car. Recently interested in DIY speakers. Tiziano thanks Parts Express for making this possible and all the people on the forum for the useful information.

Products Used:
Cabinets Dayton Audio TW-0.75MA 0.75 cu. ft. 2-Way Speaker Cabinet Maple
https://www.parts-express.com/dayton-audio-tw-075ma-075-cu-ft-2-way-speaker-cabinet-maple–302-736
Woofers Dayton Audio DS215-8 8″
https://www.parts-express.com/dayton-audio-ds215-8-8-designer-series-woofer-speaker–295-430
Tweeter Tang Band 25-1983 1″ Titanium Dome
https://www.parts-express.com/tang-band-25-1983-1-titanium-dome-tweeter–264-908
Speaker Cabinet Port Tube 1-3/4″ ID x 4″ L
https://www.parts-express.com/speaker-cabinet-port-tube-1-3-4-id-x-4-l–260-407
Dayton Audio BPA-38NI HD Binding Post Pair Nickel
https://www.parts-express.com/dayton-audio-bpa-38ni-hd-binding-post-pair-nickel–091-1246
JSC Wire 18 AWG Red/Black Zip Power Speaker Wire
https://www.parts-express.com/jsc-wire-18-awg-red-black-zip-power-speaker-wire-1-ft-usa–100-050
Audio Pipe Crossovers CRX-22K
1-1/2 acoustic insulating foam

A 25W Stereo Williamson Amplifier

$
0
0
img_0379 img_0387 img_0389 img_0403 img_0406 internalfinal.jpeg

Designer:
Craig J. Coley

Project Category:
Amplifiers

Project Level:
Advanced

Project Time:
20+ Hours

Project Cost:
$500 – $1,000

Project Description:
This project is called the Coley W225. It is a two-channel, 25W Williamson amplifier using ultra-linear output transformers. Each channel uses a pair of 6SN7 dual triodes driving a pair of fixed bias 6L6GC output tubes. The THD of the amplifier has been measure at 0.75% THD at full power and less than 0.25% at 1W. Frequency response at 1W has been measured to be 20Hz to 28KHz ±1.0dB at 1W. The design includes internal Bluetooth 4.0 and RF remote control. A small key fob remote control operates a motorized Alps volume control and the power relay. Front panel metering is incandescent backlit and shows the 6L6GC cathode current of each channel.

Design Goals:
This project began purely as a hobby amplifier based upon the 1949 publications by Williamson and the 1950s publications by David Hafler. The ultimate design is my own, based upon currently available components. The development work ended up proving the timelessness and quality of the products produced more than a half-century ago by companies like Dynaco.

Tips & Tricks:
The design was developed and proven with a rough prototype constructed on a wooden panel. The power for the prototype was provided by an older Heathkit variable supply that was a great help in determining design margin, THD and bias levels. A General Radio load and power meter was used for all testing.

Once the design was tested and found to be robust, a new schematic was created for the stereo version. The final design included a 5U4 tube rectifier to provide a soft startup, preventing cathode stripping of the tubes when HV is applied before the tubes are warm. The somewhat unusual decision was also made to include Bluetooth in the final design; finding a high quality receiver board was difficult but the results were surprisingly good and it allowed for convenient play from a variety of streaming services like Spotify.

For the mechanical work, a 2D CAD drawing was created for the chassis which aided tremendously in producing a symmetrical and pleasing finish. Prior to drilling, the chassis was covered with vinyl tape to prevent scratches while performing the required mechanical work.

Conclusion:
The final version of the amplifier was beyond any initial expectations and has become the only amplifier I use. The remote control and Bluetooth make the amplifier both easy to operate and useful with a wide variety of playback devices.

The DIY approach was not cheap however, especially when the development costs of a new design are taken into consideration. Direct material cost was $850.00 and construction time was 40 hours. The actual development cost, however, was well over $2000.00 due to the cost of test equipment, tooling, extra tube sets and various Bluetooth and remote modules evaluated.

About the Designer:
This project was designed and constructed by Craig J. Coley of Burleson, TX. I work as an electrical designer and am listed as inventor on 8 US patents in the field of electro-optics. I have been an electronics hobbyist since I built a Heathkit radio at age 7 and a ham radio operator since age 11.

Parts used:
All transformers and inductors were ordered directly from Edcor. Resistors under 5W are carbon film, resistors 5W and above are ceramic wire wound. The design was tested with NOS American 5U4G, 6SN7 and 6L6GC tubes, NOS Soviet 5C3S, 6N8S and 6P3S tubes, as well as new Electro-Harmonix; all types performed well. Soviet tubes are installed in the final version and were used for all testing. The chassis is a stock Hammond steel model with walnut sides. 600V poly capacitors were used for coupling and Nichicon aluminum electrolytics were used for the power supply.

10W Executive Tube Amplifier

$
0
0
tiny582016 img_0436 img_0417 img_0424 img_0425

Designer:
Craig J. Coley

Project Category:
Amplifiers

Project Level:
Advanced

Project Time:
20+ Hours

Project Cost:
$500 – $1,000

Project Description:
This project is called the Coley W210 and is a very small “executive” tube amplifier. It is a two-channel, 10W Williamson circuit with ultra-linear output transformers. Each channel uses one 6SL7 dual triode driving a pair of self biased 6V6 output tubes. The THD of the amplifier has been measure at less than 0.25% at 1W. Frequency response at 1W has been measured to be 20Hz to 28KHz ±1.0dB at 1W. The design includes internal Bluetooth 4.0 and RF remote control. A small key fob remote control operates a motorized Alps volume control and the power relay. The miniature front panel meters are incandescent backlit and indicate audio level with 10W at 0dB.

Design Goals:
The project was an extension of my W225 amplifier and was intended to be a small amplifier for my desk at the office. To reduce the component count, the dual 6SN7 preamplifier and driver tubes of the W225 were replaced with a single high gain 6SL7. While the design is my own, it is certainly inspired by the pioneering work of David Hafler at Dynaco in the 1950s.

Tips & Tricks:
Since the design was so similar to my earlier W225, the same wooden panel prototype was modified and used to prove out the W210. It was also tested with the same Heathkit variable supply and General Radio power meter.
Once the design had been proven robust, a new schematic was created for the stereo version. Even though there is a small risk of cathode stripping, limited size dictated the use of solid state rectifiers. The small chassis also includes the same excellent Bluetooth 4.0 module and power relay board used on the W225. Due to limited space, however, a custom remote volume control board had to be designed and is based on a miniature Adafruit RF receiver and key fob transmitter. A Bluetooth receiver in a tube amplifier is unusual but the board used in the W210 is surprisingly good and it allowed for convenient play from a variety of streaming services like Spotify.
For the mechanical work, a 2D CAD drawing was created for the chassis which aided tremendously in producing a symmetrical and pleasing finish. Prior to drilling, the chassis was covered with vinyl tape to prevent scratches while performing the required mechanical work.

Conclusion:
The amplifier performs very well and is my daily amplifier on my desk at the office. The direct cost of materials is around $450.00 and direct labor for construction was 40 hours. The most difficult aspect of this design is its size; it is very difficult to hand wire and I would highly recommend a larger case.

About the Designer:
This project was designed and constructed by Craig J. Coley of Burleson, TX. I work as an electrical designer and am listed as inventor on 8 US patents in the field of electro-optics. I have been an electronics hobbyist since I built my first Heath radio at age 7 and a ham radio operator since age 11.

Parts Used:
All transformers were ordered directly from Edcor. Resistors under 5W are carbon film, resistors 5W and above are ceramic wire wound. The design was tested with NOS American 6SL7 and 6V6 tubes as well as Soviet 6N9S and 6P6S tubes; all types performed well. Soviet tubes are installed in the final version and were used for all testing. The chassis is a stock Hammond steel model with walnut sides. 400V poly capacitors were used for coupling and Nichicon aluminum electrolytics were used for the power supply.

Very Small Executive Speakers

$
0
0
img_0377 pinknoiseresponse crossoverplot crossoverdesign

Designer:
Craig J. Coley

Project Category:
Bookshelf Speakers

Project Level:
Intermediate

Project Time:
1-8 Hours

Project Cost:
$100 – $500

Project Description:
This project is called the Coley P4 and is a very small “executive” speaker system designed for use with the Coley W210 stereo 10W amplifier. It uses a 4” Dayton woofer, HiVi planar isodynamic tweeter, first order series crossover and a somewhat unusual passive bass boosting circuit. Every effort was made to make these speakers as unobtrusive as possible, consistent with the intended purpose as a desktop system. Extensive use of SPICE modeling was performed to optimize the crossover design using commercially available components. Some driver efficiency was sacrificed in the design to gain extended low frequency performance.

Design Goals:
The objective of this project was to produce an excellent sounding speaker in a very small package for use as desktop speaker in the workplace.

Driver Selection:
The drivers were selected to be consistent with the requirements of jazz music, my primary listening genre. The bass had to be low enough to clearly reproduce an upright bass while the tweeter had to be delicate and transparent for cymbals and female vocals. For these reasons, the Dayton DS115-8 and HiVi RT1C-A were the selected drivers.

Enclosure Design:
Since several people in my home and office have asthma, I chose not to use MDF due to the possibility of formaldehyde emission. Solid 1”x6” cedar planks were used in a 12”x6”x6” enclosure. The cut boards were then butt mounted, trim nailed and sealed with natural wood glue. Once dried, an orbital sander was used to sand the entire box flat and the cabinet finished with only natural tung oil. Great care should be taken during assembly to not accidentally split the lumber. A more skilled carpenter could easily dovetail the box joints for a much more finished result.

Enclosure Assembly:
Wood hole saws were used for the woofer, port and terminal block mounting while a jig saw was used to cut the rectangular hole for the HiVi tweeter. The port is located on the rear of the enclosure behind the HiVi tweeter, extending almost the full depth of the enclosure.

Since the box was made without a removable baffle, the crossover components are next mounted and wired through the driver openings. Once the wiring is complete, the enclosure is completely filled with Polyfill which serves to both dampen the natural resonance of the cabinet as well as reduce the internal velocity of sound by about 20%.

Crossover Design:
Since I personally like the sound of first order series crossovers, this topology was chosen. The normal difficulty in designing series crossovers is greatly simplified by using SPICE to simulate the crossover performance in conjunction with the lumped inductance and resistive loading of the speaker. Final tweaking is still by ear but the SPICE model can zero-in on a workable design much sooner than simply trial and error. The unusual addition of an RL network in series with the speaker produces a 6dB/octave rolloff, effectively boosting the bass of the little woofer. In designing this, the L value largely determines where in frequency this occurs and the R limits the depth. The sweep curve shown in photos definitely shows a rolloff below 100Hz but this would be far worse without the bass boosting circuitry.

Tips & Tricks:
It is definitely not necessary to use natural wood; MDF would work equally well or better if allergies were a non-issue in your home. A slightly larger enclosure would extend the low frequency response but a substantial increase in enclosure volume will require tweaking the bass boost circuit.

Conclusion:
The speakers perform very well and are on my desk at work paired with my W210 tube amplifier. I almost exclusively listen to jazz music and the bass is more than adequate without the booming that would be common if I let the enclosure Q run too high. The HiVi planar isodynamic tweeters provide realism and crisp highs to cymbals and female vocals.

About the Designer:
This project was designed and constructed by Craig J. Coley of Burleson, TX. I work as an electrical designer and am listed as inventor on 8 US patents in the field of electro-optics. I have been an electronics hobbyist since I built my first Heath radio at age 7 and a ham radio operator since age 11.

Parts Used:

Dayton Audio DS115-8 4″ Designer Series Woofer Speaker
HiVi RT1C-A Planar Isodynamic Tweeter
Jantzen Audio 0.60mH 20 AWG Air Core Inductor Crossover Coil
ERSE Super Q 15mH 16 AWG 500W Inductor Crossover Coil
Dayton Audio DMPC-4.7 4.7uF 250V Polypropylene Capacitor
Mills 15 Ohm 12W Non-Inductive Resistor
Round Speaker Terminal Cup 2-15/16″ Gold Banana Binding Post
Speaker Cabinet Port Tube 1″ ID x 4″ L Flared
Acousta-Stuf Polyfill Speaker Cabinet Damping Material 5 lb. Bag

3-Way Classic

$
0
0
????????????? ????????????? 20160827_112432l ????????????? ????????????? ????????????? 20160819_083914l 20160819_083932l 20160820_103023l 20160820_103043l 20160823_124522l seas_3wc_classic_xover1 seas_3wc_ported_freqresponse seas_3wc_sealed_freqresponse

Designer:
Rick Helman

Project Category:
Bookshelf Speakers

Project Level:
Intermediate

Project Time:
20+ Hours

Project Cost:
$500 – $1,000

Project Description:
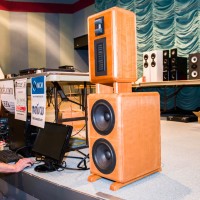
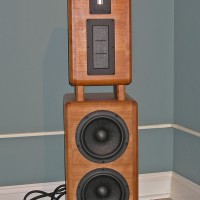
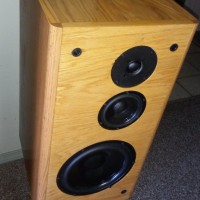
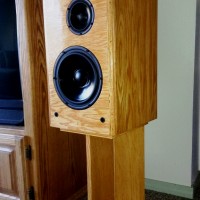
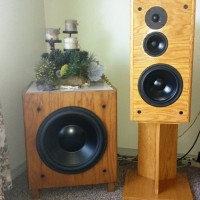
The speaker is a three-way ported classic 1970s to 1980s bookshelf design containing an 8” woofer, 4” midrange, and 1” fabric dome tweeter in a 1.31 cubic foot enclosure with crossover points at about 550 and 3600 hertz. The speaker was designed by Troels Gravensen from Denmark. Design details of the 3WC can be found at www.troelsgravesen.dk/3WClassic.htm.

Design Goals:
Transparent smooth sound with a wide and deep sound stage, fast midrange transient attack, 6 to 8 ohm system for compatibility with my Pioneer Elite SC-5 140 watt per channel 7.1 receiver, a maximum sound output level of at least 105 decibels (db) before exceeding xmax, an F3 less than the 50 to 80 hertz range for compatibility with my sealed Dayton RSS390HF-4 subwoofer and SPA1000 plate amp, efficiency of at least 90 db @2.83V/1 meter, and gentle crossover slopes of 12 db/octave for smoothness where possible.

Driver Selection:
Seas CA22RNX 8” woofer, Seas MCA12RC 4” midrange, and Seas 27TFFC 1” tweeter. Both the woofer and midrange have cast frames, treated paper cones, and rubber surrounds. The woofer is rated at 80 watts continuous power handling with an xmax of 6mm. Other speakers were considered such as the Dayton RS225-8 8” woofer, RS-125P-8 4” paper mid woofer, and RS28F-4 1-1/8” dome tweeter, which would have cost less than my driver selection, but I did not have access to a tested crossover design and am just starting to learn Passive Crossover Design software.

Enclosure Design:
The speaker is a three-way ported design with a net volume of 37 liters (1.31 cu. ft.) in size and external dimensions of 23-3/4 x12x13 inches. The midrange is housed in a separate sealed ½” MDF 1.5 liter sub-enclosure. A 2-1/2” ID port cut to about 6-3/4” long with an outside flair was installed on the rear baffle, which should yield a FB of 35 hertz and F3 of about 44 hertz with a slight 1-1/2 db rise. If one wishes, the port can be plugged with foam or old socks for an acoustic suspension enclosure variation, which will have a QTC of .74 and an F3 of about 52 hertz. The acoustic suspension version will have a slightly smoother response but with reduced power handling capacity below 80 hertz.

Speaker stands were also constructed and placed under each speaker enclosure to avoid the need for crossover baffle step compensation circuitry and allow the tweeter height to be at ear level about 38”. The stand is 15” wide by 13-7/16” deep by 18” high.

Enclosure Assembly:
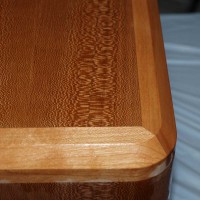
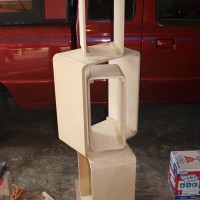
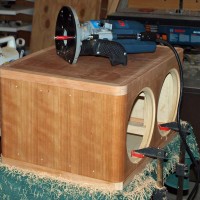
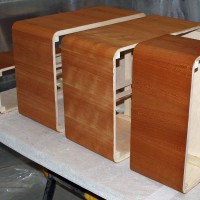
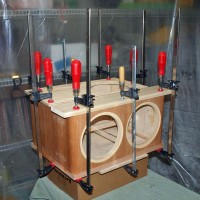
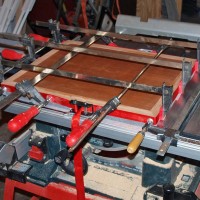
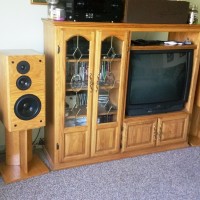
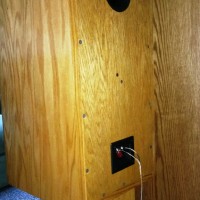
The enclosure is constructed of ¾”oak plywood that was stored from a La Scala and Tapped Horn project that I did not build (don’t have space) and ¾” oak ply battens for support of the butt-jointed assembly. The enclosure pieces take less than one 4’ X 8’ sheet of oak plywood for the pair. The front edges contain ¼ round ¾” thick oak corners to help smooth out dispersion. Oak edge banding was ironed on to all exposed corners. Front-to-rear and side-to-side bracing was utilized using scrap wood to minimize undesired enclosure side wall and baffle movement. The enclosure pieces were glued with Elmers wood glue, clamped, screwed with 1-1/4” dry wall screws and later internally sealed as needed with painters acrylic caulk. All speaker holes were cut and recessed with a router and Jasper jig, all screw holes were pre-drilled, and T-Nuts were installed for woofer mounting. The back of eac h midrange hole was chamfered using a belt sander to allow free air flow and reduced compression of the midrange before the sub-enclosure was glued and clamped to the front baffle. The front speaker baffle is permanently affixed to the enclosure, while the rear baffle is removable via dry wall screws.

A roll of 3-1/2” thick fiberglass wall insulation was purchased. A portion of the insulation was cut to size and pulled apart into two pieces 1-3/4” thick for the top, back, and one side of each enclosure, as well as for the back of each midrange sub-enclosure. The left-over insulation will be used in another future speaker project. The cut insulation was stapled through small cardboard squares onto the walls of each enclosure. A wad of polyester fill was added behind each woofer and midrange hole.

Wood filler was used on the enclosure and stands to seal any holes and flaws in the wood. Thereafter, the assemblies were sanded with 220 grit paper. Then Watco Golden Oak oil was applied with a foam brush, sanded with 330 grit paper, and wiped off. After waiting several days for the oil to completely dry, two thin coats of satin finish Polyurethane was brushed on to complete the finish.

The speaker grilles were cut to size from ½” MDF. A 9”+ hole was cut out with a router around each woofer area and additional cutting around the midrange and tweeter area was done with a jig saw. The MDF was then spray painted with cheap brown paint and the grille male fasteners pounded into the holes with a socket and hammer. Brown grille cloth was cut to size and was glued to the grille frame with spray contact cement and reinforced with a staple gun. Excess grill cloth was trimmed off with an X-Acto knife.

Crossover Design:
Although the crossover is Troel’s design, I had to make some minor modifications due to parts obtainability and cost considerations. I could not locate the 3.9 ohm resistors used in tweeter circuit and, therefore, replaced them with Dayton Precision Audio Grade 10 watt, 2 percent resistors that included 2-8 ohm resistors connected in parallel on the series connection for increased power handling and a 4 ohm connected on the parallel connection. Additionally, instead of the 1.8 ohm resistor called for in the midrange circuit, a 10 watt, 2 percent 1.0 ohm and 0.82 ohm resistors connected in series were used for increased power handling. Finally, instead of the almost $22, 56 mfd polypropylene capacitors used in the parallel connection with woofer circuits, 33 mfd and 22 mfd non-polarized capacitors ($1.84) connected in parallel were used. All other capacitors used were Audyn 400 volt as available and Dayton 250 volt polypropylene.

Crossover coils had similar gauge size and resistance as in Troel’s design, but due to the unique mH rating, they were specially wound to size and special ordered.

All parts were placed on a ¼ “ thick oak ply board cut to fit on the bottom inside of the enclosure using hot melt glue after all soldering occurred. Larger coils were also bolted, or strapped and screwed to the board. Input, woofer, midrange, and tweeter wires were cut to length and soldered directly to the crossover with the designated “+” and ” –“ clearly marked. Holes were pre-drilled on each corner and in the middle of each board and into the enclosure inside bottom. Once the crossovers were assembled, they were screwed into the bottom with 1” screws through the ¼” finished boards and ¼” thick rubber washers (from plumbing section of hardware store).

Tips & Tricks:
This may be my last enclosure building project as it is extremely difficult to achieve precision to 1/16” using an old table saw, and electric hand jig saw, circular saw, drill, router, belt sander, and orbital sander.

¼ round ¾” thick oak round was less than ¾” thick, which required me to glue popsicle sticks and add wood filler in the gap between the front baffle and ¼ round corner. The oil staining left the sticks a light color and the filler a dark color, neither was golden oak. It would be wise to widen the baffle to eliminate the gap.

Do not use a belt sander on the oak veneer surface of the plywood, especially near corners as it easily sands off.

When constructing speaker grille assemblies, drill holes for the male and female fasteners through both the assembly and front speaker baffle at the same time with both temporarily clamped together to insure proper alignment of the grille fasteners when later attached.

When constructing the crossovers, use terminal or barrier strips to avoid having to splice and solder together up to 7 connections. I did not do this and some of my solder joints look like welds, which add new meaning to the phrase, “heavy metal”.

Conclusion:
The speakers were placed on the stands, connected to the Pioneer receiver, and tested for low frequency response using a Test CD without the subwoofer connected. Low frequency began to roll off below about 45 hertz as predicted by the Woofer Box and WIN ISD modeling programs. The subwoofer was then connected and all speakers were ran through the Pioneer automatic MCACC program with a setup microphone to measure the acoustic characteristics of the listening area, taking into account ambient noise, speaker size, distance, delay and channel level. The program then optimized the speaker settings and equalization for the room. Evidently, the Seas 3WC speakers had minor 500 and 1,000 hertz spike issues in my 13’ X 15’ X 8’ living room that were reduced through the program. The subwoofer output level had to remain at about ¼ volume to match the 3WCs. A variety of music was then played through the system only running on stereo with s ubwoofer crossed over at 50 hertz.
These speakers are not perfect, but are by far the best sounding speaker system I have built. A Telarc Michael Murray recording of Saint-Saens and Loius Couperin pipe organ music was exceptional where one could feel the bass and perception of cathedral ambience down to what appeared to be in the mid to high 20 hertz range. Other Telarc classical music recordings from the Signature Monster Music CD that included voice, strings, and brass renderings also sounded extremely smooth, yet dynamic with outstanding soundstage and 3-D depth. More conventional highly mixed, closed mic’ed Fleetwood Mac, Alan Parsons, Steely Dan and Eric Clapton Blues music recordings sounded clear with lightning fast midrange transients, depth and resolve that was not realized on my previous 6-1/2” MTM speaker. George Winston’s piano music was extremely well-balanced as one could hear and feel the bite of the hammers strike. Overall, I am quite pleased and will probably keep these speakers a long time.

About the Designer:
Rick Helman has been a DIY speaker builder for over 42 years. He grew up with and later inherited his father’s Electrovoice Georgian corner horn speakers. Over the years, he has built JBL style rear loaded horn speakers, Kef B-139 transmission line systems, Bose 901 clones with factory equalizer and Pioneer 4-1/2” inch drivers, Seas 13 inch 3-way with Peerless K040MRF midrange and K010DT tweeter, mass loaded 42 hertz F3 Audax 5-1/4” mini speaker, 4-1/2” Pioneer MTM speakers (from Bose clone) in a push-pull isobaric configuration with a 1” Titanium dome tweeters, Eclipse 12” downward firing ported subwoofers with Dayton 250 watt plate amplifiers, Dayton III 6-1/2” with 1-1/8” “Silkie” MTM speakers, Cornscalas (Cornwall and LaScala mix) with 15” woofers and Selenium horn midranges and tweeters in a 6.79 cu.ft. cabinet, a sealed subwoofer with a Dayton RSS390HF-4 woofer and SPA-1000 plate amplifier, and Dayton Classic 2-way speakers using the woofers from the Dayton III.

Parts Used:

Part #      Qty.      Description

027-121    2    Audyn Cap 33 uF 400V Met. Poly
027-118    4    Audyn Cap 10 uF 400V Met. Poly
027-115    2   Audyn Cap 5.6 uF 400V Met. Poly
027-113    2    Audyn Cap 3.9 uF 400V Met. Poly
027-415    4    Dayton Audio Cap 2.2 uF 250V Poly
027-412    2    Dayton Audio Cap 1.5 uF 250V Poly
027-350    2    33uF 100V Electrolytic Non-Pol. Cap
027-348    2    22uF 100V Electrolytic Non-Pol. Cap
004-8    4    Dayton Audio 10W 2% AG Res. 8.0 Ohm
004-4    2    Dayton Audio 10W 2% AG Res. 4.0 Ohm
004-1.2    2    Dayton Audio 10W 2% AG Res. 1.2 Ohm
004-1.0    6    Dayton Audio 10W 2% AG Res. 1.0 Ohm
004-.82    2    Dayton Audio 10W 2% AG Res. 0.82 Ohm
260-478    2    Port Tube 2-1/2” ID X 8-1/2”L Flared
095-272    1    ¼”(22-18) Fml. Discon. Crimp Term., 50
095-280    1    ¼”(16-14) Fml. Discon. Crimp Term., 50
269-2114  2    3-5/8” X 3-1/8” Banana Jack Term. Cup
260-779   2    PE Cast Frame #8-32 Speaker Mount. Kit
081-435    1    PE #6 X ¾” Deep Thread Pan Screws, 100
260-367    1    Speaker Grill Guides, Heavy Duty, 12 Pair
260-339    1    Brown Grille Cloth, 1 Yard 70” wide

Viewing all 739 articles
Browse latest View live


<script src="https://jsc.adskeeper.com/r/s/rssing.com.1596347.js" async> </script>